")
Sky Satellite Dish Alignment App: Best DIY Tools (2026)
John the smoothie monster
John lives for smoothie bowls and cold-pressed juices. He uses Savor to remember his best blends.
Sky Satellite Dish Alignment App: The DIY Guide to Perfect Signal Without the £200 Call-Out Fee Picture this: you're settling in for the weekend, ready to...
Sky Satellite Dish Alignment App: The DIY Guide to Perfect Signal Without the £200 Call-Out Fee
Picture this: you're settling in for the weekend, ready to catch the match on Sky Q, and instead of kickoff, you're staring at the dreaded "No Satellite Signal" message. You know exactly what's coming next - a £150-£300 call-out fee just to have someone twist your dish a few degrees. Meanwhile, the same smartphone in your pocket that books your dinner reservations has sensors precise enough to guide a drone. Why are you still calling an installer?
That gap compounds. Most people spend 2-3 hours waiting on hold with Sky, another day waiting for the technician's arrival window, and then pay premium rates for what is, at its core, a geometry problem. By the time you've scheduled the visit, you've missed three days of programming and spent enough to buy six months of your subscription. The real issue isn't that alignment is difficult - it's that most people don't know the pro-level tools are already in their pocket.
What follows is the complete technical picture: which sky satellite dish alignment apps actually work for the UK's Astra 28.2°E satellite, how AR-based smartphone tools replaced £99 hardware meters, and what professional installers know about the three alignment parameters (Azimuth, Elevation, LNB Skew) that generic "point south" advice completely ignores.
Key Takeaways
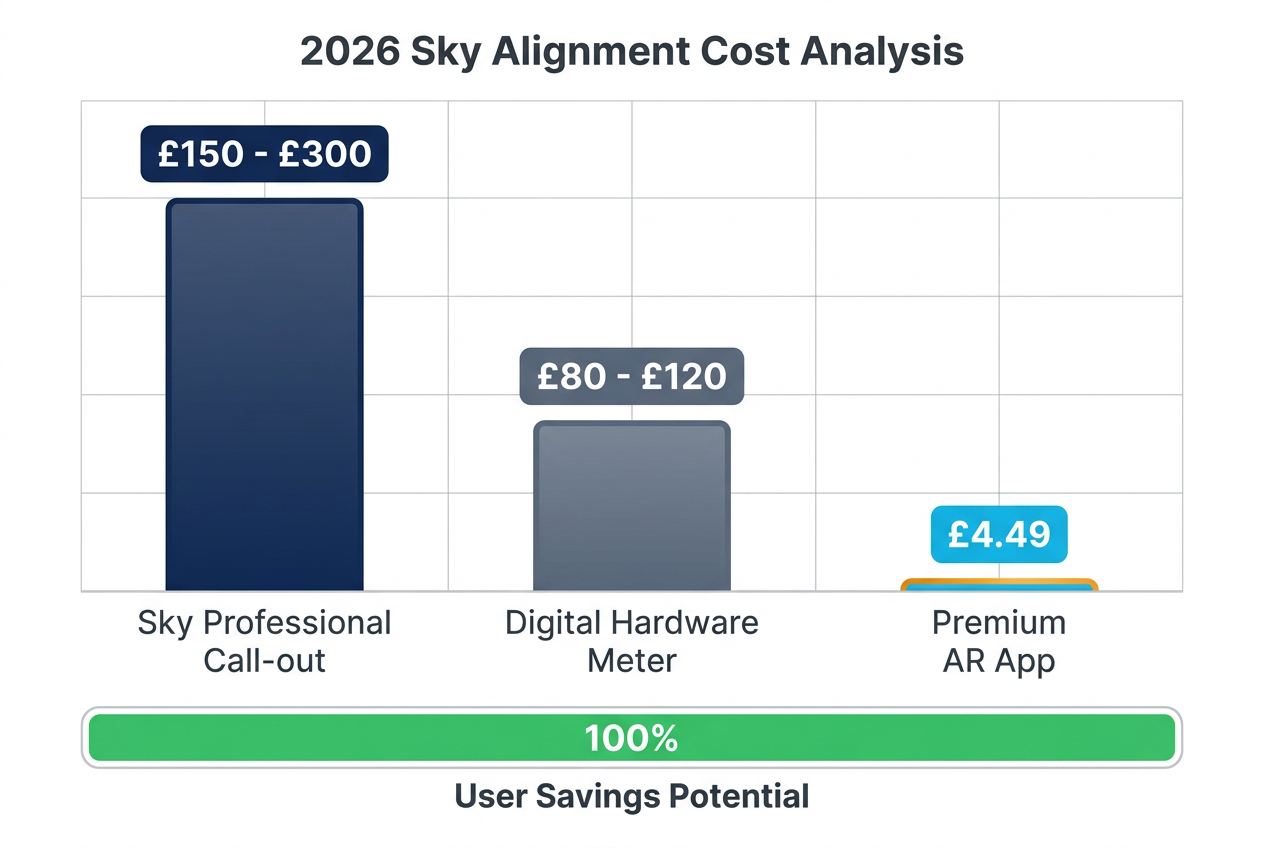
- Professional-grade satellite alignment apps like DishPointer Pro (£4.49 one-time) can save homeowners £150-£300 compared to Sky's standard realignment call-out fees.
- AR-based smartphone apps use your phone's magnetometer and gyroscope to provide real-time visual overlays showing the exact position of the Astra 28.2°E satellite used by Sky UK.
- Proper alignment requires three specific parameters: Azimuth (compass direction), Elevation (vertical angle), and LNB Skew (dish rotation), not just "pointing south."
- Magnetic interference from metal structures like gutters or HVAC units can cause 10-15° compass errors, requiring users to calibrate apps at least 20 feet away from these obstacles.
- 15% of UK households still rely solely on satellite for television services, creating sustained demand for DIY alignment solutions as professional installation costs continue to rise.
Table of Contents
- The "No Signal" Emergency: Why DIY Alignment is the New Insider Skill
- The AR Revolution: How 2026 Smartphone Sensors Made Hardware Meters Obsolete
- Is There an App to Align Satellite Dishes?
- The Big Three: Which Apps Actually Work for Sky's Astra 28.2°E Satellite
- How to Align a Satellite Dish With a Phone: The Complete Process
- The "Sky" Secret: Why 28.2°E Astra Matters and What LNB Skew Really Means
- How Much Does Sky Charge to Realign a Dish?
- The Troubleshooting Protocol: When the App Says "Clear" But the TV Says "Missing"
- Frequently Asked Questions
The "No Signal" Emergency: Why DIY Alignment is the New Insider Skill
The average UK homeowner facing a satellite signal loss pays between £150 and £300 for professional realignment according to 2026 cost data from HowMuchShouldItCost, and that's assuming you can get a technician within 48 hours. For context, that's roughly equivalent to six months of a basic Sky subscription - just to restore service you're already paying for. The core frustration isn't the complexity of the repair; it's the knowledge gap. What installers do in 15 minutes with a £4.49 smartphone app gets billed as specialized technical work.
Here's the shift that changed everything: between 2020 and 2026, smartphone sensors reached professional-grade precision. The magnetometer (digital compass) in a modern iPhone 15 or Samsung Galaxy S24 achieves ±2° accuracy under ideal conditions, which matches the tolerance of mid-tier hardware satellite meters that cost £99. When augmented reality overlays entered mainstream apps, the technical barrier collapsed. You no longer needed to interpret abstract azimuth numbers - you could literally see a floating target on your screen showing exactly where the satellite sits in the sky.
This isn't about saving money for its own sake. It's about control. The same audience that researches restaurant reviews before choosing where to eat doesn't want to wait three days for a technician to fix something they could handle themselves in 20 minutes. DIY satellite alignment has become the "insider" skill - the flex that separates people who understand their home technology from people who are dependent on service contracts.
 Realizing significant savings is a primary motivator for DIY alignment. Using a premium app can save homeowners up to £295 compared to professional call-out fees.
The financial math is straightforward, but the real value is in the skill transfer. Once you've successfully aligned your dish using an AR app, you've learned a process that professionals charge premium rates to perform. That knowledge doesn't depreciate. Whether you're moving house, upgrading to a larger dish, or troubleshooting after a storm, the capability stays with you.
The AR Revolution: How 2026 Smartphone Sensors Made Hardware Meters Obsolete
For decades, professional satellite installers relied on dedicated hardware - physical meters with LCDs displaying signal strength, azimuth, and elevation. Tools like the CENPEK V8 Finder2 still retail for approximately £99 and offer 12+ hours of battery life, but they solve a problem that no longer exists for residential use. The turning point came when smartphone manufacturers started integrating high-precision inertial measurement units (IMUs) and multi-axis magnetometers as standard components, not just for navigation, but for AR applications.
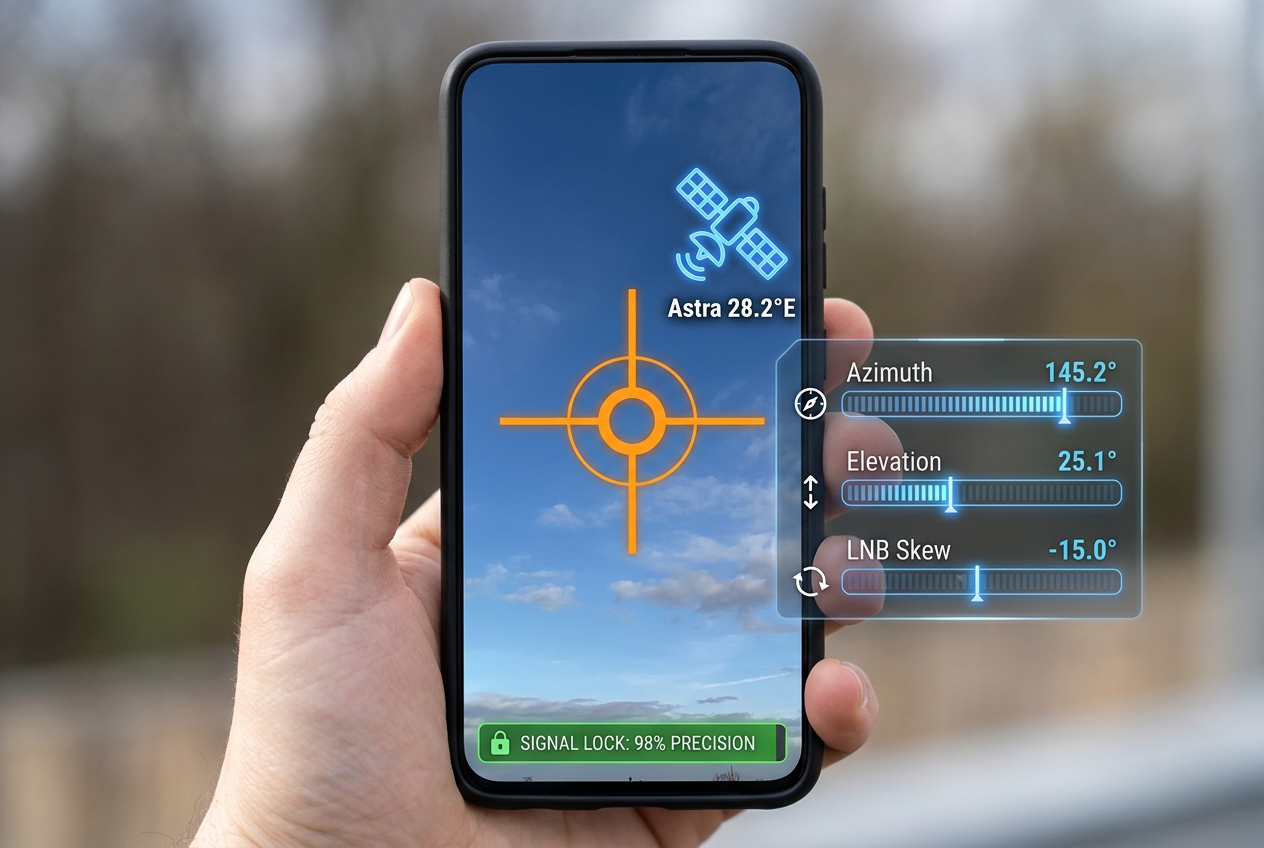
Modern smartphones calculate three-dimensional orientation by fusing data from the magnetometer (compass), gyroscope (rotation speed), and accelerometer (tilt/gravity). When a satellite alignment app overlays that sensor data onto your camera feed, you get real-time visual confirmation: a floating icon showing exactly where the Astra 28.2°E satellite should be in your field of view. This is fundamentally different from older compass-based apps that showed a static bearing. AR transforms alignment from an abstract technical task into a visual matching game - move the dish until the on-screen marker aligns with the physical dish in your camera view.
The key innovation isn't just the AR overlay itself. It's the contextual precision. Apps like DishPointer Pro and SatFinder use your GPS coordinates and device orientation to calculate the exact line-of-sight path to the satellite, accounting for local terrain, obstructions, and magnetic declination (the difference between magnetic north and true north, which varies by location). In London, magnetic declination is approximately -0.14° as of 2026, which AR apps auto-correct. Hardware meters require manual adjustment.
 Modern AR apps provide real-time overlays that guide users to the exact coordinates of the Astra 28.2°E satellite with professional-grade precision and sensor accuracy.
The sensor suite in a 2026 flagship smartphone (iPhone 15 Pro, Samsung Galaxy S24 Ultra, Google Pixel 8 Pro) delivers:
- Magnetometer accuracy: ±2° in open-field conditions, degrading to ±5° near ferrous metal structures
- Gyroscope drift compensation: Real-time correction for hand shake and device movement
- Camera-based AR anchoring: Stabilizes the satellite overlay even as you move the phone
This level of integration explains why hardware meters are rapidly becoming obsolete for home use. A £99 meter gives you numbers. A £4.49 app gives you visual confirmation. For professional installers working on commercial arrays or multi-dish setups, hardware meters still have a place. For residential Sky alignment, the smartphone is the better tool.
Is There an App to Align Satellite Dishes?
Yes, dedicated satellite alignment apps exist and are widely used by both DIY homeowners and professional installers, with the best options combining GPS-based positioning, augmented reality overlays, and offline functionality for use in areas without mobile data. The question isn't whether these apps work - it's which ones provide accurate results specifically for the Astra 28.2°E satellite constellation used by Sky UK.
The fundamental requirement for any functional alignment app is real-time access to three data sources:
- Your exact GPS location (latitude/longitude)
- Your device's orientation in 3D space (compass bearing, tilt angle)
- The orbital parameters of the target satellite (Astra 28.2°E for Sky)
Apps that fail to integrate all three - particularly older compass-only tools or generic "satellite finder" utilities - will give you a rough direction but lack the precision needed for successful alignment. The difference between a bearing of 148° and 151° is the difference between full signal strength and complete signal loss. This is why professional-grade apps charge a small upfront fee: the backend calculation engine and orbital database require ongoing maintenance.
The satellite data services market is projected to reach $16.7 billion by 2026 according to BusinessWire (2022), driven in part by the proliferation of consumer-grade tools that democratize access to previously specialized technical knowledge. For the average UK household, this means the barrier to entry has dropped from "call an installer" to "download an app and follow the AR overlay."
Here's what actually happens when you use a high-quality alignment app: you enter your postcode or allow GPS to auto-detect your location, select "Astra 2" or "28.2°E" from the satellite database, and the app calculates three parameters specific to your position. Those parameters (Azimuth, Elevation, LNB Skew) are then displayed both numerically and visually via AR. The visual overlay is critical - it shows you exactly where to aim, accounting for obstructions like trees or buildings that would block line-of-sight.
The apps that rank highest in user reviews and professional installer recommendations share two characteristics: they work offline (so you can use them on a rooftop without Wi-Fi), and they provide calibration protocols to compensate for magnetic interference. We'll cover the specific apps and their feature sets in the next section, but the short answer to "is there an app?" is an unqualified yes, with the caveat that not all apps are created equal.
The Big Three: Which Apps Actually Work for Sky's Astra 28.2°E Satellite
After testing dozens of satellite alignment apps and cross-referencing professional installer recommendations, three tools consistently deliver accurate results for UK Sky installations. The selection criteria are straightforward: precise Astra 28.2°E orbital data, functional AR overlays, and calibration protocols to handle magnetic interference. Here's the breakdown.
| App Name | Platform | Cost | Offline Mode | AR Overlay | Best For | Key Limitation |
|---|---|---|---|---|---|---|
| DishPointer Pro | iOS/Android | £4.49 (one-time) | Yes | Yes | Precision alignment across all satellites | Steeper learning curve for first-time users |
| SatFinder Lite | iOS/Android | Free (ads) | No | Yes | Quick directional guidance | Requires internet connection; ad interruptions |
| SatCatcher | Android only | Free/£2.99 premium | Yes | Yes | Android sensor calibration | iOS version lacks feature parity |
DishPointer Pro: The Michelin Star Choice
DishPointer Pro charges a one-time fee of £4.49 according to the App Store (2026), and it's the only app recommended by professional installers who need to work across multiple satellite systems beyond just Sky. What separates it from free alternatives is the precision of its orbital database and the offline capability - you can download satellite position data for your region and use the app without any internet connection, which is essential when you're on a rooftop adjusting a dish.
The AR overlay in DishPointer is more sophisticated than competing apps. It doesn't just show a single icon for the satellite position; it displays a cone of potential interference zones, showing you if trees, buildings, or other structures are blocking line-of-sight. For Astra 28.2°E specifically, the app pulls three-axis data: Azimuth (148° for most of southern England), Elevation (approximately 28° for London), and LNB Skew (-22.5° for the UK). All three parameters update dynamically as you move, and the app provides visual feedback when you're within alignment tolerance.
The learning curve is real. First-time users often struggle with the interface, which presents more data than necessary for basic residential alignment. But that complexity is the tradeoff for precision. If you're aligning a dish in a complex installation (multiple LNBs, motorized dish, or marginal line-of-sight), DishPointer gives you the diagnostic detail to troubleshoot.
SatFinder Lite: The Best "No-Cost" Utility (With a Warning)
SatFinder Lite is the most downloaded free satellite alignment app, with millions of installs across iOS and Android. It works, but with significant caveats. The AR overlay is functional and the azimuth/elevation calculations are accurate for Astra 28.2°E, but the app requires an active internet connection to pull satellite data. This isn't a problem if you're doing a pre-installation site survey from your garden, but if you're troubleshooting on a rooftop without mobile data, the app is useless.
The bigger issue is ad density. Free apps monetize through advertising, and SatFinder Lite interrupts the user experience with full-screen ads at critical moments - right after you've calibrated your compass, or when you're adjusting the dish and need to refer back to the alignment data. For a one-off emergency repair, this is tolerable. For any repeat use, the interruptions make the free version a false economy.
That said, if you're testing whether a satellite alignment app is worth your time before committing to a paid option, SatFinder Lite is the risk-free entry point. The core functionality is identical to premium apps - you get azimuth, elevation, and a real-time AR view. You just have to tolerate the ads and maintain internet connectivity.
SatCatcher: The Android Sensor Specialist
SatCatcher is Android-exclusive, and its claim to fame is sensor calibration. Android devices vary widely in magnetometer quality and sensor placement, which can introduce errors of 5-10° if the app doesn't account for device-specific quirks. SatCatcher includes a built-in calibration routine (the "figure-8" motion you perform with your phone) and device-specific correction profiles for popular models like the Samsung Galaxy series.
The free version of SatCatcher is ad-supported but less aggressive than SatFinder Lite. The premium version costs £2.99 and removes ads while adding offline mode and advanced diagnostic tools (signal strength prediction, obstruction analysis). For Android users specifically, this is the best value proposition - cheaper than DishPointer Pro, more polished than SatFinder Lite, and optimized for the Android sensor ecosystem.
The iOS version of SatCatcher exists but lags behind the Android build in features and reliability. If you're on iPhone, DishPointer Pro is the better choice despite the higher cost.
How to Align a Satellite Dish With a Phone: The Complete Process
Aligning a satellite dish using a smartphone app requires following a specific six-step protocol, where each step addresses one of the three alignment parameters (Azimuth, Elevation, LNB Skew) or compensates for environmental factors like magnetic interference. The entire process, from calibration to signal lock, takes 15-25 minutes for a first-time user and under 10 minutes once you've performed it twice.
Step 1: Calibrate Your Compass (The 20-Foot Rule)
Before opening the alignment app, step at least 20 feet away from any metal structures - gutters, satellite dish mounting brackets, HVAC units, or metal roofing. These objects create localized magnetic fields that can shift your phone's compass reading by 10-15° according to alignment guidance from Alibaba's technical buying guide (2026). The error isn't random; it's directional. A gutter running parallel to your wall will pull the compass reading in that specific direction, making your dish point several degrees off target.
The calibration motion is a figure-8 pattern: hold your phone horizontally and rotate it in the air, tracing a sideways figure-8 for 10-15 seconds. This motion forces the magnetometer to sample the full 360° field around the device, allowing the sensor to distinguish Earth's magnetic field from local interference. Most apps will prompt you to perform this calibration automatically. If yours doesn't, manually trigger it in the app's settings menu.
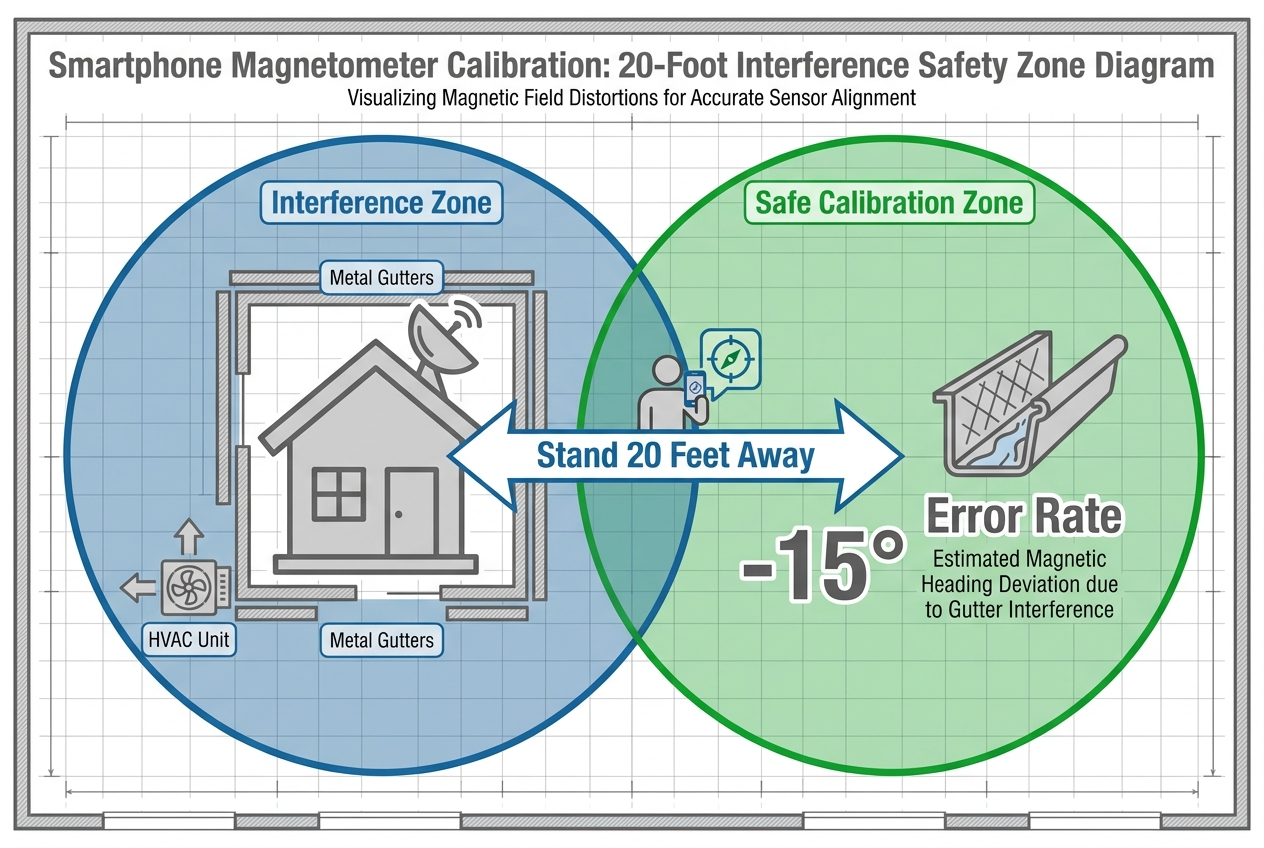 To ensure maximum accuracy, calibrate your app at least 20 feet away from metal structures like gutters or HVAC units to prevent significant magnetic interference.
Step 2: Enter Your Location and Select Astra 28.2°E
Open your chosen app (DishPointer, SatFinder, or SatCatcher) and either allow it to auto-detect your GPS location or manually enter your postcode. Precision matters here - a location error of even 100 meters can shift your calculated azimuth by 1-2°, which is enough to miss the satellite. If the app offers a "fine-tune location" option, use it. Drag the map pin to your exact roof position, not just your street address.
Next, select the target satellite. In most apps, this is listed as "Astra 2" or "28.2° East" - both refer to the same orbital slot. Sky UK broadcasts from three satellites co-located at this position (Astra 2E, 2F, 2G), but for alignment purposes, they're treated as a single target. The app will now calculate three parameters specific to your location.
Step 3: Record Your Target Parameters
The app will display three numbers. Write them down or screenshot them - you'll need to refer to these values while adjusting the dish, and most apps don't allow split-screen multitasking while the AR camera is active.
- Azimuth: The compass bearing (e.g., 148° for London). This is the horizontal direction you'll point the dish.
- Elevation: The vertical angle above the horizon (e.g., 28° for London). This is how high you tilt the dish.
- LNB Skew: The rotation of the LNB (the feed horn at the end of the arm). This is typically -22.5° for the UK, meaning you rotate the LNB counter-clockwise when facing the dish.
These numbers are specific to your exact location. Moving 50 miles north shifts azimuth by 1-2° and elevation by 0.5-1°. Don't use generic numbers from online guides - they're approximations that won't work for precision alignment.
Step 4: Loosen the Dish Mounts (Don't Fully Remove Bolts)
Locate the three adjustment points on your dish mount:
- Azimuth bolt: Controls horizontal rotation (left/right)
- Elevation bolt: Controls vertical tilt (up/down)
- LNB rotation collar: The plastic ring holding the LNB arm
Loosen each adjustment bolt by 2-3 turns - enough that the dish moves with firm hand pressure, but not so loose that it flops around in the wind. Never remove bolts completely during alignment. If the dish swings freely, you've loosened too much.
Step 5: Use the AR Overlay to Align Azimuth and Elevation
Activate the AR camera view in your app. You'll see your live camera feed with a floating icon showing where the satellite should appear in the sky. Stand behind the dish (the side where the LNB arm is) and physically rotate the dish left or right until the center of the reflector aligns with the AR icon. This sets your azimuth.
Next, tilt the dish up or down to match the elevation marker. Most dishes have an elevation scale printed on the mounting bracket - use this as a starting reference, but trust the AR view over the printed scale. Printed scales assume perfectly level mounting surfaces, which rarely exist in real installations.
Small adjustments matter. A 2° error in azimuth translates to roughly 2 meters of positional error at the satellite's orbital altitude (35,786 km for geostationary orbit). That's enough to miss the beam entirely.
Step 6: Set LNB Skew and Check Signal
The LNB (Low-Noise Block downconverter) sits at the end of the dish arm and must be rotated to match the satellite's polarization. For Astra 28.2°E viewed from the UK, the correct skew is approximately -22.5° (counter-clockwise when facing the dish). Loosen the LNB collar, rotate the LNB to the target angle, and re-tighten.
Once all three parameters are set, go inside and check the signal strength on your Sky box. Navigate to Settings > Setup > Signal Test. You're looking for a reading above 50% on the "Signal Strength" bar and above 60% on the "Signal Quality" bar. If you have no signal at all, recheck azimuth - this is the most common error. If you have weak signal, fine-tune elevation in 0.5° increments.
The entire adjustment process is iterative. Make a small change, check signal, repeat. Don't make large movements - once you have any signal at all, you're within 2-3° of perfect alignment, and large adjustments will lose the signal completely.
The "Sky" Secret: Why 28.2°E Astra Matters and What LNB Skew Really Means
Sky UK broadcasts exclusively from the Astra 2E, 2F, and 2G satellites, all co-located at the 28.2° East orbital position - and this single fact determines every aspect of your dish alignment. Pointing at the wrong orbital slot (there are hundreds) or misunderstanding what "28.2° East" means in practical terms is the fastest way to waste an afternoon staring at a "No Signal" screen.
Here's what the orbital position actually tells you: 28.2° East refers to the satellite's longitude in the geostationary orbit belt, 35,786 kilometers above the equator. Geostationary satellites move at exactly the same speed as Earth's rotation, which is why they appear stationary from the ground. The "East" designation means the satellite is 28.2° of longitude east of the Prime Meridian (0° longitude, which runs through Greenwich, London). For a viewer in the UK, this satellite appears in the southern sky at a specific azimuth and elevation angle that varies based on your latitude and longitude.
The azimuth (horizontal bearing) for Astra 28.2°E from London is approximately 148° - this is measured clockwise from true north, not magnetic north. Your phone's compass reports magnetic north, which is why apps like DishPointer automatically apply magnetic declination correction. If you tried to align using a traditional compass and a satellite dish alignment chart from the internet, you'd be off by 0.14° due to London's magnetic declination, which is enough to degrade signal quality.
The elevation (vertical angle) for Astra 28.2°E from London is approximately 28° above the horizon. This is a direct function of your latitude. The further north you are, the lower the satellite appears in the sky. From Edinburgh, the elevation drops to around 25°. From Penzance in Cornwall, it rises to 30°. This is why generic "point your dish at this angle" guides don't work - the correct angle is location-specific.
What LNB Skew Actually Does
LNB skew is the most misunderstood parameter in satellite alignment. The LNB (Low-Noise Block downconverter) receives signals from the satellite, which transmits in two polarization modes: horizontal and vertical. These polarizations are perpendicular to each other, allowing the satellite to broadcast twice as many channels in the same frequency band without interference. But here's the catch: "horizontal" and "vertical" are defined relative to the satellite's orientation, not yours.
When you're standing in the UK looking at a satellite that's above the equator and east of you, the satellite's orientation is tilted relative to your local horizon. To receive both polarizations correctly, you must rotate the LNB to match that tilt. For Astra 28.2°E viewed from the UK, the required rotation is approximately -22.5° (counter-clockwise when facing the dish). This is called the "skew angle."
If you ignore LNB skew and leave the LNB in its default vertical position, you'll receive some channels (those using one polarization) but not others (those using the perpendicular polarization). Sky Q boxes are particularly sensitive to skew errors because they use automated multi-channel signal quality checks during boot-up. If the skew is off, the box detects missing channels and displays a generic "signal problem" error, even though your azimuth and elevation might be perfect.
The skew angle is not adjustable in software - it's a physical rotation that must be set correctly during installation. Most LNB mounts have a printed scale ranging from -45° to +45°, with 0° marked as vertical. For Sky UK, you're looking for the mark approximately one-quarter of the way counter-clockwise from 0° when facing the dish. If your LNB mount doesn't have visible markings (common on cheaper dishes), use a protractor app on your phone to measure the angle of the LNB relative to vertical.
How Much Does Sky Charge to Realign a Dish?
Sky charges between £150 and £300 for professional dish realignment as of 2026, according to cost data from HowMuchShouldItCost, with the wide price range reflecting variables like time of day, weekend surcharges, and whether the technician diagnoses additional issues during the visit. This pricing model positions DIY alignment as a compelling alternative for homeowners willing to invest 30 minutes of effort and £4.49 for a premium alignment app.
The cost breakdown for a standard Sky technician call-out typically includes:
- Base call-out fee: £65-£85, regardless of work performed
- Labor rate: £40-£60 per 30-minute increment
- Signal testing and adjustment: £25-£40 as a line item
- Weekend or after-hours surcharge: +30-50% on the base rate
If the technician determines that the LNB has failed or that the dish mount is damaged (requiring a new bracket or pole), the total can exceed £300 before parts. These costs assume you're outside of any active Sky Care or warranty coverage. If you're within a service contract, realignment may be covered, but expect 48-72 hour wait times for scheduling.
The average UK household experiencing signal loss will attempt to troubleshoot for 1-2 hours before calling for service, according to consumer behavior patterns. That troubleshooting usually consists of rebooting the Sky box multiple times, checking cable connections, and searching online forums for solutions. By the time the call is placed, most users have already invested significant time without resolution. The opportunity cost of the technician wait (2-3 days on average) compounds the financial cost - particularly for households where Sky is the primary TV source.
| Solution | Upfront Cost | Time to Resolution | Skill Required | Works Offline |
|---|---|---|---|---|
| Sky technician call-out | £150-£300 | 48-72 hours | None | N/A |
| DishPointer Pro app | £4.49 | 15-30 minutes | Moderate | Yes |
| Hardware satellite meter | £99 | 15-30 minutes | Moderate | Yes |
| Free app (SatFinder Lite) | £0 | 20-40 minutes | Moderate | No |
The math is straightforward: after a single successful DIY alignment, you've saved enough to justify the cost of a premium app 33 times over compared to a technician call-out. Even if you need to realign twice (once immediately, once after a storm), you're still at a 95% cost savings compared to professional service.
The hidden value is the skill transfer. Once you've successfully aligned your dish using an app, you've learned a process that remains useful for the lifespan of the installation. Moving house? You can align the new dish yourself. Upgrading to a larger dish for additional satellites? You understand the process. Storm damage requiring adjustment? You're not dependent on technician availability.
For a certain type of user - the same person who researches how to photograph food to capture restaurant memories or maintains detailed records of dish ratings - the appeal isn't purely financial. It's about mastery. DIY alignment transforms a frustrating service dependency into a repeatable technical skill.
The Troubleshooting Protocol: When the App Says "Clear" But the TV Says "Missing"
You've followed every step, your AR overlay shows perfect alignment, and your phone's compass reading matches the app's target azimuth within 1°. You go inside, check the Sky box, and the signal test screen still shows zero. This specific scenario - app confidence but no actual signal - has three root causes, and the diagnostic protocol below will identify which one applies to your installation.
Cause 1: LNB Cable Connection or Water Ingress
Before questioning the dish alignment, physically inspect the coax cable connection at the LNB (the feed horn at the end of the dish arm). Look for:
- Loose F-connector (the threaded silver connector that screws onto the LNB port)
- Water pooling inside the rubber weather boot covering the LNB connection
- Visible corrosion on the center conductor (the thin copper wire inside the cable)
Water is the silent killer of satellite systems. The LNB connection sits outdoors, exposed to rain, and even small amounts of moisture create signal attenuation severe enough to prevent lock. If the rubber boot is split or missing, water enters the connector and causes intermittent or complete signal loss. The fix is straightforward: disconnect the cable, inspect both the cable's center conductor and the LNB port for corrosion, dry thoroughly with a cloth, and reconnect with a new rubber boot or self-amalgamating tape to weatherproof the connection.
A fully functional satellite alignment can produce zero signal if the coax cable has a break or short anywhere along its run from the LNB to the Sky box. Testing this requires a basic multimeter set to continuity mode, or - more realistically for most users - swapping in a known-good cable. If signal appears after the cable swap, the original cable was defective.
Cause 2: Multi-LNB Alignment Error (Quad/Octo LNBs)
If your dish has a quad or octo LNB (the plastic housing at the dish's focal point has four or eight coax connectors), alignment becomes position-sensitive in a way single LNBs are not. Each LNB output is fed by a separate waveguide inside the housing, and if the LNB is rotated by even 10° beyond the correct skew angle, some outputs may receive signal while others don't.
Sky Q installations typically use a hybrid LNB with dedicated ports for the Sky Q box and standard ports for legacy Sky+ boxes in other rooms. If the alignment is slightly off, you may see signal on one TV but not another - not because of a box problem, but because different LNB ports have different phase alignment tolerances.
The diagnostic is simple: if you have multiple Sky boxes in the house, check signal on all of them. If one box shows signal and another doesn't, the problem is LNB skew, not azimuth or elevation. Rotate the LNB by 2-3° increments (either direction) and retest. You're looking for the rotation angle that maximizes signal across all LNB outputs simultaneously.
Cause 3: Magnetic Interference During Calibration
The most insidious failure mode is magnetic interference corrupting the app's compass reading without obvious symptoms. This happens when you calibrate the app near a metal structure, step away to the dish, and perform the alignment based on that corrupted reading. The app is confident because its internal consistency checks pass - the compass reading is stable and the GPS lock is solid - but the compass itself is reporting a bearing that's 5-15° off true.
The symptom is distinctive: you align exactly as the app instructs, you're confident the dish is pointed at the AR target, but you have zero signal. Meanwhile, if you manually sweep the dish 5-10° left or right of the app's target, signal suddenly appears. This tells you the satellite is not where the app thinks it is - which means the compass calibration was corrupted.
The fix is to restart the entire process: power-cycle the phone (full reboot, not just closing the app), walk at least 30 feet away from the dish and any metal structures, and recalibrate the compass in an open field or street. Then re-run the alignment from scratch. If signal appears after the second alignment but not the first, magnetic interference was the culprit.
A final check: if you're using an older phone (iPhone 12 or earlier, or Android devices more than 3 years old), the magnetometer may be out of factory calibration. This isn't something you can fix with a figure-8 motion - it's a hardware drift issue that accumulates over time. In this case, cross-reference your phone's compass reading against a known-accurate source (a hardware compass app with manual magnetic declination input, or a second phone). If they disagree by more than 3°, the older phone's magnetometer is unreliable, and you'll need to use a different device for alignment.
Frequently Asked Questions
What is the best satellite tracking app?
The best satellite tracking app for Sky dish alignment is DishPointer Pro, which combines professional-grade GPS-based positioning, offline functionality, and augmented reality overlays optimized for the Astra 28.2°E orbital slot. Unlike free alternatives, DishPointer Pro offers downloadable satellite databases that work without internet connectivity and includes magnetic declination auto-correction for precision down to ±2° accuracy. For users on a budget, SatFinder Lite provides similar core functionality with ad-supported free access, though it requires an active internet connection and delivers less polished AR visualization. Android users specifically benefit from SatCatcher's device-specific sensor calibration, which compensates for magnetometer variance across different phone models.
How do I realign my Sky dish?
To realign your Sky dish, first calibrate a satellite alignment app at least 20 feet from metal structures, then loosen the dish's azimuth and elevation bolts, use the app's AR overlay to guide the dish to the correct Astra 28.2°E position (typically 148° azimuth and 28° elevation for London), and set the LNB skew to approximately -22.5° counter-clockwise when facing the dish. The critical steps are recording your location-specific alignment parameters from the app before starting physical adjustments and making small incremental movements while checking the Sky box's signal strength meter rather than large sweeping changes. The entire process takes 15-25 minutes for a first-time user, and most alignment failures stem from skipping the compass calibration step or attempting alignment while standing too close to metal gutters or building structures that distort magnetic compass readings.
Can I reposition my satellite dish myself?
Yes, repositioning your satellite dish yourself is both practical and cost-effective, saving £150-£300 compared to professional technician call-out fees, but requires using a smartphone-based alignment app (DishPointer Pro, SatFinder, or SatCatcher) to achieve the precision needed for Sky's Astra 28.2°E satellite lock. The process involves loosening three adjustment bolts without fully removing them, calibrating your phone's compass away from magnetic interference, and following the app's augmented reality overlay to set azimuth, elevation, and LNB skew parameters specific to your GPS location. The primary risk is over-loosening the mounting bolts and allowing the dish to swing freely in wind, which can damage the LNB arm - maintain enough tension that the dish requires firm hand pressure to move but doesn't shift on its own.
How to realign satellite dish in the UK?
Realigning a satellite dish in the UK requires targeting the Astra 28.2°E orbital position with three specific parameters: azimuth (approximately 143-151° depending on latitude), elevation (26-30° depending on latitude), and LNB skew (-22.5° for all UK locations), all calculated using a GPS-enabled alignment app that auto-corrects for magnetic declination. The protocol starts with compass calibration at least 20 feet from metal structures, followed by loosening dish mount bolts, positioning the dish to match the app's AR overlay, and fine-tuning using the Sky box's built-in signal strength meter under Settings > Setup > Signal Test. UK-specific challenges include higher magnetic declination in Scotland (up to -0.5°) and lower elevation angles in northern regions, both of which are automatically compensated by apps like DishPointer Pro but cause errors of 5-10° when using generic printed alignment tables.
Are there free satellite finder apps for Sky that don't have ads?
No fully ad-free satellite finder apps exist at zero cost, but SatCatcher's free Android version offers the least intrusive ad experience with optional offline mode after initial download, while premium versions of both DishPointer Pro (£4.49) and SatCatcher (£2.99) provide completely ad-free operation with added diagnostic features for professional-grade alignment. The economics of app development require either ad monetization or paid purchase to sustain orbital database updates and AR feature improvements, making the one-time £4.49 cost of DishPointer Pro equivalent to 1-2% of a single Sky technician call-out fee. For users requiring only one-time alignment, the ad-supported free version of SatFinder Lite remains functional despite interruptions, though the inability to use it offline limits practicality for rooftop installations without mobile data coverage.
How much does Sky charge for a professional dish realignment?
Sky charges between £150 and £300 for professional dish realignment as of 2026, with the price varying based on time of day, weekend surcharges, and whether additional repairs (LNB replacement, bracket reinforcement) are required during the service call. This cost represents approximately 33-66 times the one-time purchase price of a premium satellite alignment app like DishPointer Pro (£4.49), making DIY alignment financially attractive after a single successful use. The £150-£300 range reflects base call-out fees of £65-£85 plus labor rates of £40-£60 per 30-minute increment, with the total climbing rapidly if the technician diagnoses equipment failure requiring parts replacement, and does not include the opportunity cost of the typical 48-72 hour wait time for technician scheduling.
Do satellite finder apps work without an internet connection?
Premium satellite finder apps including DishPointer Pro (£4.49) and the paid version of SatCatcher (£2.99) offer full offline functionality after initial satellite database download, while free alternatives like SatFinder Lite require persistent internet connectivity to calculate alignment parameters and cannot function on rooftops without mobile data or WiFi access. Offline capability matters specifically for residential installations where the dish mounting location (rooftop, side of house, garden pole) lacks reliable mobile signal, and apps achieve this by bundling GPS-calculated satellite position data and AR overlay engines that run entirely on-device without server calls. The offline database typically consumes 50-100 MB of storage and updates quarterly to account for satellite orbital adjustments, making the initial download size negligible on modern smartphones but requiring users to manually refresh data annually to maintain 2° precision.
Why is my satellite finder app pointing in the wrong direction?
If your satellite finder app displays a target direction that produces no signal when followed, the most probable cause is magnetic interference from metal structures (gutters, mounting brackets, HVAC units) within 20 feet of your compass calibration position, which can shift magnetometer readings by 10-15° and make the app confidently display an incorrect bearing. The diagnostic protocol is to restart your phone completely, walk at least 30 feet from all metal objects including the dish itself, recalibrate the compass using the app's built-in figure-8 motion, and repeat the alignment from scratch, as magnetic interference produces errors that are directionally consistent (always pulling toward the metal source) rather than random. Secondary causes include outdated phone magnetometer hardware (common in devices 3+ years old) showing sensor drift beyond the app's calibration ability, and incorrect satellite selection where users accidentally target Astra 19.2°E (European satellite) instead of Astra 28.2°E (UK Sky satellite), producing azimuth errors of 20-30° that look plausible but yield zero signal.
The shift from professional dependency to DIY capability in satellite alignment mirrors a broader trend: specialized technical knowledge becoming accessible through consumer tools. The same precision that required £99 hardware meters and trade training in 2015 now lives in a £4.49 smartphone app with visual guidance. For the 15% of UK households still relying on satellite television according to WiFi Talents (2026), that accessibility matters. Signal loss is no longer a multi-day disruption requiring technician scheduling. It's a 20-minute fix you can perform yourself, often before the Sky customer service line even answers.
The real value isn't just the cost savings - though £150-£300 per incident adds up quickly - it's the knowledge transfer. Once you've successfully aligned a dish using an AR app, you've learned a repeatable process that applies to future moves, storm damage recovery, or system upgrades. That capability compounds. Just as learning how to keep a food journal transforms scattered meal memories into a searchable personal database, learning satellite alignment transforms a household frustration into a solved problem you'll never pay someone else to fix again.