
5 Elevated Dinner Concepts to Master and Archive for Your Permanent Collection
Alex the juice queen
Alex hunts for the best juice bars and presses. She rates every sip and saves her favorites in Savor.
Beyond the Feed: 5 Elevated Dinner Concepts for Your Permanent Collection Table of Contents The Archival Imperative: Why Your Dinners Deserve Better The...
Beyond the Feed: 5 Elevated Dinner Concepts for Your Permanent Collection
Table of Contents
- The Archival Imperative: Why Your Dinners Deserve Better
- The Izakaya Table: Small Plates, Big Narrative
- The Regional Italian Deep Dive: Beyond Pasta
- The Modern Bistro Steak Night
- The Nordic Minimalist Vegetable Course
- The North African Spice Route Dinner
- The Archival System: Killing the Camera Roll Graveyard
- Frequently Asked Questions
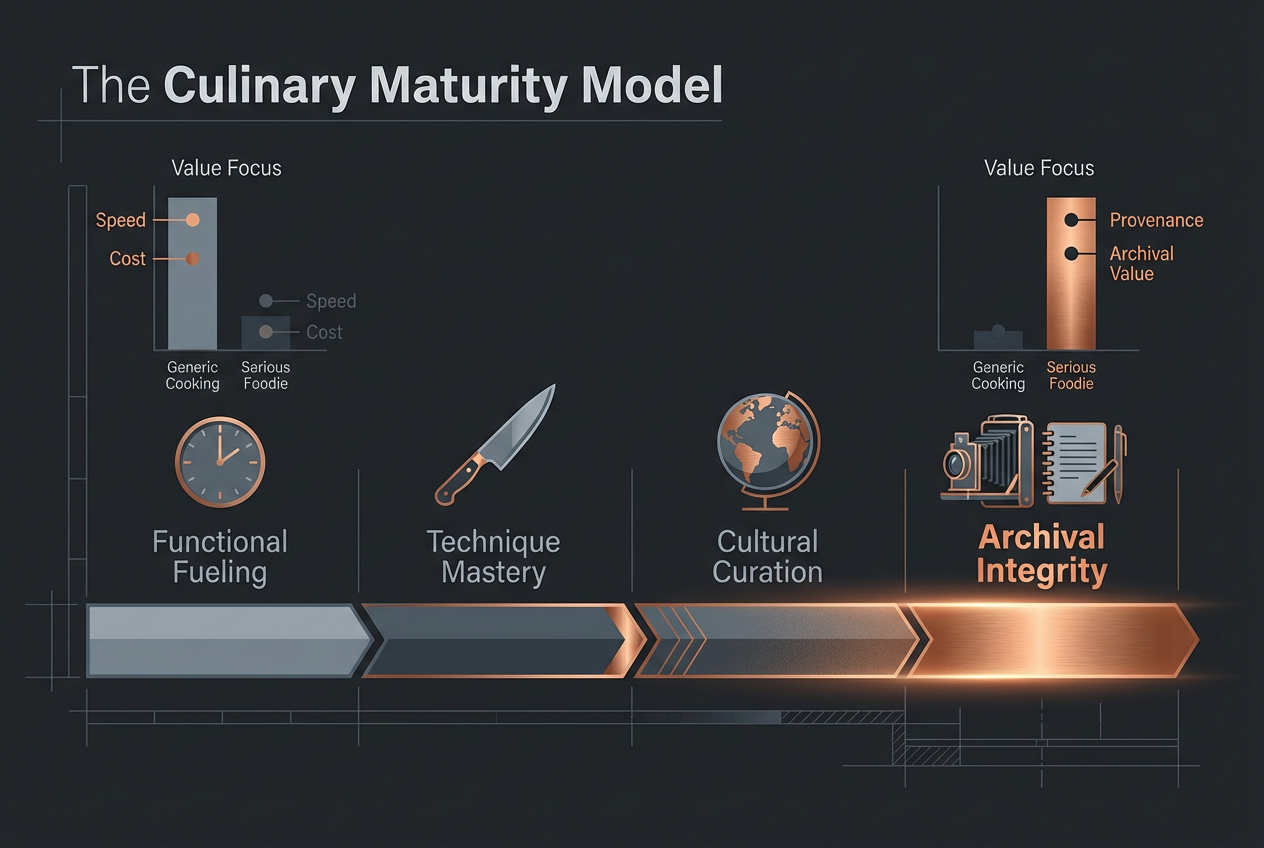
The Archival Imperative: Why Your Dinners Deserve Better
The problem isn't finding dinner ideas. It's that you've cooked a hundred memorable meals and can't recall a single technique, ingredient source, or flavor combination when you need it most.
You've spent years developing your palate at reservations you booked months in advance. You know the difference between Calabrian and Sicilian anchovies. You can taste when a chef has compromised on fish stock. But open your phone's camera roll, and what do you find? A graveyard of beautiful but unsearchable food photos, each one a ghost of a meal you can't quite reconstruct.
The divide between dining out and cooking at home has never been wider, not in skill but in systems. Restaurants operate from recipe databases, supplier relationships, and documented processes. Your home kitchen runs on vibes and half-remembered conversations with your butcher.
 Evolving your kitchen practice from simple meal preparation to a deliberate act of cultural curation and archival record-keeping.
This is where the serious foodie diverges from the casual cook. You don't need another list of "30-minute weeknight meals." You need dinner concepts that function as cultural markers - meals sophisticated enough to reflect your culinary education, documented well enough to become part of your permanent repertoire.
The content structure matters here. Generic food blogs focus on speed and cost efficiency, metrics that mean nothing when you're trying to recreate the coal-grilled mackerel you had at that Tokyo izakaya. The serious foodie operates in a different paradigm entirely:
| Element | Generic Content | Serious Foodie Content |
|---|---|---|
| Focus | Speed & Cost | Provenance & Technique |
| Tone | Relatable/Parent-focused | Authoritative/Cultured |
| Imagery | Bright, high-key, "perfect" | Moody, textural, "process-oriented" |
| Metric | "Easy to clean" | "Authentic flavor profile" |
Consider what happens when you invest three hours making osso buco only to realize six months later that you can't remember whether you used veal or pork shank, what temperature you braised it at, or which wine you reduced into the sauce. The meal becomes a pleasant but fuzzy memory instead of a reproducible technique.
This article provides five elevated dinner concepts designed specifically for archival integrity. Each section includes not just the recipe framework, but the documentation strategy that transforms a single meal into a permanent entry in your culinary library. You'll learn which photos to take, what notes matter, and how to tag each meal so you can actually find it later.
These aren't random dinner ideas. They're strategic choices that represent distinct culinary traditions, each one teaching you techniques applicable across dozens of future meals. The izakaya concept teaches you about umami layering and small-plate composition. The regional Italian dinner forces you to understand soffritto as foundation rather than garnish. The bistro steak night is your graduate education in the Maillard reaction.
And because the serious foodie knows that great cooking exists in a larger ecosystem, we'll also address the system design: how to choose between organizing your culinary archive with apps versus notebooks, why the three-photo rule works better than comprehensive documentation, and which metadata actually matters when you're searching for "that lamb dish I made last spring."
The goal isn't just to cook well tonight. It's to build a searchable, referenceable record of your culinary evolution - the kind of personal archive that professional chefs maintain automatically but home cooks almost never create.
Let's get into the specifics.
The Izakaya Table: Small Plates, Big Narrative
An izakaya dinner teaches you umami layering, binchotan-style grilling, and how to compose a meal where no single dish dominates but every plate contributes to a coherent narrative.
The izakaya represents something specific in Japanese food culture that Western "small plates" concepts often miss. It's not tapas, where dishes arrive randomly. It's not dim sum, where carts dictate your meal. The izakaya is a deliberately choreographed progression through temperature, texture, and intensity, designed for the urban professional who needs both sustenance and ritual after work.
Start with your zensai (appetizers), which should wake up the palate without overwhelming it. A proper sunomono salad does this perfectly: thinly sliced cucumber dressed in rice vinegar, a touch of sugar, and toasted sesame seeds. The acidity cuts through any residual flavors from your day while the sesame provides just enough fat to coat your mouth for what's coming next.
The technical detail that matters: use a mandoline to get your cucumber slices paper-thin, around 1-2mm. Thick slices won't absorb the dressing properly and you'll end up with bland cucumber in a pool of vinegar. Salt your slices first, let them sit for 10 minutes, then squeeze out the excess water. This step concentrates the cucumber flavor and creates the right texture - you want a slight snap, not a crunch.
For your grilled components, you're working with high heat and quick cooking times. Traditional izakaya use binchotan (white charcoal), which burns at 1,000°F and produces almost no smoke. You won't replicate this exactly at home, but you can get close with a cast-iron skillet heated until it's just starting to smoke, or a gas grill with all burners on high.
The classic move: shio (salt-grilled) chicken thighs. Score the skin in a crosshatch pattern, salt generously (more than feels comfortable), and place skin-side down on your hottest heat source. Don't move it. The fat will render, the skin will crisp, and the salt will form a savory crust. When the edges start to turn golden-brown and curl up, flip once. Total cooking time runs 8-10 minutes depending on thickness.
What makes this technique archival-worthy: the same method works for mackerel, duck breast, pork belly, even thick slices of eggplant. Once you understand the principle - aggressive heat, generous salt, patience - you've unlocked an entire category of preparation.
Your third course needs acid and funk to cut through the richness you've built. Nasu dengaku (miso-glazed eggplant) handles both. The miso glaze combines white miso paste, mirin, sake, and sugar in a 3:1:1:0.5 ratio by volume. Brush it on halved Japanese eggplant that you've already scored and grilled until soft. The sugars caramelize under high heat, creating a lacquered surface that's simultaneously sweet, salty, and deeply savory.
The technical breakthrough here is understanding tare (glazing sauces) as a system. This same ratio structure applies to yakitori sauce, teriyaki, and most Japanese grilling applications. Adjust the miso type (white for sweet, red for funky), add ginger or garlic if you want, but the proportions remain constant.
End with something rice-based but not heavy. Ochazuke (tea-poured rice) works perfectly: leftover rice in a bowl, topped with grilled salmon skin, pickled plum, and nori, then finished with hot green tea or dashi poured over the top. It's comforting without being filling, and the liquid makes it easy to eat even when you're full from the previous courses.
The Archival Strategy:
Your photography here requires a macro lens or macro mode on your phone. Get close enough to capture the char pattern on the chicken skin - those blackened edges against golden-brown fat render tell the story of proper technique. Shoot the miso glaze while it's still bubbling from the broiler; that caramelization won't last long once it cools.
For your notes, record your heat source and cooking time. "High heat, 8 minutes" means nothing six months from now. "Cast iron, medium-high gas burner, 5 minutes per side, chicken thigh 1.5 inches thick" gives you reproducible data.
Tag this meal with your sake pairing. Izakaya culture revolves around the drink-food relationship, and if you served this with a junmai ginjo that had a specific flavor profile, that information matters for future planning. Learning to track these pairings systematically makes every subsequent meal easier to plan.
The meta-lesson of izakaya cooking: composition matters as much as execution. These aren't random small plates; they're a curated progression through flavor intensity and temperature. Document that structure, not just the individual recipes.
The Regional Italian Deep Dive: Beyond Pasta
Regional Italian cooking forces you past the red-sauce American interpretations and into the ingredient-driven reality of Italian food, where a dish's identity comes from specific local products and historical preparation methods.
Let's start in Lombardy with osso buco alla milanese because it demonstrates every principle that separates regional Italian food from the generic "Italian" category. The dish comes from a specific place (Milan), uses a specific cut (cross-cut veal shanks), requires a specific technique (brasatura, or braising), and traditionally pairs with a specific accompaniment (risotto alla milanese).
The cut matters more than you'd think. Veal shanks contain a high ratio of connective tissue to meat, which means they need low, slow cooking to convert that collagen into gelatin. This is why you can't substitute chicken or pork chops and expect the same result - you need that specific protein structure to create the sauce's characteristic silky texture.
Start with your soffritto, which in Lombardy means finely diced onion, carrot, and celery sweated in butter (not olive oil) until the vegetables turn translucent but haven't taken on any color. This takes 15-20 minutes over low heat. Most home cooks rush this step, cranking the heat to speed things up, then wonder why their braise tastes harsh instead of sweet.
The technical principle: aromatic vegetables contain sugars that caramelize at around 320°F. But you don't want caramelization in your soffritto - you want those sugars to dissolve into the fat, creating a sweet, vegetal base. High heat gets you browning. Low heat gets you extraction. Different goals, different methods.
Brown your veal shanks in the same pot after you remove the soffritto. You want a deep golden-brown crust on both cut sides, which takes about 4-5 minutes per side over medium-high heat. Don't crowd the pan - if you have more than two shanks in a 12-inch Dutch oven, you're steaming them instead of browning them.
Return your soffritto to the pot, add white wine (Lombardy uses local whites like Franciacorta), and let it reduce by half. Then add your tomatoes - and here's where regional specificity matters. Milanese osso buco uses a minimal amount of tomato, just enough to add acidity and a hint of sweetness. You're looking for maybe half a cup of crushed tomatoes or tomato paste for four shanks. This isn't a tomato-based braise; it's a wine-and-stock braise with tomato as a supporting player.
Add veal or chicken stock until the liquid comes halfway up the shanks. Any higher and you're boiling them; any lower and the exposed meat will dry out. Cover and transfer to a 325°F oven for 2-2.5 hours, until the meat is tender enough to cut with a spoon but hasn't fallen apart yet.
The gremolata (lemon zest, garlic, and parsley) gets added at the end, right before serving. This is non-negotiable. The bright acidity and aromatics cut through the rich, unctuous sauce and wake your palate back up. Mix equal parts finely minced parsley, lemon zest, and raw garlic. Sprinkle it over the top of each shank just before plating.
For a completely different regional expression, try Tuscan cacciucco, a fish stew from Livorno that demonstrates how Italian coastal cooking differs from the Lombardian approach. Cacciucco starts with another soffritto, but this one includes garlic and chile flakes, and it's cooked in olive oil rather than butter. You build your base with white wine and tomatoes (Tuscans use way more tomato than Lombards), then add fish stock and whatever combination of seafood your fishmonger has that day - traditionally, you need at least five different types of fish for an authentic cacciucco.
The lesson here: Italian cooking isn't a single cuisine. It's twenty different regional cuisines, each one shaped by local ingredients and historical trade routes. Lombardy had access to veal and butter because they raised dairy cattle. Tuscany had olive oil and seafood because they're on the coast. Understanding this geography makes you a better cook because you stop looking for the "right" way to make Italian food and start asking "which region's approach fits my ingredients?"
The Archival Strategy:
Document your meat source. "Veal shanks from butcher" means nothing. "Milk-fed veal shanks from Providence Farm, cut 2 inches thick, from the hind leg" gives you the information you need to replicate this dish or troubleshoot if something goes wrong.
Photograph your soffritto at three stages: raw, sweated (translucent), and if you accidentally let it brown, that too. These visual references will train your eye faster than any written description.
Your notes should include the braising temperature and time, but also the doneness check. "Meat pulls away from bone with fork but shank still holds shape" is a better marker than "2.5 hours at 325°F" because every oven runs differently.
Tag this with the region and the season. Italian food is intensely seasonal - the osso buco you make in January with winter vegetables will taste different from one you make in August with summer tomatoes. That variation is a feature, not a bug, and tracking it helps you understand the cuisine better.
The Modern Bistro Steak Night
Cooking a perfect steak at home requires understanding the Maillard reaction, managing heat zones, and executing compound butter as a finishing sauce rather than just a garnish.
The modern bistro steak represents the culmination of French technique applied to simple ingredients. You're not trying to reinvent anything here - you're executing a classic preparation well enough that it competes with restaurants charging $75 for the same cut.
Start with your steak selection, which matters more than any cooking technique. You want a dry-aged ribeye, cut 1.5 inches thick, with good marbling throughout. The dry-aging process concentrates the beef flavor and breaks down connective tissue, giving you both intensity and tenderness. If you can't find dry-aged, look for Prime grade beef and dry it yourself in the refrigerator for 2-3 days, uncovered, on a wire rack. This won't replicate true dry-aging, but it will improve the crust formation considerably.
The science: wet surfaces don't brown well because the water needs to evaporate before the Maillard reaction can begin. Maillard reactions (the chemical process that creates that savory, browned crust) start around 285°F, but water boils at 212°F. If your steak surface is wet, you spend the first several minutes of cooking just evaporating moisture instead of building flavor. That's why dry-aged steaks brown better - they've already lost much of their surface moisture.
Pull your steak out of the refrigerator 45-60 minutes before cooking. This tempering step brings the interior temperature up to around 55-60°F, which means your center will reach medium-rare (130°F) at roughly the same time your exterior develops a proper crust. If you cook straight from the fridge (35°F internal temp), you'll either overcook the exterior while waiting for the center to warm up, or undercook the center to preserve the crust.
Salt your steak heavily, at least 45 minutes before cooking (ideally 2-4 hours). Use kosher salt, not table salt, and apply it generously to both sides. The salt will first draw moisture out of the meat through osmosis, then that moisture will dissolve the salt, creating a concentrated brine that gets reabsorbed into the muscle fibers. This process seasons the meat throughout, not just on the surface.
The reverse-sear method gives you the most control. Place your seasoned steak on a wire rack over a sheet pan and slide it into a 250°F oven. Use a probe thermometer to monitor the internal temperature. When it hits 115-120°F (for medium-rare), pull it out. This low-temperature cooking phase brings the interior up to temperature gently and evenly, and it further dries the surface.
Now for the sear. Heat a cast-iron skillet over high heat until it's smoking. Add a high-smoke-point oil (avocado or refined peanut oil work well) and immediately place your steak in the pan. Don't move it. Let it sit for 90-120 seconds, until a dark mahogany crust forms. Flip and repeat on the other side. If your steak has a thick fat cap, hold it on its side with tongs to render and crisp that edge.
Your total sear time should be 3-4 minutes maximum. Because you already brought the interior up to temperature in the oven, you're just focusing on crust development now. This is the advantage of reverse-searing over traditional methods - you separate the two goals (internal temperature and exterior crust) into distinct steps.
Remove the steak and let it rest while you make your beurre rouge (red wine butter sauce). In the same pan, add a minced shallot and cook for 30 seconds, then deglaze with red wine (use something you'd actually drink - Côtes du Rhône works well). Reduce the wine by three-quarters, until it's syrupy, then whisk in cold butter one tablespoon at a time. The emulsion happens because the butter fat forms microscopic droplets suspended in the wine reduction, stabilized by the milk proteins in the butter.
Season your sauce with salt and a pinch of black pepper, then spoon it over your sliced steak. The beurre rouge adds richness and acidity simultaneously, cutting through the beef fat while reinforcing the savory notes from the Maillard crust.
Side note: compound butters work here too, but they're garnishes, not sauces. If you want to go that direction, try a maître d'hôtel butter (softened butter mixed with lemon juice, parsley, and salt) or a blue cheese butter. But the beurre rouge is more interesting technically and tastes more professional.
The Archival Strategy:
Your photo sequence here needs to capture: (1) the raw steak showing the marbling, (2) the reverse-sear setup in the oven, and (3) the final seared crust. That third photo should be a close-up shot showing the gradient from the dark exterior to the pink center. Use natural light if possible - flash will blow out the details you want to preserve.
Document your exact temperatures and times. "Oven at 250°F to 118°F internal (took 35 minutes), sear at high heat for 90 seconds per side" gives you a reproducible formula. Next time, you can adjust based on whether you want more or less pink in the center.
Note your steak dimensions (thickness, weight) because these affect cooking time significantly. A 12-ounce ribeye cut 1.5 inches thick cooks differently from a 16-ounce ribeye cut 2 inches thick, even at the same temperatures.
Tag this with your wine pairing for the sauce. The beurre rouge made with Côtes du Rhône tastes different from one made with Bordeaux or Burgundy. That's not pretension - it's chemical reality. Different wines have different acid structures and tannin levels, which affect the final sauce's flavor profile.
The Nordic Minimalist Vegetable Course
Nordic cooking forces you to take vegetables seriously as a primary ingredient rather than a side dish, using techniques like salt-baking and cold infusions to extract and concentrate flavors most cuisines ignore.
The Nordic approach to vegetables represents a complete philosophical shift from Mediterranean or Asian cooking. You're not adding layers of flavor through aromatics, spices, or sauces. You're revealing the vegetable's inherent flavor through temperature, salt, and strategic subtractions.
Start with salt-baked beets because they demonstrate the technique perfectly and create a dish that looks stunning on the plate. Take 4-6 medium beets (ideally a mix of red and golden varieties for visual contrast) and scrub them clean but don't peel them. Spread a thin layer of kosher salt (about 1 cup) on a sheet pan, place your beets on top, then cover them completely with another 2-3 cups of salt. You're building a salt crust that will completely encase each beet.
Roast at 400°F for 60-90 minutes, depending on beet size. The salt crust creates an environment where the beets essentially steam themselves in their own moisture while simultaneously drawing out excess water. This concentrates the sugars and earthy flavors while preventing the beets from becoming waterlogged.
When you crack open the salt crust (satisfying in itself), the beets will be incredibly tender and intensely flavored. Let them cool slightly, then peel them - the skins should slide off with just your fingers or a paper towel. The salt crust doesn't make the beets salty; it regulates the cooking environment. Most of the salt stays in the crust.
Slice your beets into rounds or wedges and arrange them on a plate with significant negative space. This is crucial to the Nordic aesthetic - you're not filling the plate with food. You're composing a still life where the white space matters as much as the ingredients.
Now for your smoked yogurt. Traditional Nordic cooking uses birch wood to cold-smoke dairy products, but you can achieve similar results at home with a smoking gun or a quick DIY stovetop smoker. Take full-fat Greek yogurt (the fat content matters for texture), spread it in a thin layer in a shallow pan, and expose it to wood smoke for 5-10 minutes. Apple or cherry wood work well if you can't source birch.
The smoke compounds bind with the fat molecules in the yogurt, creating a savory, almost meaty flavor that transforms how you think about dairy. If you don't have smoking equipment, you can approximate this by stirring a tiny amount (we're talking 1/8 teaspoon per cup) of liquid smoke into your yogurt, but the flavor won't be as clean or complex.
Your dill oil needs to be a proper cold infusion, not just chopped dill mixed with oil. Blanch a large bunch of dill (stems and all) in boiling water for 10 seconds, then shock it in ice water. Squeeze out all the excess moisture, then blend it with a neutral oil (grapeseed or mild olive oil) until the mixture is completely smooth and bright green. Strain through a fine-mesh sieve or cheesecloth. This process keeps the dill's chlorophyll intact and creates an intensely herbaceous oil that stays bright green instead of turning brown.
The technical principle: most herb oils turn brown because heat (either from prolonged blending or from cooking) damages the chlorophyll. The blanch-and-shock method deactivates the enzymes that cause browning while preserving the color compounds. You end up with an oil that looks as good as it tastes.
To plate: spread a thin layer of smoked yogurt across your serving plate, arrange your beet slices with deliberate spacing, then drizzle the dill oil in strategic dots or lines. Add a sprinkle of flaky sea salt. The composition should look almost architectural - precise, minimal, intentional.
The flavor combination works because you've created a progression through smoke, earth, acid (from the yogurt), and fresh herb aromatics. Each element has space to express itself instead of competing for attention.
The Archival Strategy:
Photography is critical here because Nordic plating is all about negative space and composition. Shoot from directly overhead if possible, using natural light. The goal is to capture the intentionality of your arrangement - how you positioned each element, the color contrast between red and golden beets, the precise drizzle pattern of the dill oil.
Your notes should document your smoke source if you're cold-smoking the yogurt. "Apple wood, 8 minutes" or "liquid smoke, 1/8 teaspoon per cup" makes a difference in reproducibility. Also note the yogurt fat content - full-fat (10% milkfat) creates a different texture and takes on smoke flavor differently than low-fat versions.
For the beets, record their size and cooking time. "Medium beets (about 3 inches diameter), 75 minutes at 400°F" gives you a baseline for scaling up or down next time.
Tag this as a plating reference, not just a recipe. The technique you've learned here - building flavor through cooking method rather than added ingredients, then presenting with intentional minimalism - applies to dozens of other vegetable preparations. This becomes a template for thinking, not just a single dish.
The North African Spice Route Dinner
North African cooking teaches you to build complex flavor through spice blending, preserve preparation, and the interplay between sweet and savory that Western cuisines often separate into distinct courses.
Let's focus on a Moroccan bastilla-inspired dinner because it forces you into territory that most Western home cooks never explore: phyllo dough construction, ras el hanout blending, and the strategic use of preserved lemons as a primary flavoring agent rather than a garnish.
Start with your spice blend because this is where North African cooking either succeeds or fails. Ras el hanout literally translates to "head of the shop," meaning the shopkeeper's best spice blend. There's no single definitive recipe - each vendor creates their own formula. But certain elements remain constant: warm spices (cinnamon, nutmeg, ginger), floral notes (rose petals, lavender), and heat (black pepper, sometimes chile).
A functional home version: 1 tablespoon each of ground cinnamon, ground ginger, ground coriander, and ground cumin. 2 teaspoons each of ground black pepper and sweet paprika. 1 teaspoon each of ground cardamom, ground nutmeg, and ground turmeric. Half a teaspoon each of ground allspice and cayenne. Mix thoroughly and store in an airtight container.
The technical detail that separates amateur from accomplished: toast your whole spices before grinding them. Buy coriander seeds, cumin seeds, and cardamom pods. Toast them in a dry skillet over medium heat until fragrant (2-3 minutes), then grind them in a spice grinder or mortar and pestle. The pre-ground stuff you buy at the supermarket has been sitting on shelves losing volatile aromatic compounds. Freshly toasted and ground spices have exponentially more flavor.
Your protein here is duck legs, which you'll braise slowly with onions, saffron, and your ras el hanout blend. Brown the duck legs first (skin side down, medium-high heat, 6-8 minutes) to render the fat and crisp the skin. Remove them and cook sliced onions in the rendered duck fat until they're deeply caramelized - this takes 20-25 minutes and you can't rush it.
Add your ras el hanout (2-3 tablespoons for four duck legs) and cook for another minute to bloom the spices in the fat. This step is non-negotiable. Raw spices taste harsh and dusty. Spices cooked in fat become aromatic and complex as heat releases their volatile compounds into the lipids.
Return your duck legs to the pot, add chicken stock and a generous pinch of saffron threads (real saffron, not turmeric-based "saffron substitute"), and braise covered at 325°F for 90-120 minutes until the meat pulls easily from the bone. The saffron provides an earthy, slightly metallic note that complements the warm spices without overwhelming them.
When your duck is done, shred the meat (discard the bones and most of the skin) and mix it with the reduced braising liquid. This becomes your filling.
The bastilla construction requires phyllo dough, which intimidates most home cooks unnecessarily. Yes, phyllo tears easily. Yes, it dries out quickly. But it's also remarkably forgiving if you work methodically. Keep your unused phyllo covered with a damp towel. Brush each sheet lightly with melted butter (or in this case, some of your reserved duck fat). Layer 4-5 sheets, turning each one slightly so the edges don't line up perfectly.
Place your duck mixture in the center, add a handful of toasted almonds and a spoonful of preserved lemon (more on this in a moment), then fold the phyllo edges up and over, creating a sealed packet. Brush the outside with more fat, then bake at 375°F for 25-30 minutes until golden brown.
The preserved lemon element deserves its own discussion because it's one of the most underutilized ingredients in Western cooking. You can't substitute fresh lemon - they're completely different ingredients. Preserved lemons have a soft, jammy texture and an intensely concentrated citrus flavor with none of the harsh acidity of fresh juice.
Making preserved lemons takes about three weeks but requires minimal effort. Quarter lemons lengthwise (leaving them attached at one end), pack them generously with salt, stuff them into a jar, and add fresh lemon juice to cover. That's it. After three weeks at room temperature, the rinds will soften and develop that characteristic fermented citrus flavor. You use only the rind, not the flesh, chopped fine.
In your bastilla, the preserved lemon provides a sharp, fermented brightness that cuts through the rich duck and warm spices. It's functioning as acid, salt, and aromatic all at once - this is why it's so effective in North African cuisine.
Serve your bastilla with a simple chopped salad of tomatoes, cucumbers, and red onion dressed with lemon juice and olive oil. The fresh vegetables provide textural contrast to the rich, flaky pastry.
The Archival Strategy:
Document your spice blend formula precisely, including the date you made it. Spices lose potency over time - ras el hanout you mixed today will taste different from the same formula mixed six months ago. When you revisit this recipe, you'll know whether to increase quantities based on spice age.
Photograph your phyllo layering technique. Shoot from the side so you can see how many layers you used and how thickly you brushed the fat. This visual reference will help you improve your technique over time.
Your notes should include your duck source and the braising liquid reduction level. "Duck legs from farmer's market, braised until liquid reduced by half" gives you better information than just following time and temperature.
Tag this with your preserved lemon batch. If you make preserved lemons regularly (you should - they last up to a year refrigerated after opening), tracking which batch you used helps you understand how age affects flavor. Younger preserved lemons taste sharper and more citrusy; older ones develop more complex, fermented notes.
The Archival System: Killing the Camera Roll Graveyard
Your culinary archive needs three components: structured photography, searchable metadata, and a retrieval system that actually works when you're standing in your kitchen wondering what to cook.
The camera roll graveyard exists because we treat food photos like snapshots instead of documentation. You take beautiful pictures of your meals, but without context, they're just pretty images. Six months later, you'll remember that the dish looked good but not what made it work, which ingredients you used, or what technique you applied.
The solution isn't to take more photos. It's to take the right photos in a structured sequence, then add enough metadata to make them searchable and useful.
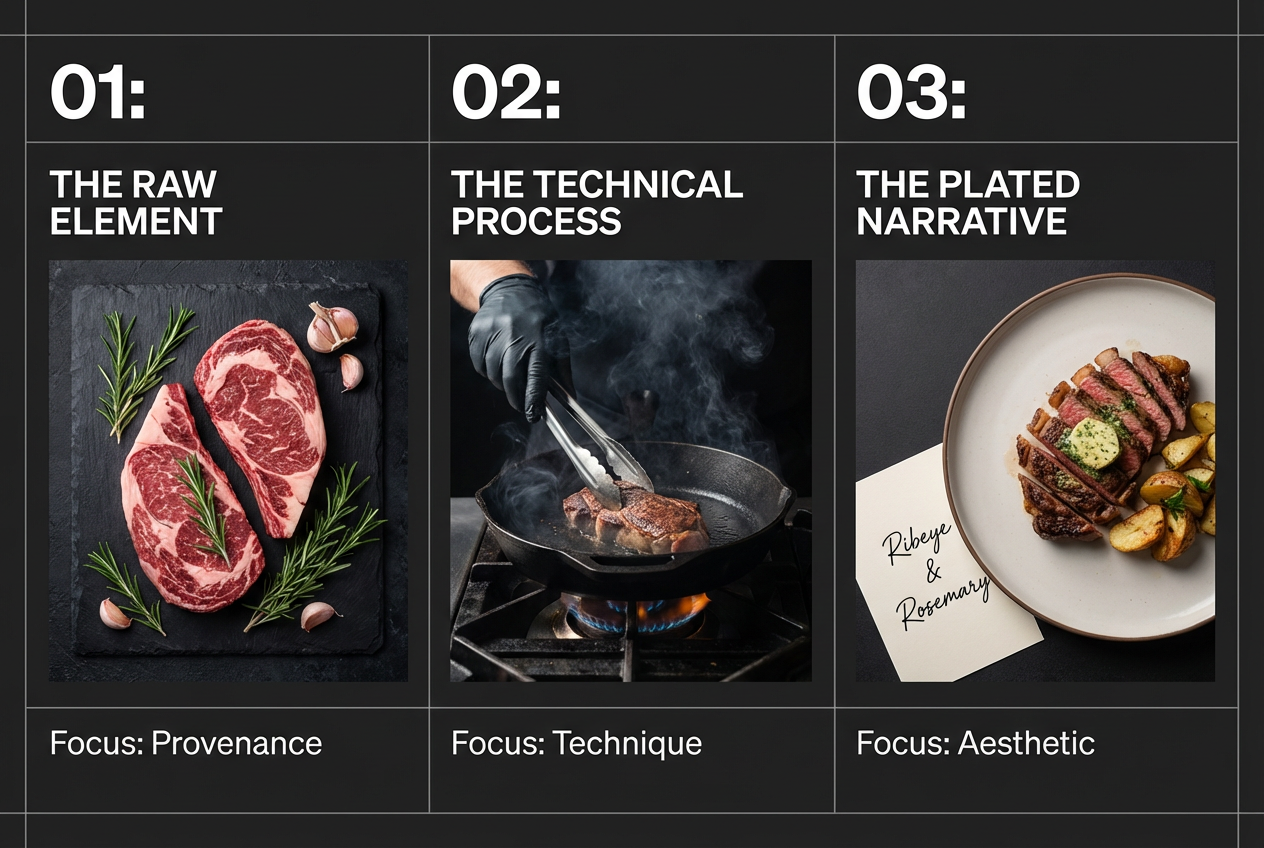
The 3-Photo Rule
For every meal worth documenting, take exactly three photos at specific stages:
Photo 1: The Raw Ingredient This captures your starting point - the quality and condition of your primary ingredients before any transformation. For the steak night, this means photographing your raw ribeye showing the marbling pattern and cut thickness. For the izakaya dinner, this might be your whole chicken thighs before scoring and salting.
Why this matters: when you're troubleshooting a recipe months later, knowing your exact starting ingredients helps you diagnose what went wrong or right. "The steak didn't brown well" could be because it was too wet, too cold, or cut too thin - your raw ingredient photo will tell you which.
Technical specs: shoot in natural light if possible, use a neutral background, include something for scale (a ruler, a coin, or just your hand). You're creating a reference document, not art.
Photo 2: The Process This captures your technique in action - the moment where transformation is happening. For the osso buco, this might be your soffritto at the sweated stage or your wine reduction at the right consistency. For the Nordic beets, this could be the salt crust before you crack it open.
Why this matters: recipes tell you what to do, but photos show you what success looks like. "Cook until the onions are translucent" means different things to different people. A photo of your translucent onions creates a visual standard you can reference.
Technical specs: get close enough to capture detail. If you're shooting a pan on the stove, shoot from a slight angle so you can see both the surface texture and the pan's contents. Don't worry about composition - clarity matters more than beauty.
Photo 3: The Plated Result This captures your final presentation, including plating decisions, garnishes, and overall composition. This is the photo that actually looks good, but it's meaningful only in context with the first two.
Why this matters: your plating evolves over time. Comparing your plated results across multiple attempts of the same dish shows you how your presentation skills improve and helps you remember which garnishes or arrangements worked best.
Technical specs: shoot from slightly above, use natural light if you can, pay attention to negative space. Unlike the first two photos, this one benefits from compositional thought. Consider reading about how to document meals with proper photographic technique if you're serious about building an archive.
 Mastering the 3-Photo Rule ensures your culinary creations are preserved with the same technical detail and aesthetic care used to create them.
Three photos create a narrative arc: what you started with, how you transformed it, and what you ended up with. This structure works for any meal complexity level and takes less than two minutes to execute.
App Recommendations: Beli vs. Notion vs. Dedicated Food Tracking
Your archival system needs to match your organizational style and retrieval needs. There's no universal solution, but three distinct approaches work well:
Beli: For the Social Archivist Beli positions itself as a social dining journal - you track restaurants you've visited, dishes you've loved, and share recommendations with friends. It works well if your cooking inspiration comes from restaurant meals you want to recreate.
The strength: Beli automatically captures restaurant metadata (location, date, who you ate with) and lets you rate individual dishes, not just overall meals. If you're using the izakaya dinner concept because you loved a similar meal at an actual izakaya, Beli helps you maintain that connection.
The limitation: it's designed primarily for restaurant tracking. Home cooking exists as a secondary feature. If you cook more than you dine out, Beli might not be your primary tool.
Notion: For the Deep-Form Archivist Notion is a blank slate that you structure yourself. Create a database with fields for recipe name, cuisine type, main protein, key techniques, cooking time, date made, rating, notes, and photos. The advantage is complete customization - you decide which metadata matters.
The strength: unlimited flexibility and the ability to create complex relational databases. You can link your preserved lemon batch notes to every recipe that uses preserved lemons, or create filtered views showing only braised dishes or only meals that took over two hours.
The limitation: requires significant setup time and ongoing discipline. If you're not naturally systematic, Notion's flexibility becomes overwhelming rather than liberating.
Dedicated Food Review Apps Purpose-built apps like Savorsync or other specialized restaurant tracking platforms bridge the gap between Beli's restaurant focus and Notion's blank-slate complexity. They're designed specifically for people who want to track both restaurant meals and home cooking in a structured but not overly complicated format.
The strength: pre-built structures that work out of the box while still allowing customization. Most include built-in photo storage, tagging systems, and search functions designed specifically for food.
The limitation: less flexibility than Notion but more structured than Beli. You're working within someone else's organizational framework.
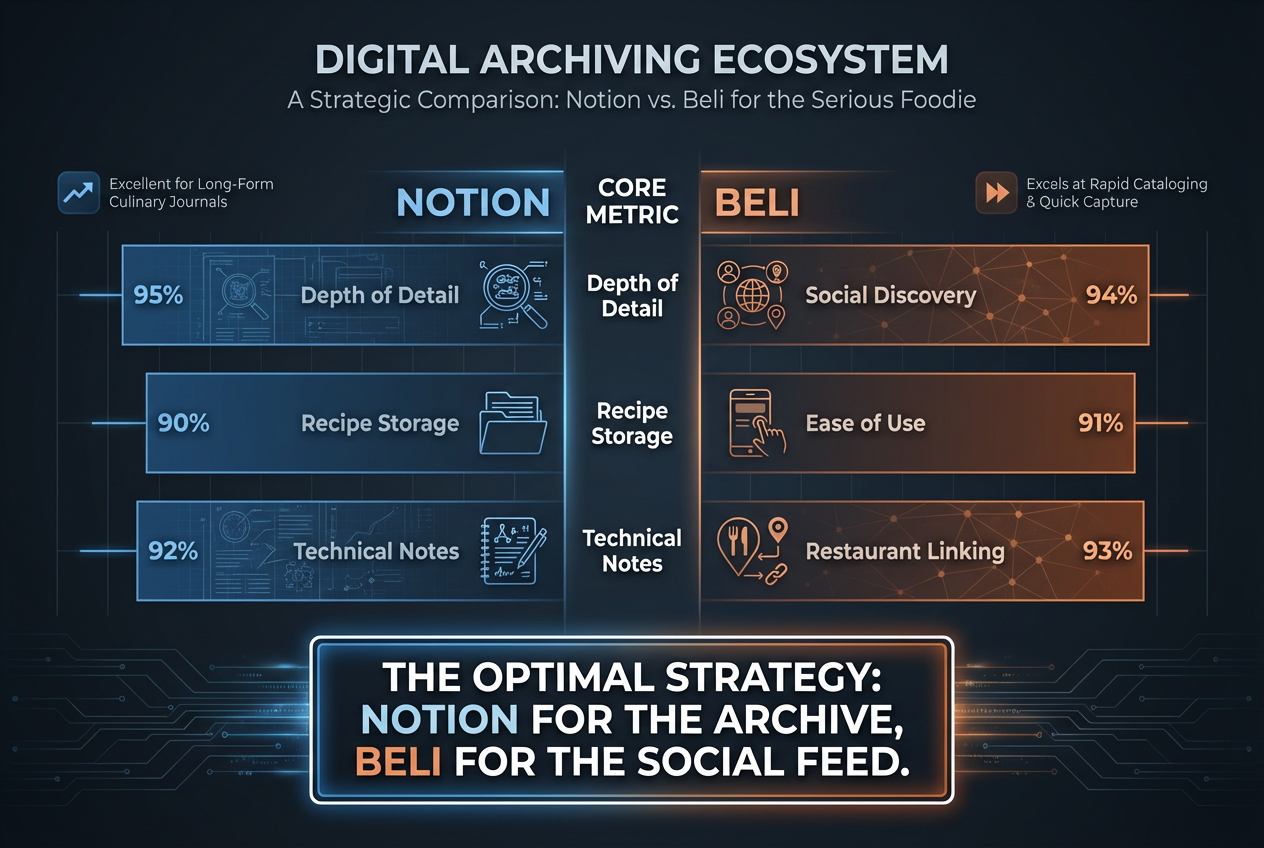 Choosing the right digital tool depends on whether you prioritize deep-form technical journaling or rapid social sharing of your gastronomic journey.
Metadata That Actually Matters
Regardless of which platform you choose, certain metadata fields are non-negotiable for serious food archiving:
Date and Season Not just when you made the dish, but what season. The osso buco you make in January with winter vegetables tastes different from August's version. Tracking seasonality helps you understand why a dish worked in one context but not another.
Primary Ingredients with Sources "Chicken thighs" tells you nothing. "Organic chicken thighs from Murray's, approximately 6 oz each" gives you reproducible information. If that dish turns out great, you know where to source the same quality. If it fails, you can troubleshoot whether the ingredient was the problem.
Key Techniques Don't write "braised" - write "braised at 325°F for 2 hours, liquid reduced by half." The specificity lets you replicate successes and diagnose failures.
What Worked / What Didn't This is your actual learning document. "The beurre rouge broke because I added the butter too quickly and the emulsion couldn't form" teaches you something useful. "Good!" tells you nothing.
Who You Served It To (If Relevant) If you're cooking to entertain, tracking your audience helps you remember what worked for different groups. That Moroccan bastilla might have been perfect for your adventurous foodie friends but too unfamiliar for your parents.
Related Meals or Restaurants If your izakaya dinner was inspired by a specific restaurant, link it. If it's part of a larger "Japanese cooking" project, tag it that way. These connections create context and help you understand your culinary trajectory.
The Weekly Review System
Archives only work if you maintain them. Set a weekly calendar reminder to spend 15-20 minutes reviewing the meals you cooked that week. Add any photos you took but haven't uploaded yet. Fill in missing notes while the details are still fresh. Adjust your ratings if you've had time to reflect on what worked.
This weekly maintenance prevents the archive from becoming another abandoned project. The discipline is similar to expense tracking or workout logging - consistency matters more than perfection.
If you're looking for guidance on structuring your food documentation system, study how professional chefs maintain recipe databases. They don't just save recipes - they save detailed production notes, yield calculations, and adaptation records. Your home archive should aim for the same level of rigor, just at a smaller scale.
Frequently Asked Questions
What makes these dinner ideas different from typical weeknight recipes?
These concepts prioritize technique mastery and cultural authenticity over convenience. While a typical weeknight recipe focuses on getting dinner on the table quickly, these ideas teach you fundamental skills - braising, spice blending, proper searing - that apply across dozens of future meals. They also come with built-in archival systems so you actually remember what you learned. The time investment is higher, but you're building permanent culinary knowledge rather than just feeding yourself tonight.
How do I choose between Beli and Notion for tracking my meals?
Choose based on your primary use case. If you dine out frequently and want to recreate restaurant meals at home, Beli's restaurant-first approach makes sense. If you cook more than you eat out and want complete control over how you organize your culinary data, Notion's flexibility is worth the setup investment. Most serious food archivists end up using both - Beli for restaurant discovery and Notion for detailed home cooking documentation. You can also explore comprehensive food tracking platforms that combine both functionalities.
Can I use regular lemons instead of preserved lemons in North African cooking?
No. Preserved lemons and fresh lemons are fundamentally different ingredients, like comparing sun-dried tomatoes to fresh tomatoes. The preservation process creates a soft, jammy texture and concentrated citrus flavor with fermented complexity that fresh lemon can't replicate. If you don't have preserved lemons, omit them entirely rather than substituting fresh lemon, which will make the dish too acidic and miss the fermented notes that define North African flavors. Making preserved lemons takes three weeks but requires almost no active work.
What's the minimum equipment needed for these elevated dinner concepts?
You need a heavy-bottomed pot or Dutch oven for braising, a cast-iron skillet for high-heat searing, a reliable oven thermometer (most ovens run 25°F hotter or cooler than their display), a probe thermometer for checking meat temperatures, and basic knife skills. The Nordic beet dish is the only one requiring specialized equipment if you want to cold-smoke the yogurt, but you can skip the smoking step or fake it with a tiny amount of liquid smoke. None of these recipes require sous vide circulators, stand mixers, or other expensive single-purpose tools.
How do I prevent phyllo dough from drying out while I work with it?
Keep unused phyllo sheets covered with a damp (not wet) kitchen towel at all times. Work quickly but methodically - lay out one sheet, brush with fat, add the next sheet, repeat. The butter or duck fat you're brushing on creates a moisture barrier that prevents additional drying. If a sheet tears, don't panic - layer another sheet over it. Phyllo is forgiving because you're using multiple layers, so individual tears disappear in the final structure. The common mistake is leaving sheets exposed to air while you prepare your filling. Get your filling ready first, then unwrap the phyllo and work continuously until you've assembled your bastilla.
Should I follow these recipes exactly or adapt them to my preferences?
Start by following them closely at least once to understand the core techniques and flavor profiles. The soffritto timing, the reverse-sear temperatures, and the phyllo layering method are techniques that work for specific reasons - changing them randomly often leads to worse results. But once you've executed the recipe as written and understand why each step exists, adaptation becomes productive rather than random. If you know why the osso buco braises at 325°F for two hours, you can intelligently adjust time and temperature for different cuts of meat. Learning the rules before breaking them is how you develop genuine culinary expertise.
How long do these elevated dinners actually take to prepare?
The izakaya table takes about 90 minutes start to finish - mostly active cooking time for multiple small dishes. The osso buco requires 3-3.5 hours but only 30 minutes of that is active work; the rest is unattended braising time. The bistro steak needs about 2 hours including the tempering and reverse-sear, but again, much of that is hands-off oven time. The Nordic beets take 2 hours total with the salt-baking, plus 20 minutes for the yogurt and dill oil. The bastilla is the most time-intensive at 3-4 hours when you include making the duck filling, but you can prepare the filling a day ahead. None of these are quick weeknight meals - they're weekend projects that reward the time investment with genuine skill development.
What if I can't find specific ingredients like saffron or dry-aged beef?
Ingredient quality directly impacts results, but some substitutions work better than others. For saffron, there's no good substitute - either use real saffron threads (expensive but a little goes a long way) or adjust the recipe to work without it. Turmeric isn't a replacement; it's a different spice entirely. For dry-aged beef, you can substitute high-quality Prime grade and use the refrigerator drying method mentioned in the steak section - it won't replicate true dry-aging, but it improves crust formation significantly. For duck legs, chicken thighs work with the bastilla recipe, though you lose the rich, gamy flavor. The key is understanding what each ingredient contributes so you can make informed decisions rather than random swaps. Sometimes it's better to wait until you can source the right ingredient than to forge ahead with poor substitutes.