
How to Build a Dinner OS to Organize Your Culinary Inspiration
John the smoothie monster
John lives for smoothie bowls and cold-pressed juices. He uses Savor to remember his best blends.
The Serious Foodie's Dinner OS: How to Curate, Index, and Re-create Your Favorite Culinary Moments You're standing in your kitchen at 6:47 PM, phone in hand,...
The Serious Foodie's Dinner OS: How to Curate, Index, and Re-create Your Favorite Culinary Moments
You're standing in your kitchen at 6:47 PM, phone in hand, scrolling through 3,472 photos of food. You know you took a picture of that incredible duck confit you had in Montreal last spring - the one with the technique you wanted to replicate - but finding it feels like archaeology. The memory is there. The photo is somewhere. The details? Gone.
This is the curation crisis.
For those who treat dining as high culture - who eat out 3-4 times per week, who recognize the difference between a proper Maillard reaction and a mediocre sear, who've mentally cataloged the world's great kitchens - dinner isn't just sustenance. It's a lifestyle. Yet we have no system for managing it. We photograph obsessively, we save links religiously, we scribble notes on napkins, and then we lose everything to the chaos of the unsearchable camera roll.
The problem isn't that you lack dinner ideas. The problem is that you've accumulated hundreds of them, and they're trapped in a digital filing cabinet with no index.
This guide is your blueprint for building what every serious foodie needs: a Dinner OS. Not just a collection of recipes, but a complete operating system for your culinary life - one that transforms scattered inspirations into a searchable, repeatable, deeply personal database of the meals that matter to you.
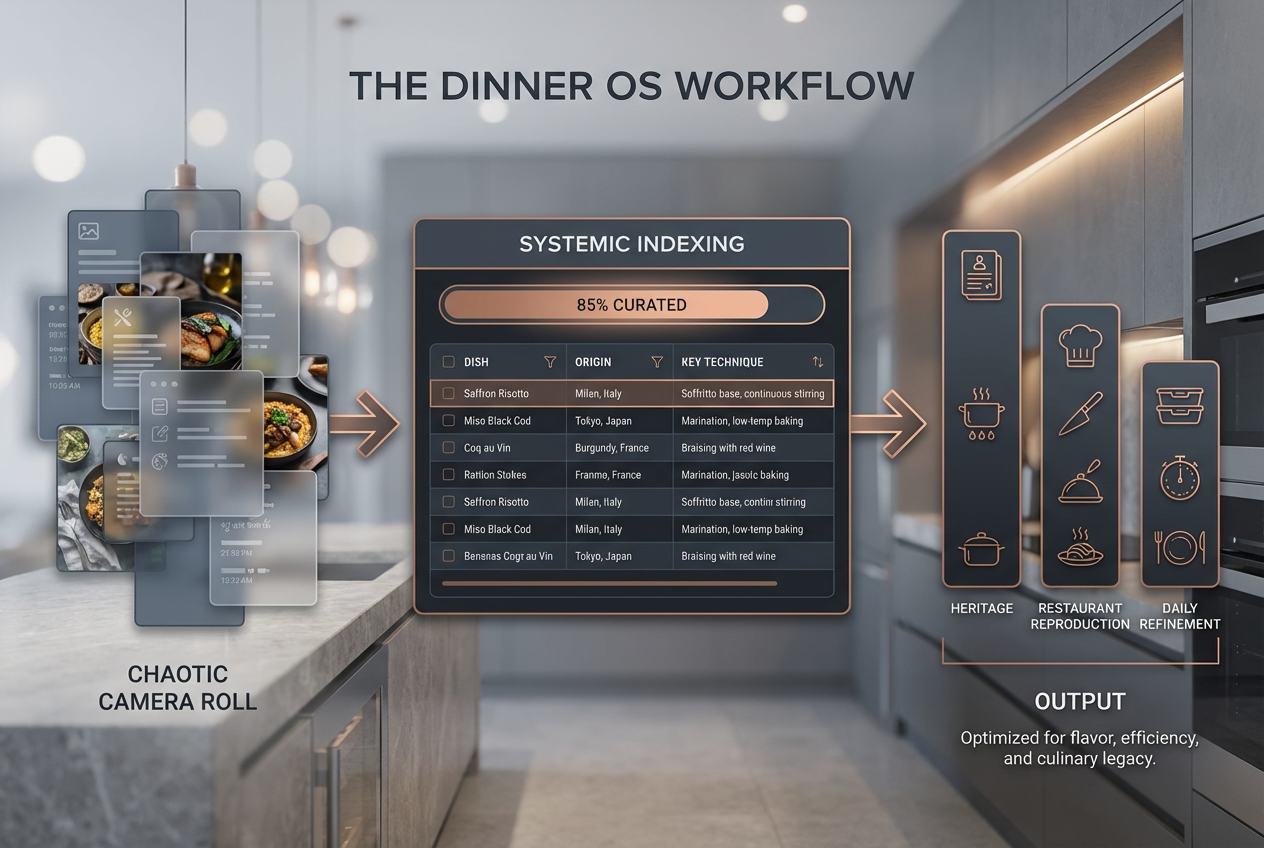
Table of Contents
- The Curation Crisis: Why Your Food Life Needs a System
- The Reverse-Engineered Dinner: 5 Restaurant Techniques Worth Mastering
- The Heritage Pivot: Discovery Meals with Deep Cultural Stories
- Technical Deep-Dive: The 5 Tools that Separate Home Cooks from Chefs
- The Digital Pantry System: Building Your Personal Culinary Database
- Execution: Turning Archived Ideas into Tonight's Dinner
- Frequently Asked Questions
The Curation Crisis: Why Your Food Life Needs a System
You're drowning in content but starving for organization. The solution isn't better bookmarking - it's treating your culinary discoveries like the valuable cultural data they actually are.
Let's talk about what happens when you don't have a system. You go to Copenhagen, you eat at three incredible restaurants, you photograph everything, you take mental notes. Six months later, someone asks where they should eat when they visit, and you can recall the general vibe but not the specific dish names. You remember that one place had an incredible way of preparing root vegetables, but was it the celeriac or the parsnip? What was the glaze?
The average dedicated food lover has between 800 and 2,000 food photos on their phone. That's not a collection - that's a landfill. Without metadata, without tags, without any organizational logic, those photos are functionally useless the moment you scroll past them.
Here's what the crisis looks like in practice:
You want to cook something special for a Saturday dinner party. You know you've saved dozens of ideas that would be perfect. But accessing them requires:
- Scrolling through months of camera roll
- Checking three different recipe apps where you've bookmarked things
- Searching your email for that newsletter with the technique you wanted to try
- Looking through screenshots you took of Instagram posts
- Remembering which of your 47 open browser tabs has that Serious Eats article
By the time you've done all that, you're exhausted and you order takeout.
The 2026 food landscape has made this worse, not better. We have more content than ever - food blogs, YouTube channels, TikTok tutorials, restaurant-quality recipes published by chefs, heritage cooking projects documenting disappearing techniques. But we have no infrastructure for managing our relationship to all of it.
This is where the concept of a Dinner OS becomes essential. An operating system isn't just storage - it's an interface between you and your data that makes retrieval intuitive. Your current system (if we can even call it that) requires you to remember when and where you encountered an idea. A proper OS lets you search by what actually matters: cuisine type, technique, ingredient, occasion, cooking time, or any other variable relevant to how you actually think about food.
Think about how Spotify changed music consumption. You didn't need to remember which album a song was on or when you first heard it. You could search by mood, by genre, by era, by artist. Your food life deserves the same treatment.
The best time to start building your Dinner OS was three years ago. The second-best time is right now, before you lose the memory of that perfect bistro meal from last Tuesday.
The Reverse-Engineered Dinner: 5 Restaurant Techniques Worth Mastering
These aren't just recipes - they're the specific technical insights that make iconic restaurant dishes memorable. Master these five techniques and you'll understand the architecture of great cooking.
Rao's Meatball: The Secret of Hydration
Rao's in East Harlem has guarded its meatball recipe for over a century, but the real "Genius" element isn't mystery ingredients - it's understanding moisture. The best restaurant meatballs maintain an almost impossible tenderness because they're built around a panade (a mixture of milk and bread) that keeps the protein structure loose even through aggressive browning.
The Technique:
- Ratio matters: 1 part torn white bread to 1 part whole milk, allowed to soak until completely sodden
- Work the panade into your meat mixture gently - aggressive mixing develops gluten and creates bounce instead of tenderness
- The Maillard reaction develops best at the surface when the interior stays moist, creating that contrast between the crusty exterior and the almost creamy center
Why It Works: When ground meat cooks, proteins contract and squeeze out moisture. The panade acts as a moisture reservoir that slow-releases liquid during cooking, preventing the tight, dry texture that plagues most home-cooked meatballs. You're essentially creating a controlled emulsion inside the meatball itself.
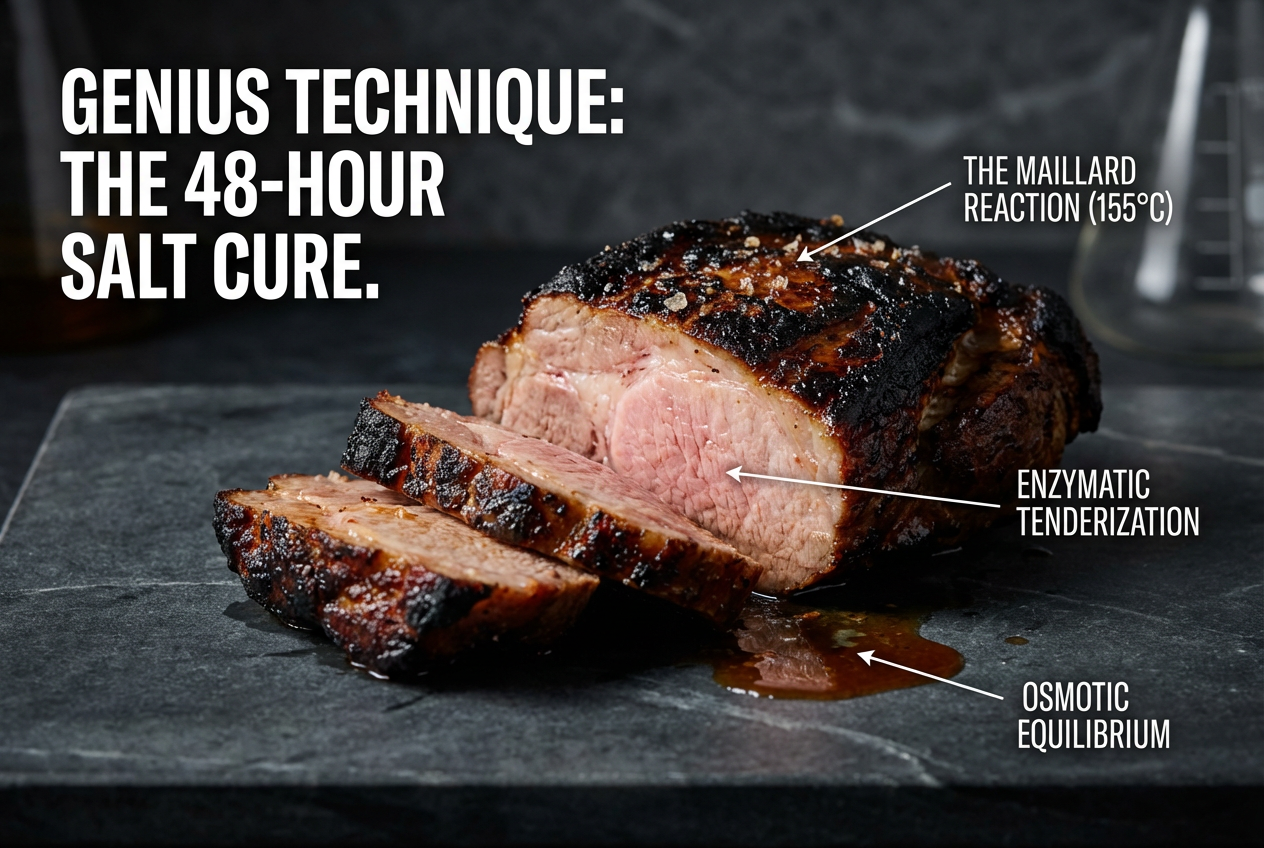
Momofuku Bo Ssäm: The Science of the Salt Cure
David Chang's Bo Ssäm became legendary not because pork shoulder is complicated, but because the technique illustrates a fundamental principle that professional kitchens understand instinctively: salt is a texture modifier, not just a flavor enhancer.
The Technique:
- Cover the entire pork shoulder in a thick layer of white sugar and salt (1 cup sugar, 1⁄2 cup kosher salt)
- Let it cure in the refrigerator for at least 6 hours, preferably overnight
- Rinse thoroughly before roasting low and slow (275°F for 6 hours)
Why It Works: The salt penetrates the meat through osmosis, beginning to break down protein structures before heat is ever applied. This pre-tenderization means the muscle fibers offer less resistance during cooking. The sugar balances the salt while encouraging deeper caramelization. The result is pork that pulls apart in thick, juicy shards rather than drying into strings.
Professional kitchens salt everything in advance. Home cooks salt right before cooking. That timing difference accounts for half the textural superiority you taste in restaurants.
Zuni Cafe Roast Chicken: The Dry Brine Revolution
Judy Rodgers' roast chicken recipe changed how serious home cooks think about poultry. The technique is deceptively simple: salt the bird heavily, leave it uncovered in the refrigerator for 1-3 days, then roast it in a preheated skillet at high heat.
The Technique:
- Pat the chicken completely dry, inside and out
- Salt liberally (about 3⁄4 teaspoon per pound) both inside the cavity and under the skin
- Place uncovered on a rack in your refrigerator for 1-3 days
- Roast at 475°F, starting breast-side up, in a preheated cast-iron or heavy roasting pan
Why It Works: Three mechanisms are working here. First, the salt penetrates the meat over time, seasoning it throughout rather than just at the surface. Second, the refrigerator's low humidity environment dries the skin, which is crucial - you cannot crisp wet skin, no matter how hot your oven. Third, the extended exposure to salt begins breaking down proteins in the breast meat, making it more tender and able to withstand higher heat without drying out.
The result is skin that shatters like glass and meat that's seasoned all the way through, not just on the surface.
Thomas Keller's Confit Byaldi: Precision Over Intuition
Keller's take on ratatouille (featured in the film Ratatouille) isn't actually more difficult than the traditional rustic version - it's more precise. The dish illustrates how professional cooking often means replacing "cook until done" with specific temperatures and times.
The Technique:
- Mandoline all vegetables (zucchini, yellow squash, eggplant, tomato) to exactly 1⁄16-inch thickness
- Layer them in an alternating pattern in a baking dish lined with piperade (a cooked pepper-tomato base)
- Season each layer individually as you build
- Cover with parchment, bake at 275°F for exactly 2 hours
Why It Works: The uniform thickness means every vegetable slice cooks at the same rate. The low temperature prevents any single element from breaking down before the others are tender. The individual seasoning of each layer ensures proper salt distribution without the need for a final adjustment that might disturb the visual presentation.
This is how restaurants think: breaking a dish into its component variables and controlling each one independently.
The French Laundry Butter-Poached Lobster: Temperature as a Variable
Most home cooks think of temperature as binary: on or off, hot or not hot. Professional kitchens understand that specific temperatures produce specific textures, especially with delicate proteins like lobster.
The Technique:
- Remove raw lobster tail meat from the shell
- Heat butter in a small pot to exactly 140-145°F (use a thermometer - this is non-negotiable)
- Submerge the lobster tail in the butter, maintaining temperature for 15-20 minutes
- The lobster will turn opaque but remain tender
Why It Works: Lobster protein begins to contract around 130°F and becomes fully opaque around 140°F. Above 145°F, it rapidly becomes tough and rubbery. By maintaining a precise temperature in the butter bath, you're holding the lobster in that narrow window where it's cooked through but hasn't yet toughened. The butter also bastes the meat continuously, adding richness while providing even heat distribution.
This is the same principle behind sous vide cooking, but it's been used in professional kitchens for decades - control the temperature, control the texture.
These five techniques aren't about copying specific recipes. They're about understanding the why behind restaurant-quality results. Once you know that moisture control, time, temperature precision, and salt timing are the actual variables that matter, you stop being dependent on following instructions and start being able to adapt techniques to any ingredient.
If you want to track which techniques you've mastered and which dishes successfully applied them, having a proper dish rating app becomes invaluable for building that technical knowledge base over time.
The Heritage Pivot: Discovery Meals with Deep Cultural Stories
Heritage cooking is experiencing a renaissance among serious food lovers because these dishes offer what restaurant dining often can't: a direct connection to cultural memory and culinary lineage.
The most interesting dinner party you'll throw this year won't be the one where you successfully replicate a trendy restaurant dish. It'll be the one where you serve something nobody's heard of - a regional specialty with a story so specific it couldn't exist anywhere else.
This is the Heritage Pivot: moving from "what's the best recipe for chicken" to "what's the story behind Shorabet Adas, and why does this specific lentil soup define home cooking across the Levant?"
Shorabet Adas: The Soup That Defines Home
Across Lebanon, Syria, Jordan, and Palestine, lentil soup isn't just a dish - it's the baseline. It's what mothers make when their children are sick, what gets served as a first course at major gatherings, what you crave when you're far from home.
But the specific formula varies block by block: some versions add cumin and coriander, others rely solely on lemon. Some are pureed smooth, others leave the lentils whole. Some finish with fried onions and a drizzle of olive oil, others with fresh herbs.
What Makes It Heritage: This isn't a recipe someone invented. It's the accumulated result of thousands of cooks making incremental adjustments based on what was available, what their families preferred, what the season provided. You're not cooking a dish - you're participating in an ongoing conversation that stretches back centuries.
Szegediner Gulasch: The Austro-Hungarian Border Soup
This paprika-heavy pork and sauerkraut stew exists because of a border. During the Austro-Hungarian Empire, ingredients and techniques mixed at the crossroads of German sauerkraut tradition and Hungarian paprika culture. The result is a dish that tastes like empire - rich, complex, a little chaotic, unmistakably marked by the collision of two culinary worlds.
The Technique Lesson: The stew teaches you how to think about fat. The pork is browned to render fat, which then becomes the medium for blooming the paprika (a fat-soluble spice that needs oil to release its full flavor). The sauerkraut adds acid that cuts through the richness while its brine seasons the broth. You're managing multiple layers of flavor development, and the order of operations matters completely.
Khachapuri: The Georgian Cheese Boat
Georgia (the country, not the state) has been making this dish - a flatbread boat filled with molten cheese, topped with an egg and a pat of butter - for as long as anyone can remember. It's street food, it's comfort food, it's hangover food, it's celebration food.
Why It Matters: Khachapuri illustrates that "heritage" doesn't mean precious or difficult. Sometimes the most culturally significant dishes are the ones people eat constantly, without ceremony. The technique is straightforward (enriched bread dough, stretched thin, filled with a specific blend of Georgian cheeses), but the feeling of it - tearing off pieces of bread to drag through that molten center - is irreplaceable.
Tourtière: French-Canadian Identity on a Plate
This spiced meat pie shows up across Quebec during the holidays, but the specific combination of pork, beef, and warming spices (cinnamon, cloves, allspice) tells the story of French colonists adapting to a harsh climate with limited ingredients.
The Cultural Context: Every family has their version. Some add potatoes to extend the meat, some use wild game instead of domestic pork, some make it in a shallow pie plate while others use a deep dish. The variations aren't about better or worse - they're about which branch of which family in which part of Quebec you're connected to.
When you make tourtière, you're making a choice about which tradition to honor. That's the difference between heritage cooking and just following a recipe.
Plov (Uzbek Style): Rice as Architecture
Central Asian plov (or pilaf, or palov - the spelling varies by region) is a one-pot rice dish built in layers: lamb, onions, carrots, all cooked in mutton fat, with the rice steamed on top. But calling it "rice with meat" misses the point entirely.
The Technique: The proper method involves creating distinct layers that cook together but don't mix until serving. The meat and vegetables form a base that flavors the rice from below, but the rice itself steams in the vapor without touching the liquid directly. The result is grains that are separate and fluffy, not mushy.
This is architecture. You're building a structure where each component has a specific role, and the final dish only works if you've respected the engineering.
Why Heritage Cooking Matters Now
The 2026 resurgence in heritage cooking among serious food lovers isn't nostalgia - it's a reaction against the homogenization of restaurant dining. When every city has the same omakase experience, the same natural wine bar, the same new Nordic-influenced tasting menu, the real discoveries happen in the margins: the dishes that never made it to restaurants because they're too specific, too regional, too tied to someone's grandmother's kitchen.
These dishes also can't be optimized. There's no "hack" for Shorabet Adas that makes it faster or easier while maintaining what makes it significant. You have to engage with the process, with the story, with the specific combination of ingredients that defines it.
For a guide on tracking these culinary discoveries across different regions, check out our resource on the best dishes for foodies in Paris or explore London's best bites.
When you cook heritage dishes, you're not just making dinner - you're building a personal archive of disappearing knowledge. That's worth documenting properly.
Technical Deep-Dive: The 5 Tools that Separate Home Cooks from Chefs
Professional results require professional standards of precision. These five tools provide the measurements and control that make the difference between "pretty good" and restaurant quality.
Let's be clear: you don't need expensive equipment to cook well. But you do need accurate equipment. The gap between home cooking and professional cooking isn't talent - it's precision. Chefs don't eyeball temperatures or guess at weights. They measure, they control variables, they eliminate uncertainty.
These five tools are your minimum infrastructure for cooking at a serious level.
1. Digital Scale (0.1-gram precision)
Why It Matters: Volume measurements (cups, tablespoons) are wildly inconsistent. A cup of flour can weigh anywhere from 120 to 150 grams depending on how you scoop it, whether it's been sifted, how humid your kitchen is. That 30-gram variance is the difference between a cake that rises properly and one that's dense and gummy.
Professional kitchens work in grams because it's the only measurement that's truly reproducible. When a pastry chef says "240 grams of flour," that amount is exactly the same in Tokyo, Paris, or your kitchen.
What to Look For:
- Precision to at least 1 gram (0.1-gram precision for smaller quantities like salt and spices)
- Tare function to zero out the weight of your container
- Maximum capacity of at least 5 kilograms
The Real Impact: Once you start weighing ingredients, you'll notice that your results become consistent. The bread that worked perfectly last week works perfectly again this week because you've removed the variable of measurement error.
2. Instant-Read Thermometer (1-second read time)
Why It Matters: "Cook until done" is not an instruction - it's a guess. Chicken is safe at 165°F. A medium-rare steak is 130-135°F. Bread is done when the internal temperature hits 200-210°F. These aren't suggestions - they're the specific points at which proteins denature, starches gelatinize, and textures develop.
Professional cooks don't guess. They measure.
What to Look For:
- Read time under 2 seconds (Thermapen is the gold standard)
- Temperature range from -40°F to at least 450°F
- Waterproof (you'll be washing this constantly)
The Real Impact: You'll stop overcooking expensive proteins. Your chicken breasts will stay juicy because you'll pull them at 155°F (carryover cooking will take them to 165°F while they rest). Your roasts will be perfect because you've measured, not guessed.
3. Carbon Steel Pan (12-inch)
Why It Matters: Nonstick pans are fine for eggs. But for the Maillard reaction - that complex browning that creates deep, savory flavors - you need a pan that can handle high heat and develop a proper sear. Carbon steel is lighter than cast iron, heats more evenly, and when properly seasoned, becomes nearly as nonstick.
What to Look For:
- 12-inch diameter for maximum cooking surface
- 2mm thickness (thinner heats faster but has less thermal mass)
- Handle that's riveted, not welded
The Real Impact: Restaurant-quality sears on steaks, proper fond development for pan sauces, the ability to move directly from stovetop to a 500°F oven without worrying about handle melting or coating degrading. This is the pan you'll use for 70% of your serious cooking.
4. Microplane (Premium Zester)
Why It Matters: Grating garlic with a knife produces chunks. Grating it on a Microplane produces a paste. That textural difference completely changes how the garlic distributes through a dish and how aggressively its flavor comes forward.
The same principle applies to citrus zest (which contains potent aromatic oils you can't access any other way), hard cheeses (properly grated Parmesan melts evenly instead of clumping), and whole spices (fresh-grated nutmeg tastes nothing like the pre-ground powder in your cabinet).
What to Look For:
- Classic zester/grater (not the box grater style)
- Stainless steel blade
- Comfortable handle (you'll be gripping this hard)
The Real Impact: Your sauces will have better texture because aromatics are properly incorporated. Your finishing touches (lemon zest over pasta, fresh Parmesan over risotto) will taste more vibrant because you're releasing oils and flavors right before serving, not hours earlier.
5. Kitchen Timer with Multiple Channels
Why It Matters: Professional cooking is about managing multiple processes simultaneously. You've got pasta boiling (12 minutes), protein resting (10 minutes), sauce reducing (5 minutes), and vegetables roasting (25 minutes). You can't hold all those times in your head, and your phone's single timer isn't enough.
What to Look For:
- At least 3 independent channels you can run simultaneously
- Clear, loud alarm
- Magnetic back for mounting on oven hood or refrigerator
The Real Impact: Nothing overcooks because you forgot about it. Nothing sits too long while you're managing something else. You can orchestrate a multi-component meal because you've externalized the time-tracking.
The Investment Philosophy
These five tools represent a total investment of around $300-400 if you buy quality versions. That's less than two dinners at a good restaurant. They'll last 10-20 years with proper care.
More importantly, they change how you cook. You stop being tentative and start being precise. You stop hoping things work out and start knowing they will. That confidence is what separates home cooks who can occasionally produce a great meal from serious food lovers who can execute at a high level consistently.
For foodies looking to document how these tools improve their cooking outcomes, having a systematic way to track improvements is invaluable - learn more about tracking your meals effectively.
The Digital Pantry System: Building Your Personal Culinary Database
A searchable, tagged archive of every meal you've loved isn't just useful - it's the foundation of a more intentional food life. Here's how to build one that actually works.
Let's fix the fundamental problem: you have the data, but you don't have the infrastructure. Those 2,000 food photos on your phone aren't a database - they're raw material waiting to be processed.
A proper Digital Pantry System has three components:
- Capture: Getting information into the system
- Classification: Adding the metadata that makes retrieval possible
- Retrieval: Finding what you need when you need it
Most people handle capture brilliantly (you're already taking the photos) but fail completely at classification. Without tags, without structure, without any organizing logic, you're just creating a bigger pile of unsearchable data.
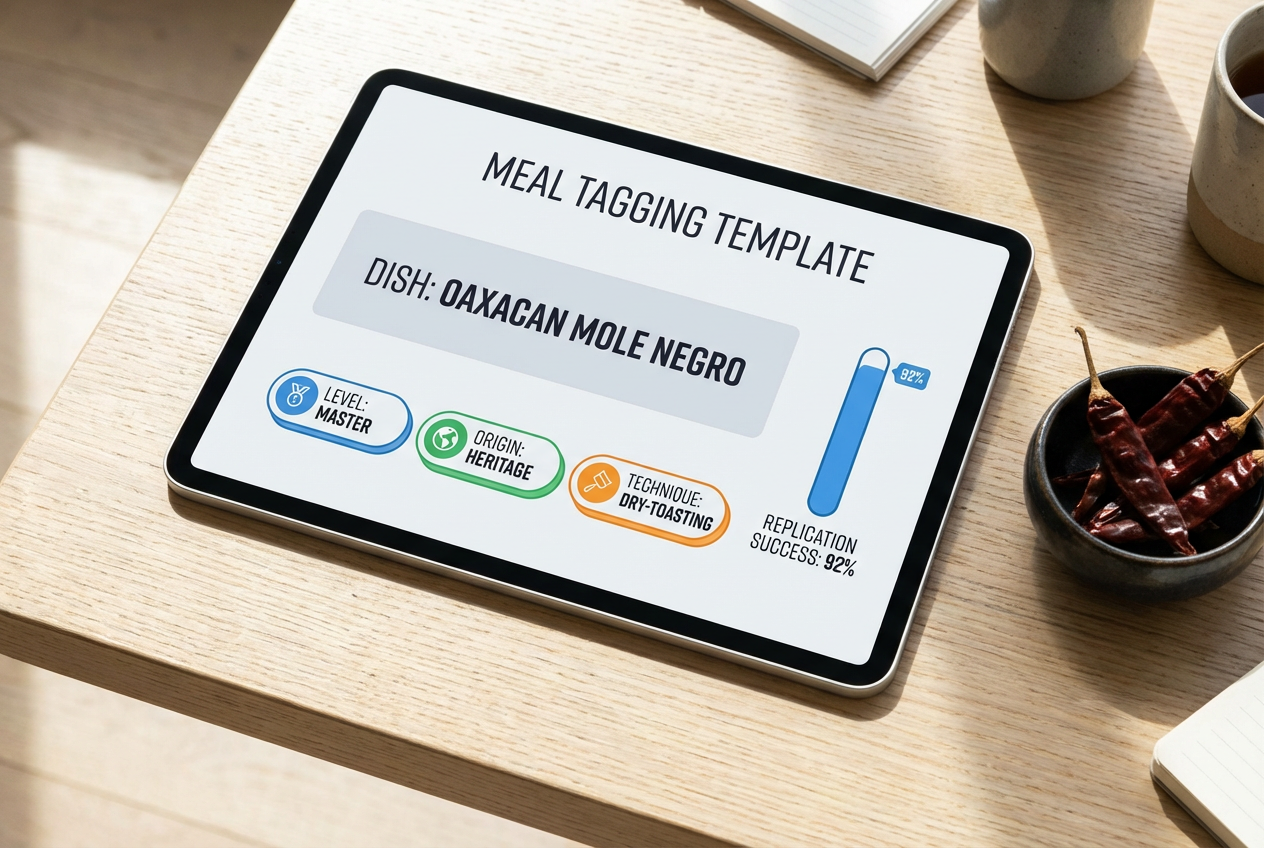
The Meal Tagging Template
This is your core structure. Every entry in your Digital Pantry should include these fields:
Essential Fields:
- Date/Time: When you ate it
- Location: Restaurant name or home kitchen
- Dish Name: What it's actually called
- Cuisine Type: Italian, Japanese, French-Vietnamese fusion, etc.
- Primary Ingredients: The 2-3 main components
- Technique: How it was prepared (grilled, braised, raw, fermented)
- Rating: Your personal 10-point score
- Price Point: Budget, mid-range, splurge
Optional But Valuable Fields:
- Occasion: Date night, solo dinner, business meal, celebration
- Replication Difficulty: Easy, moderate, challenging, requires special equipment
- Key Flavor Notes: What stood out (umami-forward, bright acid, funky fermentation)
- Would Order Again: Yes/No/Maybe
- Potential Pairings: What you drank with it, what you'd serve alongside it
The goal isn't to fill out every field for every meal - that's the path to abandonment. The goal is to have structure available so that when you eat something truly memorable, you can capture the details that will help you find it later or attempt to recreate it.
Platform Options for Your System
You need software that handles both photos and structured data. Here are your real options:
Specialized Food Apps: Savor is purpose-built for exactly this use case - dish-level tracking with photos, ratings, notes, and tags. It's designed for people who care about specific dishes rather than generic restaurant ratings. If you're serious about building a culinary archive, a dedicated tool beats trying to hack together something in a general-purpose app.
Notion: The most powerful DIY option. You can build a database with custom properties for every field mentioned above, attach photos, create filtered views (all pasta dishes rated 8+, all braised meat preparations, all date-night options under $30). The downside: you have to build and maintain the structure yourself.
Apple Notes + Advanced Tagging: If you're deep in the Apple ecosystem, you can use the tagging system in Notes. Create notes for each meal, add photos, then tag with relevant categories. It's simpler than Notion but less powerful for complex filtering.
Google Sheets + Google Photos: The spreadsheet approach. Create a row for each meal, fill in the data, add a link to the photo in Google Photos. Searchable, sortable, but requires discipline to maintain.
The best system is the one you'll actually use. If spreadsheets feel like work, don't use a spreadsheet. If Notion feels overwhelming, don't use Notion.
The 3-Tier Entry System
Not every meal deserves the full treatment. Here's how to allocate effort:
Tier 1 - Quick Capture (30 seconds):
- Photo
- Dish name
- Location
- Quick rating
Use this for everyday meals that were good but not revelatory. You're building a record, not writing a dissertation.
Tier 2 - Standard Entry (2-3 minutes):
- Everything from Tier 1
- Cuisine type
- Key ingredients
- Technique
- Brief notes on what worked
Use this for meals that were memorable enough that you might want to find them again or attempt to recreate them.
Tier 3 - Deep Archive (5-10 minutes):
- Everything from Tier 2
- Detailed flavor notes
- Specific technique observations
- Replication difficulty assessment
- Potential pairing ideas
- Multiple photos (plating, cross-section, table setting)
Reserve this for the meals that genuinely changed how you think about food. The dishes that make you want to understand every component. The experiences worth documenting in detail because you know you'll want to recreate or reference them later.
The mistake most people make is trying to do Tier 3 entries for everything. That's not sustainable. The trick is to recognize which tier a meal deserves and match your effort to that tier.
Making It Searchable
Tags are useless if you can't remember what tags you used. Here's a tagging strategy that actually works:
Cuisine Tags: Keep it simple. Italian, Japanese, French, Mexican, Chinese, Indian, Thai, Mediterranean, American, Fusion. Don't create a tag for "Northern Italian" and "Southern Italian" - just use Italian and add regional specifics in the notes if relevant.
Ingredient Tags: Focus on the primary protein or defining ingredient: Beef, Pork, Chicken, Fish, Shellfish, Pasta, Rice, Vegetables, Eggs. Going more granular (ribeye vs. strip steak) should happen in the dish name or notes, not in tags.
Technique Tags: This is where you build your culinary education: Grilled, Roasted, Braised, Fried, Raw, Cured, Fermented, Smoked, Sous Vide, Poached. These tags help you find examples when you're trying to learn a new technique.
Occasion Tags: Date Night, Solo, Group, Quick, Special Occasion, Weeknight. These help you filter for context - you don't want to accidentally try to recreate a 4-hour braise on a Tuesday night.
The key is consistency. If you use "Braised" sometimes and "Slow-Cooked" other times, your filtering breaks down. Pick your terms and stick to them.
The Weekly Review
Here's the habit that makes the system work: every Sunday, spend 15 minutes reviewing the week's meals. Add entries for anything you photographed but didn't tag yet. Make sure your ratings are recorded. Add any additional notes while the memory is fresh.
This weekly checkpoint prevents the backlog from becoming overwhelming. It's also when you notice patterns - did you eat out four times this week? Have you been defaulting to the same cuisine? Is there a technique you keep encountering that you should actually learn?
The Digital Pantry System isn't just about retrieval - it's about building self-awareness around your food life. What you track, you improve.
For food lovers traveling frequently who need to organize discoveries across cities, our guide on New York foodies and Los Angeles foodies offers city-specific strategies for tracking meals on the go.
Execution: Turning Archived Ideas into Tonight's Dinner
The best system in the world is worthless if you can't use it to actually decide what to cook. Here's how to bridge the gap between inspiration and execution.
It's Thursday at 5:30 PM. You need to make dinner. This is the moment your Dinner OS proves its value - or reveals that it's just another productivity system you've abandoned.
The transition from "archive" to "action" requires a different kind of thinking. You're not browsing anymore; you're filtering based on constraints.
The Constraint Framework
Every dinner decision involves at least three constraints:
Time Constraint: How much active cooking time do you have? A 4-hour braise can be mostly passive if you're home, but if you've got 45 minutes total, you need something that comes together fast.
Your Digital Pantry filter: Technique: Quick | Weeknight
Ingredient Constraint: What's in your kitchen right now, or what can you grab in one quick shop? You're not driving to three specialty stores on a weeknight.
Your Digital Pantry filter: Primary Ingredient: [whatever protein you have] | Replication Difficulty: Easy or Moderate
Energy Constraint: How much mental bandwidth do you have? New techniques require focus. Familiar dishes can run on autopilot.
Your Digital Pantry filter: Difficulty: Easy | Would Make Again: Yes
The beauty of a properly tagged system is that you can combine these filters. "Show me all pasta dishes I've rated 8+ that take under 30 minutes" becomes a simple query instead of a scroll through hundreds of photos hoping something catches your eye.
The 3-Source Strategy
For any given dinner, you're pulling from three sources:
Source 1: Your Greatest Hits These are the dishes you've made successfully before and know you can execute reliably. Filter your Digital Pantry for: Rating 8+, Replication: Easy or Moderate, Would Make Again: Yes.
Keep a separate list of your top 10-15 "confidence dishes" - the ones you could make in your sleep. These are your safety net.
Source 2: The Inspired Replication A restaurant dish you've archived with good notes and a clear technique. You're attempting to recreate a specific experience. Filter for: Detailed Notes, Replication: Moderate or Challenging, Technique: [whatever you want to practice].
These dinners are part cooking, part education. You're building skills while making dinner.
Source 3: The Improvisation You have ingredients, you have techniques from your archive, now you're combining them in a new way. This is where your Digital Pantry acts as a reference library - you're not following a specific entry, but you're pulling technique observations from multiple dishes.
Thursday weeknight? Source 1. Saturday with time? Source 2 or 3. Sunday meal prep? Could be any of them.
The Shopping Translation
Your Digital Pantry entries aren't recipes - they're inspiration with technical notes. Making the jump from "delicious duck breast with cherry gastrique" to "here's what I need to buy" requires one more step.
From Archive Entry to Shopping List:
- Identify the core components (protein, primary vegetable, sauce base)
- Check your notes for technique specifics (duck needs to be scored, gastrique requires red wine vinegar and fresh cherries)
- List the ingredients you definitely need vs. things you might have
- Add 1-2 simple side components that aren't the star but round out the meal
The mistake is trying to recreate every element exactly. The goal is to capture the essential technique and the overall flavor profile. If your notes say the restaurant used Amarena cherries but all you can find are Bing cherries, the dish will still work. The technique (reducing fruit with acid and sugar to create a glaze) is transferable.
The Weeknight Strategy
Monday through Thursday, you're not trying to replicate a Michelin-starred meal. You're looking for:
- 30-45 minutes total time
- Mostly familiar techniques
- Ingredients you can get at a regular grocery store
- One-pan or one-pot when possible
Your Digital Pantry becomes a filter, not a full archive: Filter for: Time: Quick, Difficulty: Easy, Cuisine: [whatever you're craving], Rating: 7+
Scroll through those 12-15 results. Pick the one that matches what you have in the fridge. Done. Dinner decision made in under 2 minutes.
The Weekend Project
Saturday or Sunday, you have time to actually cook. This is when the Heritage recipes or complex Restaurant Replications become possible.
Strategy:
- Filter your archive for: Replication: Challenging, Would Order Again: Yes
- Look for dishes where you took detailed technique notes
- Pick something that teaches you a new skill (maybe you've never butterflied a lamb leg, maybe you've never made pasta from scratch)
- Read through your notes, identify the 1-2 critical moments where technique matters most
- Prep everything in advance (mise en place isn't optional for complex dishes)
- Execute, photograph the result, add a new entry documenting how your version compared to the original
This is how serious home cooks get better. Not by taking classes, but by attempting to recreate the things that impressed them, learning from the gaps between their execution and the professional version, and iterating.
The Dinner Party Application
Your friends are coming over. You want to serve something impressive but not so complicated that you're stressed the entire time.
Your Digital Pantry filter:
- Rating: 9+
- Difficulty: Moderate (not Easy, not Challenging)
- Occasion: Group or Special Occasion
- Technique: [something you've practiced before]
You're looking for dishes that are impressive but within your skill range. The 9+ rating means it's memorable. The Moderate difficulty means you can execute it reliably. The technique filter ensures you're not attempting something brand new under pressure.
Pull up 3-4 options. Consider which one makes the best story (are you serving a Heritage dish with a compelling backstory? Is this a Restaurant Replication where you can explain the technique?). Make your choice, shop accordingly, execute with confidence because you've made similar dishes before.
The Feedback Loop
After you cook from your archive, add a new entry:
- Tag it as "Home Replication"
- Note what worked and what didn't
- Rate your version honestly
- Add technical notes for next time
This turns your Digital Pantry into a living document. The same dish might appear three times: the original restaurant version (rated 10), your first attempt (rated 7, notes: "duck overcooked, gastrique too sweet"), your second attempt (rated 9, notes: "pulled duck at 135°F, reduced sugar by a third - much better").
That's not clutter - that's your culinary education, documented and searchable.
For more inspiration on dishes worth adding to your repertoire, explore our guides to popular dishes in Peru or what to eat in Tokyo.
Frequently Asked Questions
What's the fastest way to start building a Digital Pantry if I have hundreds of unorganized food photos?
Start with the future, not the past. Beginning today, commit to tagging every new meal properly using the 3-Tier Entry System. For your backlog, do a 30-minute triage session: scroll through your camera roll, identify the 20-30 most memorable meals, and create Tier 1 entries for just those. The rest can stay in your camera roll as a low-priority archive. Trying to retroactively tag everything guarantees you'll give up. Focus on building the habit with new content, and chip away at the backlog during Sunday reviews when you have extra time. The goal is forward momentum, not perfect historical documentation.
How do I decide what deserves a 10-point rating versus an 8 or 9?
A 10 represents a dish that changed how you think about food - something technically flawless that also delivers an emotional or intellectual insight. It's the meal you're still thinking about a week later. A 9 is excellent execution without that transformative quality. An 8 is very good but with small flaws or just slightly less memorable. Don't overthink it. Your rating system is personal; it only needs to be consistent with itself. What matters is that you can filter for "9+" when you want to find your best experiences. Consider documenting your rating philosophy in a note within your system so you stay consistent over time. If you're looking for a structured approach, check out our professional pizza scoring protocol guide.
Is it worth tagging dishes I make at home, or should I only track restaurant meals?
Tag both, but use different markers to distinguish them. Restaurant meals show you what's possible; home meals document what you can execute. Some of your highest-rated entries should eventually be dishes you've made yourself - that's the entire point of building technical skills. Create a Location tag for "Home Kitchen" and use the Replication Difficulty field to note "Original Creation" for dishes you've developed yourself. Your Digital Pantry becomes more valuable when it shows both aspirational examples and proven repeatable successes. The interplay between "what I've experienced" and "what I can make" is where real growth happens.
What if I eat at a restaurant with multiple great dishes - do I create separate entries for each?
Yes. Your system is dish-level, not restaurant-level. A restaurant can serve an incredible pasta (9/10) and a mediocre dessert (6/10), and you need to be able to find the pasta later without the dessert cluttering your search results. This is the fundamental difference between your Digital Pantry and generic restaurant review apps - you're tracking specific culinary experiences, not venues. Create individual entries for each dish, use the Location field to note the restaurant, and add a quick note like "also tried the risotto - see separate entry" if you want to cross-reference. This granularity is what makes the system useful for actually deciding what to cook or what to order on a return visit.
How do I handle dishes I want to recreate but don't have a full recipe for?
This is where technique notes become crucial. When you eat something you want to recreate, focus your observation on method rather than ingredients. Note things like: "meat was seared hard, then finished in oven - probably 500°F stovetop, then 350°F oven for 8-10 minutes," or "sauce was an emulsion, started with shallot and butter base, finished with cold butter off heat." Capture texture, cooking methods, and flavor profiles. Later, you can find recipes that use the same techniques and adapt them. Your Digital Pantry entry acts as a technical brief for research, not a complete recipe. Tag these as "Replication Target" so you can filter for dishes that need recipe development when you have time to experiment.
Should I include nutritional information or calorie counts in my tracking?
Only if that data actually affects your cooking decisions. For most serious food lovers, the goal is to document exceptional culinary experiences and techniques, not to monitor macros. Calorie tracking belongs in health-focused apps; your Digital Pantry is about taste memory and skill development. That said, if you're trying to develop a lighter cooking repertoire or you're tracking how different preparation methods affect nutritional profiles, adding a "Dietary Notes" field makes sense. The key is to avoid cluttering your system with data you'll never use. Every field you add is another barrier to actually entering information. Start minimal, add complexity only when you find yourself repeatedly wishing you'd captured something.
How do I keep my tagging system from becoming too complex and unusable?
Limit yourself to 5-7 tags per entry, maximum. More than that and you're over-engineering. Use broad categories (Italian, not "Tuscan vs. Sicilian") and rely on the notes field for specifics. Review your tags quarterly and merge duplicates - if you've used both "Braised" and "Slow-Cooked," pick one and standardize. The best tagging systems are slightly too simple rather than too complex. If you can't remember what tags you have, you have too many. Some platforms like Savor handle this by suggesting tags as you type, helping you stay consistent without memorizing your entire taxonomy. The goal is effortless retrieval, not perfect categorization.
What's the best way to share discoveries from my Digital Pantry with friends?
Most systems allow you to export or share individual entries. Create a "Shareables" tag for dishes that photograph well and have compelling stories. When a friend asks for restaurant recommendations, don't just say "go to X" - share the specific dish entry with your rating, notes, and photo. It's more useful than a generic venue recommendation because it tells them exactly what to order and why it's worth trying. For home-cooked dishes, you can share your replication notes and technique observations. Some dedicated food apps like Savor allow you to follow other users and see their ratings, which creates a curated network of recommendations from people whose taste you trust. That's far more valuable than crowd-sourced reviews from thousands of strangers.