
The Serious Foodie’s Guide to Food 4 Less: Sourcing Michelin-Grade Ingredients in a Warehouse
Alex the juice queen
Alex hunts for the best juice bars and presses. She rates every sip and saves her favorites in Savor.
The Serious Foodie’s Guide to Food 4 Less: Sourcing Michelin-Grade Ingredients in a Warehouse You just dropped $250 on a tasting menu at that new restaurant...
The Serious Foodie’s Guide to Food 4 Less: Sourcing Michelin-Grade Ingredients in a Warehouse
You just dropped $250 on a tasting menu at that new restaurant everyone’s obsessing over. Next week, you’re standing in the fluorescent-lit aisles of Food 4 Less, filling your cart with masa harina, dried guajillo chilies, and a five-pound bag of lard. Is this cognitive dissonance? Not even close. This is the high-low strategy, and it’s how the smartest food lovers actually eat.
The cultural narrative around budget grocery stores is outdated and boring. Food 4 Less isn’t where you go because you have to - it’s where you go because you know something everyone else doesn’t. While Whole Foods charges $18 for a tiny jar of harissa, you’re walking out with authentic North African spices in bulk, the same ones used in professional kitchens, for a fraction of the cost.
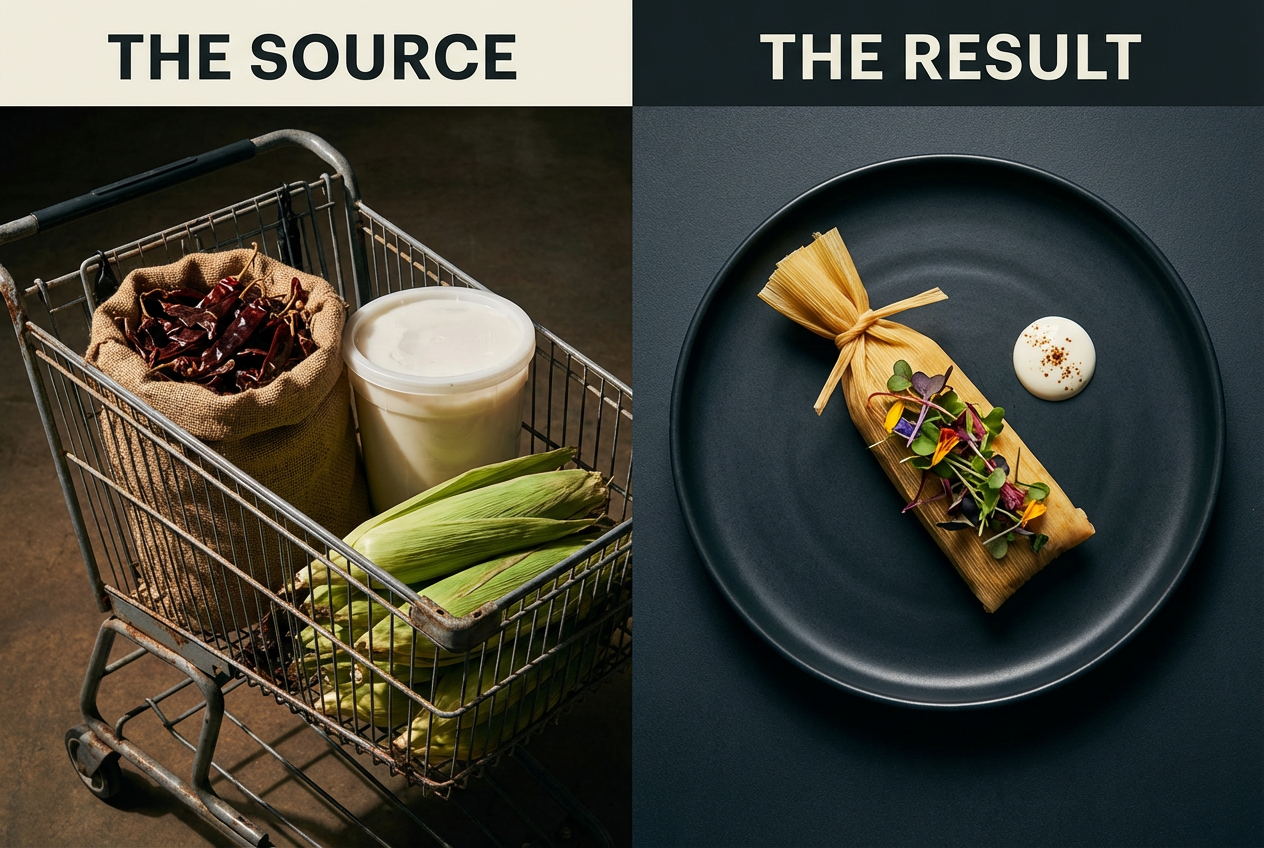 Embrace the high-low strategy by sourcing authentic, bulk staples from warehouse markets to create elevated, restaurant-quality dishes without the boutique price tag.
This isn’t about saving money because you’re broke. It’s about allocating your food budget like a strategic investor: splurge on experiences you can’t replicate at home, then source high-quality raw materials for your weekend cooking projects from places that don’t mark up ingredients 400% just because they have Edison bulbs and reclaimed wood shelving.
Table of Contents
- Strategic Positioning: The High-Low Lifestyle
- The Hidden Gem Registry: What to Actually Buy
- The Anti-Yelp Organization Method: Digital Curation
- The Weekend Project Recipe: 24-Hour Birria
- The Camera Roll Audit: Making Your Food Photos Searchable
- Building Your Personal Flavor Library
- From Warehouse to Table: The Complete Workflow
- Frequently Asked Questions
Strategic Positioning: The High-Low Lifestyle
BLUF: The high-low strategy means spending serious money on unique dining experiences while sourcing authentic, high-quality staples from warehouse stores for home cooking projects - it’s not about being cheap, it’s about being discerning.
The foodie economy has created a bizarre paradox. We’ll research a restaurant for hours, make a reservation three months in advance, and spend $200 on a meal that lasts two hours. Then we turn around and buy the same commodity ingredients from boutique markets at markup rates that would make a luxury goods dealer blush.
Here’s what the high-low lifestyle actually looks like: You’re not canceling your OpenTable habit or avoiding that omakase experience. You’re simply recognizing that a pound of dried Rancho Gordo beans and a pound of bulk pintos from Food 4 Less can produce nearly identical results in your Sunday chili. The difference? One costs $8, the other costs $1.89.
This isn’t frugality - it’s resource optimization. When you stop overpaying for bulk staples, you free up budget for the meals that actually matter. That $150 you saved on your monthly pantry stock? That’s a tasting menu at the new Japanese spot that just got written up.
The warehouse store becomes your secret pantry, the place where professional cooks actually shop when they’re not on the clock. Walk into any serious home cook’s kitchen, and you’ll find restaurant-quality dishes made from ingredients sourced from three different places: the farmers market for produce, the specialty butcher for proteins, and yes, the warehouse store for everything else.
Food 4 Less excels in categories where authenticity matters more than marketing. Their international aisles - particularly Latin American, Asian, and Eastern European sections - often stock the exact brands used in ethnic restaurants. That’s not an accident. These stores serve immigrant communities who demand the real thing, not some watered-down "gourmet" version created for suburban palates.
The cool factor isn’t in where you shop - it’s in what you know to buy. Being able to identify the difference between different grades of paprika, knowing which brand of fish sauce is actually fermented properly, understanding why Mexican crema beats sour cream in every application - that’s the expertise that separates casual home cooks from serious food people.
Using Savor to document your warehouse finds transforms shopping from a chore into a curated discovery process. You’re not just buying groceries; you’re building a searchable database of ingredients, tracking which brands deliver on quality, and creating a personal reference library that makes you better at cooking over time.
The Hidden Gem Registry: What to Actually Buy
BLUF: Food 4 Less beats specialty stores on authenticity and value for specific items: Mexican dairy products, bulk dried chilies, bone-in cuts for stock, whole spices, ethnic pantry staples, and select produce that doesn’t require boutique sourcing.
Not everything at Food 4 Less deserves a spot in your cart. But certain items? They’re legitimately better than what you’ll find at stores charging three times the price.
Mexican Crema and Queso Fresco
Forget the "Mexican-style" sour cream at Whole Foods. Food 4 Less stocks actual Mexican crema - the kind with the right fat content and tang that doesn’t break when you add it to hot soup. The queso fresco is usually from regional producers supplying restaurants, sold in proper blocks instead of those sad pre-crumbled containers. You’re looking at $3.50 for a pound of cheese that would cost $12 at a specialty market.
Dried Chilies (The Real MVPs)
The dried chili selection puts boutique spice shops to shame. We’re talking whole guajillo, ancho, pasilla, árbol, and cascabel chilies in quantities large enough to actually use. A two-pound bag of anchos costs around $8 and will last you six months of serious cooking. The same amount from a specialty purveyor? Probably $35. Toast them yourself, rehydrate them properly, and you’ve got the foundation for every great sauce in Mexican cuisine.
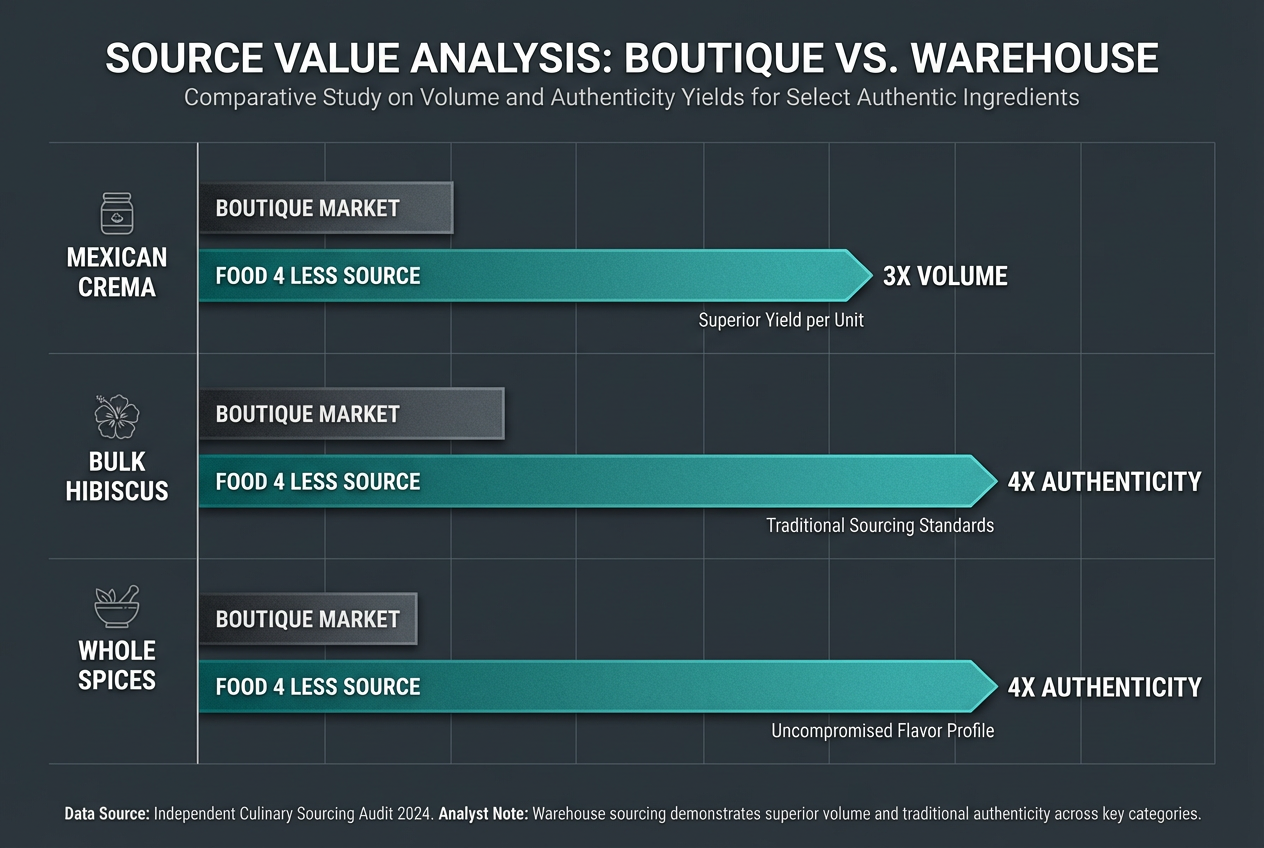 When sourcing authentic international staples, warehouse markets often provide triple the volume and higher authenticity scores than high-end boutique specialty grocery stores.
Bone-In Cuts for Stock
Professional kitchens build flavor from bones and scraps. Food 4 Less sells bone-in chicken thighs, pork neck bones, and beef marrow bones at prices that make stock-making economically viable. A bag of chicken backs costs less than $2 and produces a gallon of liquid gold. This is how restaurants achieve depth - they don’t buy $9 boxes of organic broth.
Whole Spices in Bulk
Pre-ground spices lose their potency fast. The bulk spice section offers whole cumin seeds, coriander, black peppercorns, and cinnamon sticks at a fraction of what you’d pay for those tiny jars. Buy a cheap coffee grinder, dedicate it to spices, and toast-and-grind as needed. Your food will taste noticeably better, and you’ll understand why restaurant dishes have more dimension than home cooking.
Masa Harina (The Good Stuff)
If you’re making tortillas or tamales at home, you need proper masa harina. Food 4 Less usually stocks Maseca or Bob’s Red Mill in large bags. Fresh masa from a tortilleria is better, yes, but for most applications, this gets you 90% of the way there at a price that makes experimentation feasible.
Lard (Unhydrogenated, Unashamed)
Real lard - the kind from rendered pork fat, not the hydrogenated blocks - makes better tortillas, flakier pie crusts, and deeper-flavored beans than any other cooking fat. A gallon tub costs around $8 and transforms your cooking. This is what your grandmother used before the food industry convinced everyone that vegetable shortening was "healthier."
Fresh Herbs in Quantity
When recipes call for "a handful of cilantro," they don’t mean four sad sprigs from a $3 clamshell. Food 4 Less sells proper bunches - the kind where you can actually make a chimichurri or a big batch of salsa verde without feeling like you’re spending $12 on garnish.
The strategy here is simple: buy what restaurants buy, in the quantities that make sense for serious home cooking. Document each discovery in a dish-centric app so you remember which brands deliver and which ones don’t. Over time, you build institutional knowledge that most home cooks never develop.
The Anti-Yelp Organization Method: Digital Curation
BLUF: Generic review sites don’t help you remember the specific grade of saffron or the brand of tajin you found - organize your Food 4 Less discoveries by flavor profile and culinary utility using dish-centric tracking instead of store ratings.
Here’s the problem with traditional food apps: they’re built around venues, not dishes or ingredients. Yelp will tell you that Food 4 Less has 3.5 stars and that someone named Karen had a bad experience with the checkout line in 2019. Cool. That doesn’t help you remember that the Los Altos brand of chipotles in adobo has better smoke depth than the La Costeña version.
 Shift from disorganized camera rolls to a structured flavor library by tagging your warehouse finds based on their culinary utility rather than store aisle.
The solution is to organize your food life around what actually matters: the specific ingredients and dishes that shape your cooking. This means shifting from a location-based system (where you save restaurants) to a flavor-based system (where you save ingredients by their culinary characteristics).
The Flavor Profile Framework
Instead of thinking "I bought stuff at Food 4 Less," think in terms of flavor building blocks:
Acid: Rice vinegars, citrus, different grades of sherry vinegar, pickled jalapeños Umami: Fish sauce brands, different misos, aged cheeses, dried mushrooms Heat: Various dried chilies, fresh peppers, different curry pastes Fat: Cooking oils, lard, crema, coconut milk brands Aromatic Base: Onion varieties, garlic, ginger, lemongrass, cilantro roots
When you find a particularly good fish sauce at Food 4 Less, you don’t just note that you bought it. You document it in Savor with context: how salty it is, what dishes you used it in, how it compares to the Red Boat you usually buy. You’re building a reference library organized by how things taste, not by what aisle you found them in.
The Photo Taxonomy System
Your phone’s camera roll is probably a graveyard of 4,000 photos, half of which are food-related. The ones from that incredible meal in Rome three years ago? Lost somewhere between your cat photos and screenshots of tweets.
The fix: create a deliberate tagging system based on utility. When you photograph an ingredient from Food 4 Less, you tag it immediately:
- Cuisine type (Mexican, Japanese, Italian)
- Ingredient category (spice, protein, preserved good)
- Flavor profile (smoky, funky, bright)
- Specific use case (makes good stock, essential for pozole, best for crudo)
This isn’t busywork - it’s creating a search engine for your taste memory. Six months from now, when you want to recreate that incredible adobo-braised short rib dish, you’ll be able to pull up the exact brand of chilies you used, see your notes about toasting time, and review the dish you made with them.
Organizing by Outcome, Not Location
The most useful organization system answers the question: "What do I make with this?" Your Food 4 Less finds get categorized by what they enable:
Weekend Projects: Ingredients for time-intensive cooking (dried beans, whole spices, bones for stock) Quick Weeknight Solutions: Pantry items that speed up cooking (canned tomatoes, jarred sofrito, quality bouillon) Technique Exploration: Things you bought to learn a new skill (different rice varieties, specialty flours, unusual cuts)
Each category gets its own space in your personal food database. When you open the best food diary app for your needs, you’re not scrolling through a chronological feed of every meal. You’re navigating a structured library organized around how you actually cook.
Moving Beyond Stars and Scores
Generic rating systems fail because they collapse complex information into a single number. A 4.5-star rating on a store tells you nothing. But documenting that the Cacique crema has 18% fat content while most grocery store brands hover around 14% - and that this matters for sauce stability? That’s actionable intelligence.
The shift from passive consumption (reading other people’s reviews) to active documentation (building your own reference system) changes how you interact with food. You’re not trying to remember everything anymore. You’re creating an external brain that gets smarter every time you cook.
This is why professional chefs keep notebooks. They can’t rely on memory alone when they’re working with hundreds of ingredients. They write things down: cooking temperatures, timing notes, which purveyor delivers quality, what brands are worth the premium. Your digital system serves the same function, just optimized for how modern food lovers actually live.
The Weekend Project Recipe: 24-Hour Birria
BLUF: This is the dish that justifies your Food 4 Less strategy - 90% of ingredients sourced from the warehouse store, 24 hours of passive cooking time, and a final result that rivals any restaurant birria you’ve had.
Birria is the perfect high-low recipe. It requires time and technique, but the ingredients are fundamentally simple: beef, dried chilies, spices, and patience. The dish you make at home, with proper sourcing and execution, will be better than what most restaurants serve because you’re not cutting corners on time or ingredients.
The Food 4 Less Shopping List
Proteins (around $25):
- 4 lbs beef short ribs (bone-in)
- 2 lbs beef shank or chuck
Chilies (around $8):
- 6 guajillo chilies
- 4 ancho chilies
- 2 árbol chilies
Aromatics and Spices (around $12):
- 1 white onion
- 1 head garlic
- 2-inch piece of ginger
- 2 cinnamon sticks
- 1 tsp whole cloves
- 1 tbsp cumin seeds
- 1 tbsp black peppercorns
- 2 bay leaves
- Fresh cilantro (one bunch)
- Fresh oregano or Mexican oregano (dried is fine)
Supporting Cast (around $8):
- 2 large tomatoes
- 1 can crushed tomatoes
- Apple cider vinegar
- Corn tortillas (get the good ones, not the cardboard)
Total ingredient cost: around $55. This makes 8-10 servings of restaurant-quality birria. Compare that to $15-18 per serving at a restaurant.
The Method (Where Time Does the Work)
Day 1, Evening (30 minutes active time):
Toast your dried chilies in a dry pan until fragrant, about 2 minutes per side. They should smell incredible and slightly darken, but not burn. Stem and seed them, then soak in hot water for 20 minutes.
While chilies soak, toast your whole spices (cumin, cloves, peppercorns) in the same pan. Your kitchen should smell like a spice market. Grind them together.
Salt your beef aggressively. This isn’t the time to be timid - you need at least 2 tablespoons of kosher salt for this much meat. Sear the beef in batches in a heavy pot until deeply browned. Don’t crowd the pan. Don’t rush it. This is where flavor lives.
Char your onion halves and tomatoes under the broiler or directly on a gas flame. You want black spots and blistered skin. Peel the worst of the char off the onion.
Blend your rehydrated chilies with the charred vegetables, garlic, ginger, ground spices, a splash of vinegar, and a cup of the chili soaking liquid. This should be a thick, dark red paste that looks like it could stain concrete.
Day 1, Night (15 minutes active, then ignore for 8 hours):
Return your seared beef to the pot. Pour the chili paste over everything. Add your canned tomatoes, bay leaves, cinnamon sticks, and enough water to almost cover the meat (about 4 cups). Bring to a bare simmer.
Put this in a 275°F oven, covered tightly. Go to sleep. The low-and-slow heat breaks down collagen, renders fat, and lets the chilies permeate every fiber of the meat.
Day 2, Morning (5 minutes):
Check your birria. The meat should be falling apart. If it’s not, give it another 2-4 hours. Pull out the beef, shred it roughly, discard the bones. Skim excess fat from the braising liquid - save this fat, it’s liquid gold for dipping your tortillas.
Taste your consommé. Adjust salt. Add a squeeze of lime. The broth should be rich, slightly spicy, deeply savory - a complete flavor experience in a spoon.
Assembly (10 minutes per batch of tacos):
This is where your Food 4 Less tortillas matter. Dip them in the reserved beef fat, add shredded meat and cheese, fold, and crisp in a hot pan until the cheese melts and the tortilla develops a crunchy exterior.
Serve with small bowls of the consommé for dipping, chopped onion, cilantro, and lime wedges. If you’ve done this right, you’ll understand why people line up for birria tacos.
Why This Recipe Matters
Birria teaches you that great cooking isn’t about expensive ingredients - it’s about proper technique and time. The dried chilies from Food 4 Less are identical to what restaurants use. The beef is the same. The difference is that you gave it 24 hours instead of the 4-hour shortcut most restaurants take.
When you document this dish in your food journal, you’re not just saving a recipe. You’re creating a reference point for understanding how chilies work, how long braises develop flavor, and what proper seasoning tastes like. Every time you make it again, you’ll refine something - maybe the char on the tomatoes, maybe the ratio of chilies, maybe the searing technique.
This is how you build culinary expertise: repetition with documentation. The recipe is just a starting point. Your personal modifications and notes - those become the valuable knowledge that separates you from someone just following instructions.
The Camera Roll Audit: Making Your Food Photos Searchable
BLUF: Your food photos are worthless if you can’t find them later - implement a simple tagging system based on cuisine, technique, and flavor profile to transform your camera roll from a digital landfill into a searchable culinary reference library.
Let’s be honest about your camera roll. It’s a mess. Somewhere in those 4,000 photos are pictures of incredible meals, perfectly composed shots of ingredients, and visual reminders of dishes you wanted to recreate. But finding that specific photo from that Mexican restaurant in Austin? That requires scrolling for 20 minutes while you question your life choices.
The problem isn’t that you take too many food photos - it’s that you treat them like disposable content instead of valuable reference material. A professional photographer would never shoot thousands of images without a system for organizing and retrieving them later. Neither should you.
The Immediate Capture Protocol
The moment you take a food photo, you need to add context while the details are fresh. This takes 30 seconds and saves 30 minutes of frustration later.
Minimum Required Information:
- What is this? (specific dish name, not just "pasta")
- Where did it come from? (restaurant name, home kitchen, friend’s place)
- Why did you photograph it? (want to recreate it, technique reference, incredible presentation)
Most people skip this step, assuming they’ll remember. You won’t. Three months from now, "spicy noodles" and "red curry thing" mean nothing. But "Khao Soi Gai from Night + Market, coconut curry base with crispy noodles on top, note the balance of sweet and funky" gives you something to work with.
The Taxonomy That Actually Works
Generic photo apps let you create albums, but albums are too rigid. You need tags - multiple categories that can overlap and combine to narrow searches.
Primary Categories:
By Cuisine: Mexican, Japanese, Italian, Thai, Chinese (regional), French, Korean, Indian (regional), Vietnamese, Mediterranean, Fusion
By Main Ingredient: Beef, pork, chicken, seafood (specific type), vegetables (specific), grains, legumes, fungi
By Cooking Technique: Braised, grilled, fried, raw, fermented, smoked, roasted, steamed, pressure-cooked
By Flavor Profile: Spicy, acidic, umami-forward, sweet-savory, smoky, funky, herbaceous, rich
By Context: Weekend project, weeknight quick, special occasion, meal prep, technique study, ingredient showcase
The power comes from combining tags. Want to find all your umami-forward Japanese dishes that use a braising technique? That’s a three-tag search. Looking for weekend project recipes featuring pork that you photographed in the last six months? You can surface exactly those images.
The Tool Stack
Your iPhone’s native Photos app won’t cut it for serious organization. You need something purpose-built for food.
The ideal system (Savor handles this well) lets you:
- Tag photos with multiple categories simultaneously
- Add detailed notes and observations
- Create custom lists based on any combination of tags
- Search across all metadata, not just file names
- Export your data if you ever want to switch systems
The last point matters more than people realize. You’re building a personal database of culinary knowledge. Vendor lock-in where your data becomes hostage to a single app’s business model? That’s unacceptable.
The Weekly Review Ritual
Organization fails when it becomes a massive backlog project. Instead, build a weekly 15-minute review into your routine. Sunday morning with coffee, Friday evening with wine - whenever works.
The Process:
- Open your camera roll
- Filter to "Recent" food photos from the past week
- For each keeper: add tags, write quick notes, assign to relevant lists
- Delete the bad shots (blurry, poorly lit, not interesting)
- Archive standouts to your "Greatest Hits" collection
This habit prevents the backlog from becoming overwhelming. Fifteen minutes a week is manageable. Six months of accumulation requiring hours of cleanup? That never gets done.
From Passive Archive to Active Reference
The real value emerges when you start using your organized photos as a reference tool while cooking. You’re making pasta at home and can’t remember the consistency of the dough from last time? Pull up your photos, read your notes about hydration ratios and kneading time.
You’re planning a dinner party and want to recreate that incredible aguachile you had in Baja? Your photos show the knife technique on the fish, the ratio of citrus to chilies, the plating style that made it memorable. You’ve created a visual recipe book that’s uniquely yours.
This is the fundamental shift from treating food photos as social media content to treating them as personal research material. Instagram doesn’t care if you can find that photo six months later. Your cooking practice depends on it.
When you combine organized visual reference with detailed tasting notes, you create a system that makes you better at cooking over time. You’re not starting from scratch with each dish - you’re building on documented experience.
Building Your Personal Flavor Library
BLUF: A personal flavor library is a searchable collection of every ingredient, dish, and technique you’ve encountered, organized by sensory characteristics rather than arbitrary categories - it’s how you develop taste memory and culinary intuition over time.
Most people experience flavors passively. They eat something delicious, think "that was good," and move on. The conscious ones might say "I should make this at home," but without a system for capturing the details, the inspiration evaporates within 24 hours.
A personal flavor library changes this dynamic entirely. It’s a structured approach to building culinary knowledge where every meal, every ingredient discovery, every cooking experiment contributes to a growing database of sensory experience.
The Five Pillars of Flavor Documentation
Professional chefs and food writers develop sophisticated palates through repetition and conscious analysis. They taste the same ingredient in different contexts, compare similar dishes across restaurants, and build mental models of how flavors interact. Your flavor library does the same thing, just with the advantage of perfect recall through documentation.
Pillar 1: Raw Ingredients
When you discover that superior fish sauce at Food 4 Less, you don’t just note that you bought it. You document:
- Brand and specific product name
- Ingredient list (actual fermentation vs added flavoring)
- Sensory characteristics (funky vs clean, salt level, sweetness)
- How it compares to other fish sauces you’ve tried
- Best use cases (dipping sauce vs cooking ingredient)
This transforms a generic purchase into a reference point. Next time a recipe calls for fish sauce, you’re not guessing - you know exactly which bottle to reach for based on the application.
Pillar 2: Dish Archetypes
Instead of saving individual restaurant dishes as isolated experiences, identify the archetypal version that defines the category for you. When you’ve had incredible birria (maybe the one you made using this guide), that becomes your benchmark. Future birria gets compared against this standard.
Your library includes:
- The defining characteristics of your benchmark version
- What makes it exemplary (specific flavor balance, texture, technique)
- Variations you’ve encountered and how they differ
- Elements you might incorporate into your own version
This is how you develop taste - by creating mental (and digital) reference points that let you evaluate new experiences with precision.
Pillar 3: Technique Observations
Every time you cook or watch someone else cook, you’re observing techniques in action. Your library captures these observations:
- What happened when you changed the heat level
- How different pans affected browning
- What ’properly seasoned’ actually tastes like for different proteins
- How long various aromatics need to develop flavor
These notes compound over time. After documenting 50 cooking sessions, you’ve built institutional knowledge that most home cooks never develop because they don’t retain the lessons from previous attempts.
Pillar 4: Flavor Combinations That Work
Some pairings are classics for a reason (tomato and basil, lamb and mint), but your personal library identifies combinations that resonate with your palate specifically. Maybe you discovered that the slight funk of good Mexican crema balances the sweetness in butternut squash soup better than regular sour cream. That’s a relationship worth documenting.
Your library tracks:
- Unexpected combinations that worked
- Why they worked (acid cutting richness, umami amplifying sweetness)
- Contexts where you might apply the same principle
- Failed experiments (so you don’t repeat them)
Pillar 5: Temporal and Contextual Notes
Flavors don’t exist in a vacuum. The same ingredient tastes different depending on season, preparation method, and what you eat it with. Your library captures these variables:
- Seasonal variations in produce quality
- How your palate changes with repetition (things you hated at first, then loved)
- Environmental factors (altitude affects cooking time, humidity affects baking)
- Personal preferences evolving over time
The Search Interface That Makes It Useful
A library is only valuable if you can retrieve information when you need it. The search interface needs to support the way you actually think about food.
Natural Language Queries: "Show me all the smoky Mexican dishes I’ve documented" "Find braises that took longer than 8 hours" "What have I made with guajillo chilies?" "Which restaurants have I rated 9+ for pasta?"
The system understands that you’re not always searching by restaurant name or specific date. You’re searching by flavor, technique, ingredient, or feeling.
Visual Browsing:
Sometimes you don’t know what you’re looking for until you see it. A well-designed flavor library lets you browse visually, surfacing memories through images rather than text search. Scrolling through your "Deeply Savory" collection might remind you of a technique you wanted to try or a dish you’ve been meaning to recreate.
Relationship Mapping:
Advanced libraries can show you connections you didn’t explicitly create. "You tend to rate dishes with fermented elements highly." "Your Mexican and Korean documentation share similar flavor profiles." "You’ve been photographing more raw preparations lately." These insights emerge from the data you’ve collected over time.
From Collection to Curation
The trap many people fall into is treating their flavor library like a hoarder’s attic - everything goes in, nothing gets edited. Professional curators know that curation requires both addition and subtraction.
Regular Maintenance:
- Merge duplicate entries
- Update notes on ingredients you’ve used multiple times
- Archive or delete bad photos that add no value
- Create new collections based on emerging patterns
- Export backups (because data loss is unacceptable)
Seasonal Reviews:
Every few months, review your library with fresh eyes:
- What dishes do you keep coming back to?
- Which ingredients haven’t you used recently?
- What techniques have you been avoiding?
- Where are the gaps in your knowledge?
This reflection transforms your library from a passive archive into an active tool for improving your cooking.
The Long Game
Building a comprehensive flavor library isn’t a weekend project. It’s a practice you maintain over years, accumulating knowledge that makes you progressively better at cooking, ordering at restaurants, and understanding food.
After a year of documentation, you’ll notice patterns in your preferences you weren’t conscious of. After three years, you’ll have enough reference material to teach others. After five years, your library becomes a form of autobiography - a sensory record of everywhere you’ve eaten, everything you’ve cooked, and how your palate has evolved.
This is the value proposition of serious food documentation. You’re not just collecting photos for social media engagement. You’re creating a personal resource that makes every future meal more informed, more intentional, and more connected to your history with food.
When someone asks "How did you learn to cook so well?", the honest answer becomes: "I wrote everything down."
From Warehouse to Table: The Complete Workflow
BLUF: The warehouse-to-table workflow has five stages: strategic sourcing, immediate documentation, deliberate cooking, detailed capture, and systematic review - each stage builds on the previous one to create a repeatable system for continuous culinary improvement.
Most people treat grocery shopping and cooking as separate, disconnected activities. You buy stuff, you make food, you eat it, you forget about it. Rinse and repeat. This approach guarantees you’ll make the same mistakes forever and never develop beyond basic competence.
The complete workflow integrates sourcing, cooking, documentation, and review into a continuous improvement cycle. Each meal informs the next one. Each grocery run becomes more strategic. Over time, the system makes you better almost automatically.
Stage 1: Strategic Sourcing
Before you even walk into Food 4 Less, you need a framework for what you’re looking for. This isn’t a random browsing session - it’s a targeted expedition.
Pre-Shopping Planning:
- Review your flavor library to identify ingredients you’ve run out of
- Check upcoming recipes or cooking projects
- Note ingredients you’ve been meaning to try
- Set a rough budget (but be flexible for unexpected discoveries)
In-Store Documentation:
Your phone comes out immediately when you spot something interesting. Take photos of:
- The product label (brand, ingredients, origin)
- The price (for future comparison shopping)
- The packaging size (for calculating cost per unit)
- Nearby related products (sometimes stores cluster authentic items together)
A quick voice note captures details you’ll forget: "The Tres Estrellas crema has 18% fat content, much higher than the regular brands. Package says it’s from Jalisco. Costs $3.49 for 16oz. Going to try this for the next batch of birria."
The Opportunistic Mindset:
The best finds are often unplanned. You weren’t specifically looking for dried hibiscus flowers, but there they are, and you remember reading about agua de Jamaica. You buy them. You document them. Later, when you have time, you research the technique.
This opportunistic approach requires trust in your system. You can afford to buy interesting ingredients without immediate plans because you know they’ll be cataloged and searchable. They won’t languish in your pantry, forgotten, because your library will surface them when relevant.
Stage 2: Immediate Documentation
The moment you get home, before anything goes into the pantry, you process your haul. This takes 10 minutes and saves hours of frustration later.
For Each New Ingredient:
- Add to your personal food database
- Include purchase date, location, and price
- Tag by cuisine, category, and potential use case
- Note any research or recipes you want to explore
- Set reminders if the item is perishable
This immediate processing prevents the backlog problem. You’re never more than a few minutes behind on documentation, which means you’re never facing a demoralizing cleanup project.
Stage 3: Deliberate Cooking
When you actually cook with your Food 4 Less ingredients, you’re operating in research mode. This isn’t about slavishly following recipes - it’s about understanding how ingredients behave.
Active Observation:
- How does this chili taste raw vs toasted vs rehydrated?
- What happens to the texture of this cut of meat at different temperatures?
- How much of this spice is enough? Where’s the line into too much?
- Does this technique from one cuisine apply to ingredients from another?
You’re not just cooking - you’re running experiments. Each session teaches you something about how food works. The documentation captures these lessons so they compound over time.
Real-Time Notes:
Keep your phone or a notebook nearby. When you notice something important, write it down immediately:
- "Toasting the cumin seeds until they just start to smoke brings out a floral note"
- "The masa needs less water than the package suggests, aim for Play-Doh consistency"
- "Browning the bones before making stock added an hour to the process but doubled the flavor depth"
These observations are pure gold. They’re lessons earned through direct experience, not secondhand advice from the internet.
Stage 4: Detailed Capture
After you finish cooking, before you eat, you document the final result. This is where your food photography skills matter.
Visual Documentation:
- One good overall shot showing plating and composition
- Close-ups of interesting textural details
- Process shots if you tried a new technique
- Ingredient spreads showing what went into the dish
Written Documentation:
- What worked exactly as planned
- What you’d change next time
- How it compared to restaurant versions or your previous attempts
- Specific measurements or techniques worth remembering
- Who you shared it with and their reactions
The written notes matter as much as the photos. A beautiful image of birria doesn’t tell you that you should have added another teaspoon of salt to the braising liquid or that 275°F was perfect but 300°F would have made the consommé too cloudy.
Stage 5: Systematic Review
Documentation only creates value when you actually reference it later. The systematic review is where knowledge becomes actionable.
Weekly Review (15 minutes):
- Look at what you cooked this week
- Identify patterns or themes
- Note ingredients you need to restock
- Flag dishes worth repeating
- Update your shopping list with new discoveries to try
Monthly Review (30 minutes):
- Review your flavor library for emerging patterns
- Identify gaps in your documentation
- Set goals for the next month (try a new technique, explore a different cuisine)
- Export backups of your data
- Share standout dishes with friends who might appreciate them
Quarterly Deep Dive (2 hours):
- Analyze your progression over the past three months
- Identify your most successful dishes and why they worked
- Look for repeated mistakes or knowledge gaps
- Plan major cooking projects for the next quarter
- Review your budget allocation between dining out and home cooking
This review cycle ensures your documentation system stays valuable. You’re not just collecting data - you’re actively using it to inform future decisions.
The Compound Effect
The magic happens over time. After six months of this workflow, you have 26 weeks of documented cooking experiments. You’ve tried 30-40 new ingredients, refined 10-15 core techniques, and built a reference library of 100+ dishes. You’re objectively better at cooking than you were six months ago, and you have the documentation to prove it.
After a year, you have legitimate expertise in several areas. You understand dried chilies better than 95% of home cooks. You can explain exactly why your stocks taste restaurant-quality. You have notes on 200+ dishes across a dozen cuisines.
After three years, you’re operating at a level that most people associate with professional cooking school - except you learned by doing, documenting, and iterating. Your flavor library contains thousands of reference points. You can teach others with authority because you’ve recorded the entire learning process.
This is why the workflow matters. It’s not about being obsessive or sucking the joy out of cooking. It’s about building a system that makes you progressively better at something you care about.
The same people who’ll spend 10,000 hours practicing guitar or studying languages often treat cooking like something that should come naturally without practice or documentation. But cooking is a skill like any other - it improves with deliberate practice and feedback loops.
Your Food 4 Less sourcing strategy feeds into this larger system. The ingredients you find there become the raw materials for experimentation. The money you save on bulk staples funds your dining experiences. The whole thing works together to create a sustainable, high-quality food life that doesn’t require a trust fund.
Frequently Asked Questions
What makes Food 4 Less different from other budget grocery stores?
Food 4 Less sits in a unique position - it’s part of the Kroger family but operates with a warehouse-style, no-frills approach that keeps costs down. The real differentiator is the demographic mix in many locations, which drives authentic international product selection that you won’t find at generic suburban chains. The stores source for immigrant communities who demand specific brands and products, meaning you get the same ingredients ethnic restaurants use without the markup.
How do I know which brands are worth buying at Food 4 Less?
Start by reading ingredient lists rather than relying on packaging design. Authentic products tend to have shorter ingredient lists and don’t contain stabilizers or artificial flavors. For Mexican products, look for brands like Cacique, Los Altos, or regional producers. For Asian ingredients, check for Thai or Vietnamese labeling rather than generic "Asian" products. Use your first few purchases as experiments - buy small quantities, document in your tracking app, and note which brands deliver on quality. After six months, you’ll have a reliable brand database specific to your local store.
Can I really build a flavor library without professional training?
Absolutely. Professional training teaches you faster, but it’s just structured practice with feedback. Your flavor library creates the same feedback loop - you taste something, you document it, you compare it to previous experiences, you refine your understanding. The difference is you’re learning at your own pace, focused on cuisines and techniques that interest you rather than a standardized curriculum. Start with basic comparisons (this salsa is spicier than the last one you made), and your observations will naturally become more nuanced over time.
How much time does this documentation system actually require?
Realistically, you’re looking at 30-45 minutes per week if you’re cooking 3-4 times. That breaks down to 10 minutes for post-shopping documentation, 5 minutes per dish for cooking notes and photos, and 15 minutes for your weekly review. It sounds like a lot until you realize you’re already spending that time - just inefficiently. You’re already taking food photos, already mentally noting things you want to remember, already forgetting 90% of it. This system just captures what you’re already doing and makes it retrievable.
What if I don’t want to use an app for food documentation?
You can absolutely do this with a notebook and a photo organizing system. The advantage of purpose-built apps like Savor is that they’re designed for searchability and relationship mapping between dishes. A notebook requires you to create your own index and cross-referencing system, which gets tedious as your documentation grows. But if you prefer analog tools, the principles remain the same: document immediately, tag systematically, review regularly. Just be honest about whether you’ll actually maintain a manual system long-term - most people don’t.
How do I avoid just becoming a food hoarder with a pantry full of forgotten ingredients?
The systematic review prevents this. When you do your weekly check-in, you see what’s sitting unused. The monthly review identifies patterns (you keep buying specialty ingredients but never using them, for example). Set a rule: every ingredient must get used within three months of purchase or you commit to finding a recipe that features it. Your flavor library should trigger reminders about underused items. If something consistently goes unused, stop buying it regardless of how interesting it seemed at the store.
Is this approach only for serious home cooks or can beginners benefit too?
Beginners might benefit most. When you’re starting out, everything is new information - you don’t have muscle memory or intuition yet. Documentation creates the external memory that experienced cooks have internalized. You can look back at your notes from last time rather than trying to remember if the dough needed more flour. The system accelerates your learning curve because you’re not repeating the same mistakes. Start simple (just photos and basic notes), then add complexity as you develop more expertise.
How do I balance this level of food documentation with actually enjoying meals socially?
The documentation happens before and after the social experience, not during. When you’re eating with others, be present. Your quick photo takes 10 seconds, then the phone goes away. The detailed notes come later when you’re processing the experience. Most people already spend 5-10 minutes after a great meal discussing what made it special - you’re just writing that conversation down instead of letting it evaporate. The documentation enhances social meals over time because you can reference shared experiences months or years later with perfect recall.