
How to Build a Searchable Food Photo Library: The Complete System for Serious Foodies
John the smoothie monster
John lives for smoothie bowls and cold-pressed juices. He uses Savor to remember his best blends.
How to Build a Searchable Food Photo Library: The Complete System for Serious Foodies Your camera roll holds 2,847 photos. You remember taking a picture of...
How to Build a Searchable Food Photo Library: The Complete System for Serious Foodies
Your camera roll holds 2,847 photos. You remember taking a picture of that perfect uni pasta in Barcelona six months ago, but you can't find it. The dish that blew your mind is buried somewhere between 400 generic brunch shots and 200 photos of your dog.
You're not alone. 84% of diners want to see photos of food and drinks before choosing a restaurant, and 82% will order a dish based purely on how it looks in a photo. We're all taking photos, but nobody's organizing them in a way that actually helps us remember, find, or recreate the meals that mattered.
This guide will show you how to transition from a chronological camera roll graveyard to a searchable, dish-centric database where you can instantly find "best carbonara," "Tokyo ramen," or "spicy Sichuan" without scrolling through thousands of irrelevant photos.
Table of Contents
- What Is a Searchable Food Photo Library?
- Why Most Food Photo Collections Fail
- The Three-Level System: Choose Your Commitment Level
- Level 1: Native Gallery Organization (Fast Setup)
- Level 2: Niche Food Apps (Specialized Tools)
- Level 3: Professional Database Systems (Maximum Control)
- The 30-Second Post-Meal Workflow
- How to Organize Photos: Dish-First vs. Restaurant-First
- Using 2026 AI Tools to Speed Up Organization
- The Metadata Layer: Making Photos Truly Searchable
- Frequently Asked Questions
What Is a Searchable Food Photo Library?
A searchable food photo library is a curated system where you can find specific dishes using text searches, filters, or tags instead of endlessly scrolling through a chronological camera roll. It's the difference between typing "best pasta Rome" and instantly seeing three annotated photos versus spending 20 minutes swiping through 1,000 images hoping to stumble across the right meal.
The core mechanism is simple: you add searchable metadata to your photos - dish names, restaurant details, ratings, dates, locations - in a way that lets you retrieve them instantly. Think of it as creating your own personal food search engine where the query "spicy ramen under $15" returns exactly three photos with context, not 400 unsorted images.
This isn't about becoming a food blogger or posting to Instagram. It's about building a private culinary archive that serves you and only you when you're trying to answer real questions: "What was that incredible taco truck in Austin?" or "Which omakase spot in Tokyo had the toro that melted on my tongue?"
The limitation? No system is truly "set and forget." Even the most automated AI tools require some level of initial setup and occasional maintenance to stay useful.
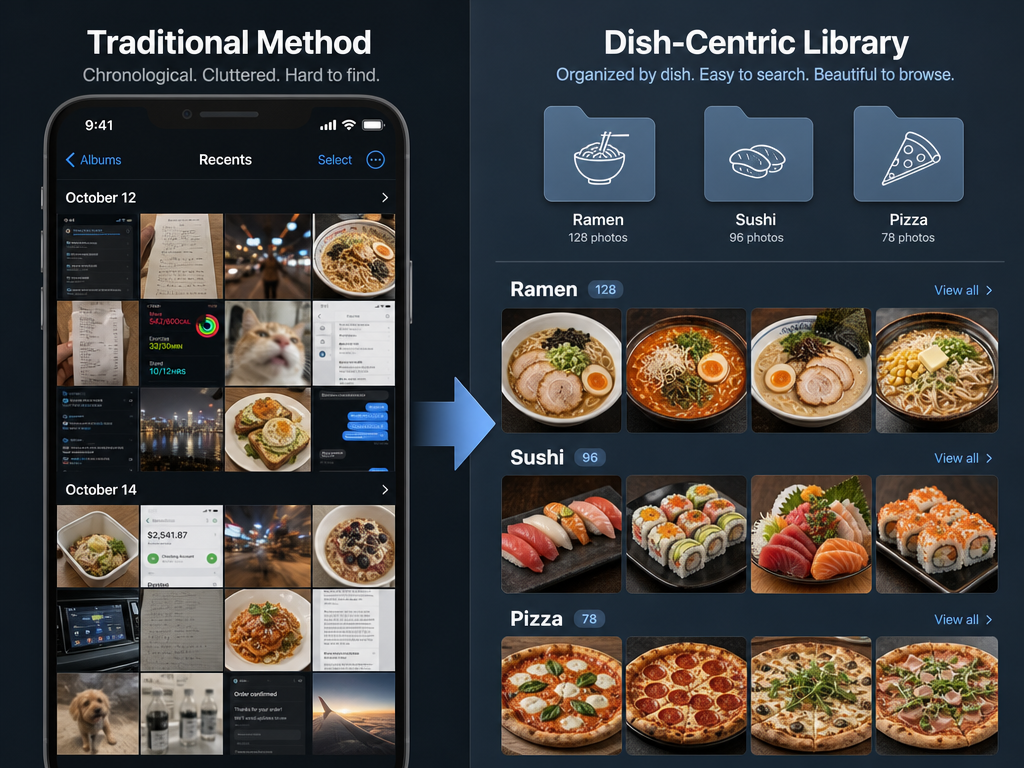
Transitioning from a chronological 'camera roll graveyard' to a dish-centric library allows for instant retrieval of specific culinary memories.
Why Most Food Photo Collections Fail
Most people's food photos exist in a state of permanent chaos because they're organized chronologically by default - the way your phone's camera roll works. The problem isn't that you don't take photos; it's that you take too many photos of everything, and food gets lost in the noise.
You go to a concert, snap 40 photos, then grab late-night ramen and take three more. Your phone doesn't know which matters to you six months later. The ramen photo sits sandwiched between blurry stage shots and a screenshot of a parking code, effectively invisible.
The second problem is the restaurant-first mental model. Most food apps (including Yelp and Google Maps) organize around venues, not dishes. When you're trying to remember "that incredible duck confit," thinking "Where did I eat that?" adds an unnecessary cognitive step. You remember the dish first, the location second.
The third failure point is the lack of a metadata layer. Without captions, tags, or ratings attached to the photo itself, your phone's AI can only guess. It might recognize "pasta" or "meat," but it can't tell you whether this was the $12 cacio e pepe that changed your life or the $45 truffle version that disappointed you.
The solution isn't taking fewer photos. It's building a system that turns random snapshots into a searchable personal database. If you're serious about curating restaurant experiences, you might also explore how to build a personal restaurant library or organize your restaurant photos by restaurant.
The Three-Level System: Choose Your Commitment Level
There's no single "best" way to build a searchable food photo library. The right system depends on your technical comfort, time commitment, and how much detail you want to capture.
Level 1: Native (Fast) uses your phone's built-in tools - Apple Photos, Google Photos - with minimal extra work. Setup takes 10 minutes, and ongoing maintenance is about 30 seconds per meal. Best for people who want basic search functionality without learning a new app.
Level 2: Niche (Specialized) uses dedicated food apps like Beli, Savor, or Pepper that are built specifically for tracking meals. Setup takes 30-60 minutes as you customize your rating scales and preferences. Ongoing maintenance is still fast, but you're locked into a specific ecosystem. Best for people who want dish-level detail and visual browsing.
Level 3: Professional (Custom) uses productivity tools like Notion or Airtable to build a fully customized database with relational tables, price tracking, and ingredient lists. Setup can take several hours, and maintenance requires discipline. Best for people who treat dining as a serious hobby and want extreme flexibility.
The table below compares these three levels across the dimensions that matter most to serious foodies.
| System Level | Setup Time | Search Speed | Data Portability | Rating Granularity | Social Sharing | Best For |
|---|---|---|---|---|---|---|
| Native Gallery | 10 minutes | Fast (text search) | Full control (your photos) | None (manual captions) | Limited | Quick setup, basic needs |
| Niche Food Apps | 30-60 minutes | Very fast (filters, tags) | App-dependent (export varies) | 5-10 point scales | Built-in | Visual browsing, dish focus |
| Professional Database | 2-4 hours | Extremely fast (custom queries) | Full control (CSV export) | Unlimited custom fields | Manual | Data analysis, long-term archive |
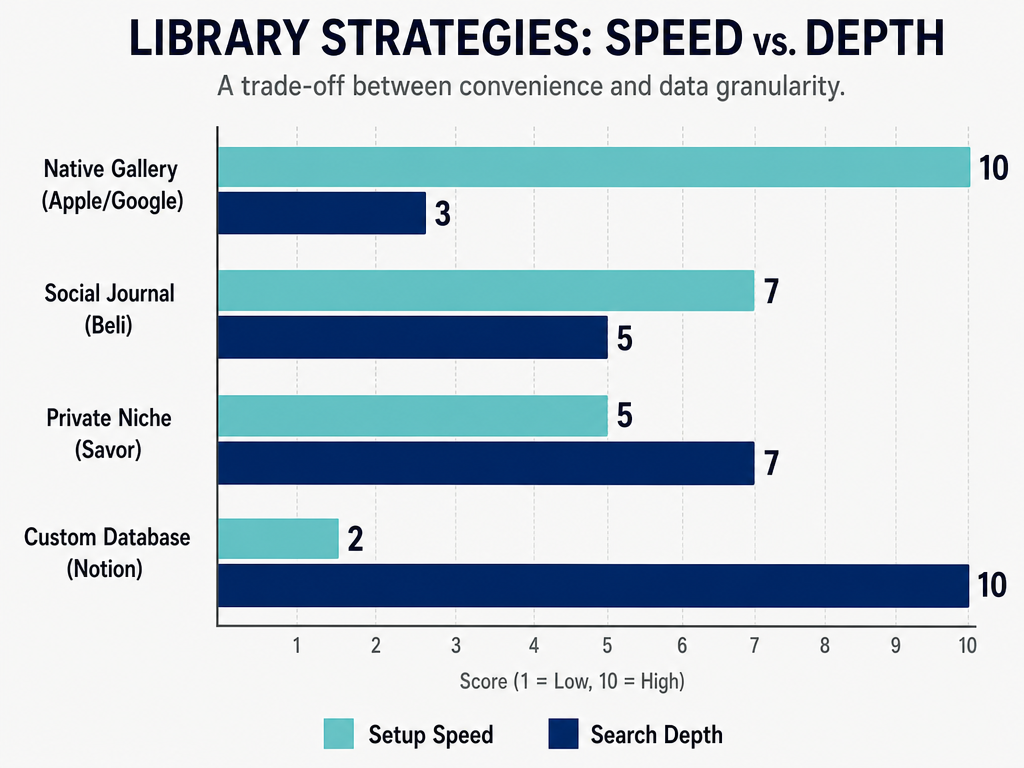
Choosing the right platform involves balancing the time spent on initial setup against the level of detail you need for future searches.
Level 1: Native Gallery Organization (Fast Setup)
Start with what you already have. Your phone's native photo app - Apple Photos or Google Photos - is surprisingly powerful if you use it intentionally.
Step 1: Create a Dedicated Food Album
Open your Photos app and create a new album called "Food Library" or "Meals Archive." This is your master collection. Whenever you take a food photo, manually add it to this album (on iOS, tap the photo, tap the share icon, choose "Add to Album"). This takes five seconds and instantly separates food from the 1,000 other photos you took that day.
If you've already accumulated hundreds of unsorted food photos, use the search function. On iOS, open Photos and type "food" into the search bar. The AI will surface most (but not all) meal photos. Select them in bulk and add them to your new album. This isn't perfect - you'll miss some and catch false positives - but it gives you a usable starting point in under 10 minutes.
Step 2: Add Searchable Captions
This is the critical step that makes native organization actually work. After taking a photo, immediately add a caption using this formula:
Dish Name | Restaurant Name | Your Rating
Example: "Uni Pasta | Osteria Francescana | 9/10"
On iOS, tap the photo, swipe up to reveal details, and tap "Add a Caption." On Android, tap the three-dot menu and select "Edit." The caption field is now searchable text. When you type "Uni Pasta" into the search bar six months later, that photo surfaces instantly.
The "Caption Power Move" is the single highest-ROI technique in this entire guide. It takes 15 seconds per photo and makes your collection searchable without learning a new app or paying for a subscription.
Step 3: Use Smart Albums for Automatic Sorting (iOS Only)
If you're on iOS, you can create Smart Albums that automatically populate based on rules. Go to Albums > See All > tap the "+" icon > New Smart Album. Set rules like "Caption contains 'ramen'" or "Location is within 5 miles of Tokyo."
This is powerful for power users but not essential if you're just getting started. The caption layer alone makes most searches work effectively.
What This System Can't Do
Native gallery organization is fast but limited. You can't filter by price, track which dishes you've tried multiple times, or compare ratings across restaurants. If you find yourself wanting those features, move to Level 2. For a deeper look at organizing restaurant photos, read how to organize restaurant photos library.
Level 2: Niche Food Apps (Specialized Tools)
Dedicated food apps are built for people who treat dining as a hobby, not a biological necessity. They understand that you want to track dishes, not just restaurants, and they make visual browsing delightful.
Savor: The Private Analytical Archive
Savor is designed for people who want dish-level ratings without the social pressure of public reviews. You build a private database where every dish gets a 10-point score across categories like flavor, presentation, and value.
The 2026 version includes AI-assisted tagging (the app suggests dish names based on your photo) and automatic location capture. The big advantage is granularity: instead of giving a restaurant four stars, you're recording "the carbonara was a 9, the tiramisu was a 6."
Savor's limitation is that it's a closed ecosystem. Your data lives in the app, and while you can export it, the process isn't as straightforward as downloading a folder of photos. If the company shuts down, you'll need to scramble to preserve your archive.
Beli: The Social Ranking Game
Beli treats food tracking like a collection game. You build ranked lists ("Best Ramen in LA," "Tacos I'd Die For") and share them publicly. The interface is gorgeous, with visual grids that make browsing satisfying.
The tradeoff is social exposure. Beli is designed for public sharing, so if you want a truly private archive, it's not the right tool. The app also uses a simpler star/favorite system instead of granular 10-point scales. That's faster for casual logging but less useful for detailed recall ("Was this ramen an 8 or a 9?").
When to Use a Niche App
Choose a dedicated food app when:
- You're dining out at least twice a week and the volume justifies learning a new system
- You want dish-level detail and visual browsing without building a custom database
- You're comfortable accepting some platform lock-in for a better user experience
If you're exploring other tools in this space, check out best food spotting apps or best apps to remember meals.
Level 3: Professional Database Systems (Maximum Control)
If you're treating dining like a serious cultural hobby - tracking prices, analyzing flavor profiles, building relational databases of ingredients - then Notion or Airtable is your endgame.
Notion: The Flexible Wiki
Notion lets you build a custom food database from scratch. You create a table with columns for Dish Name, Restaurant, Date, Rating, Price, Cuisine Type, Tasting Notes, and any other field you care about. Each entry is a full page where you can embed photos, write essays, and link to other entries.
The power is in relationality. You can create a separate "Restaurants" database and link it to your "Dishes" database, so every dish automatically pulls in the restaurant's location, Michelin stars, and price range. You can filter views to show "All ramen dishes rated 8+ under $20."
The limitation is friction. Setting up a Notion database takes hours if you want it done right, and you'll need to manually input data every time you eat. There's no automatic photo import from your camera roll, no AI tagging, no one-tap logging. This is for people who enjoy data architecture as much as they enjoy food.
Airtable: The Spreadsheet on Steroids
Airtable is similar to Notion but feels more like an advanced spreadsheet. It's better for numerical analysis (average rating per cuisine type, spending trends over time) and has more powerful filtering and sorting.
The tradeoff is a steeper learning curve. If you've never used Airtable before, expect to spend a few hours watching tutorials. But if you're comfortable with spreadsheets and want maximum control, it's the most powerful tool available.
When to Go Professional
Choose Notion or Airtable when:
- You're dining out at least 3-4 times per week and have accumulated hundreds of meals
- You want to analyze trends ("Am I rating Italian restaurants higher than Japanese?")
- You enjoy building systems and don't mind spending time on database design
- You want full data portability and no reliance on a food app staying in business
For more on customizing your own tracking system, explore best apps for recipe organization.
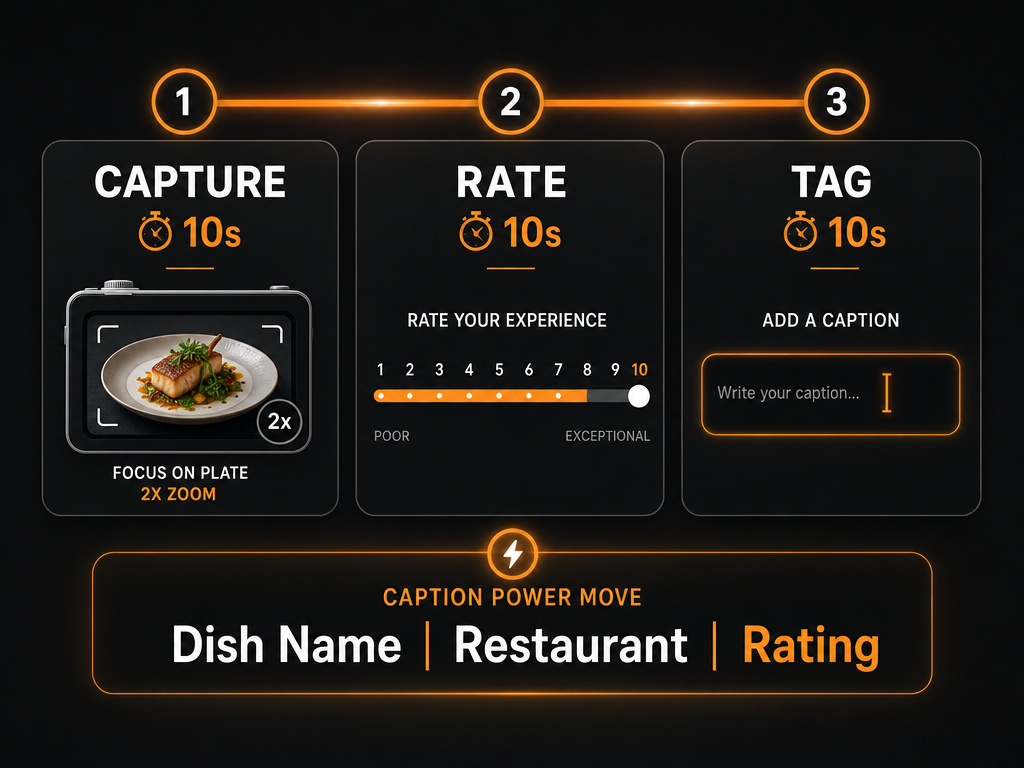
A consistent 30-second routine prevents a backlog of untagged photos and ensures your library remains searchable in the long run.
The 30-Second Post-Meal Workflow
The best system in the world is useless if you don't maintain it. The key is building a post-meal routine that's fast enough to become automatic.
At the table (10 seconds): Take your photo. Use 2x zoom if possible - it tightens the frame and reduces background clutter. Pay attention to lighting. Natural window light beats overhead fluorescents every time.
Right after the meal (20 seconds): Add the caption or log the entry while you're still in the car, on the train, or walking to your next destination. This is when the details are fresh. If you wait until you get home, you'll forget the name of the dish, misremember the price, or lose the moment entirely.
The formula is simple:
- Capture with intention (10 seconds)
- Caption immediately (20 seconds)
- Move on with your life
If you let photos pile up, you'll face the "backlog of shame" - 500 untagged images that require an entire Sunday afternoon to process. The 30-second habit prevents this. It's the difference between maintaining a useful archive and abandoning the system entirely after three months.
How to Organize Photos: Dish-First vs. Restaurant-First
Most food apps default to restaurant-first organization. You search for "Joe's Pizza," then see all the dishes you've had there. This mirrors how Yelp and Google Maps work, but it's backwards for memory.
When you recall a great meal, you remember the dish first. You think "that incredible duck confit" or "the best cacio e pepe I've ever had." The restaurant name comes second, if at all.
Dish-first organization means your library is structured around categories like Ramen, Tacos, Pasta, Steak - not around restaurant names. When you search, you're querying "show me all the ramen I've rated 8 or higher," not "show me everything I ate at Ippudo."
To implement this in a native gallery, use captions that start with the dish name, not the restaurant. Instead of "Osteria Francescana: Uni Pasta," write "Uni Pasta | Osteria Francescana." Your phone's search algorithm weights the beginning of a caption more heavily, so leading with the dish improves retrieval.
In Notion or Airtable, create a "Dish Type" field and make it your primary filter. Build views like "All Pasta Dishes," "All Ramen," "All BBQ." The restaurant becomes secondary metadata.
The dish-first approach mirrors how serious foodies actually think. You're not collecting restaurants; you're collecting extraordinary eating experiences that happen to occur at specific locations.
Using 2026 AI Tools to Speed Up Organization
The newest AI features in iOS and Android can dramatically reduce the friction of organizing food photos, but they're not as automated as the marketing suggests.
iOS: Visual Look Up for Food Scenes (2026)
Apple's Visual Look Up now recognizes specific dishes and suggests labels like "Carbonara," "Sushi Nigiri," or "Banh Mi." It's not perfect - it frequently confuses ramen for pho - but it's a useful starting point.
To use it, tap a food photo, then tap the sparkle icon at the bottom. The system will suggest a dish name. You can accept it or edit it, then save the caption. This cuts your tagging time from 20 seconds to 5 seconds when the AI is accurate.
The limitation is that Visual Look Up doesn't capture restaurant names, ratings, or prices. You still need to add those manually.
Android: Google Lens for Menu OCR
Google Lens can read text from photos, including menu items. If you take a picture of the menu before ordering, you can later search for dishes by the exact names printed on the menu.
To use it, open Google Photos, select the menu photo, and tap the Lens icon. The text becomes selectable and searchable. This is especially useful for restaurants with complex names or dishes in foreign languages.
The limitation is that OCR works best on printed text, not handwritten menus or heavily stylized fonts. And it doesn't help if you didn't photograph the menu in the first place.
The AI Reality Check
AI tools are assistants, not replacements. They can suggest dish names and extract menu text, but they can't remember why this particular carbonara was special or whether the $45 price tag was justified. That context still requires 15 seconds of manual annotation.
If you want more on AI-assisted organization, see how to organize photos with AI.
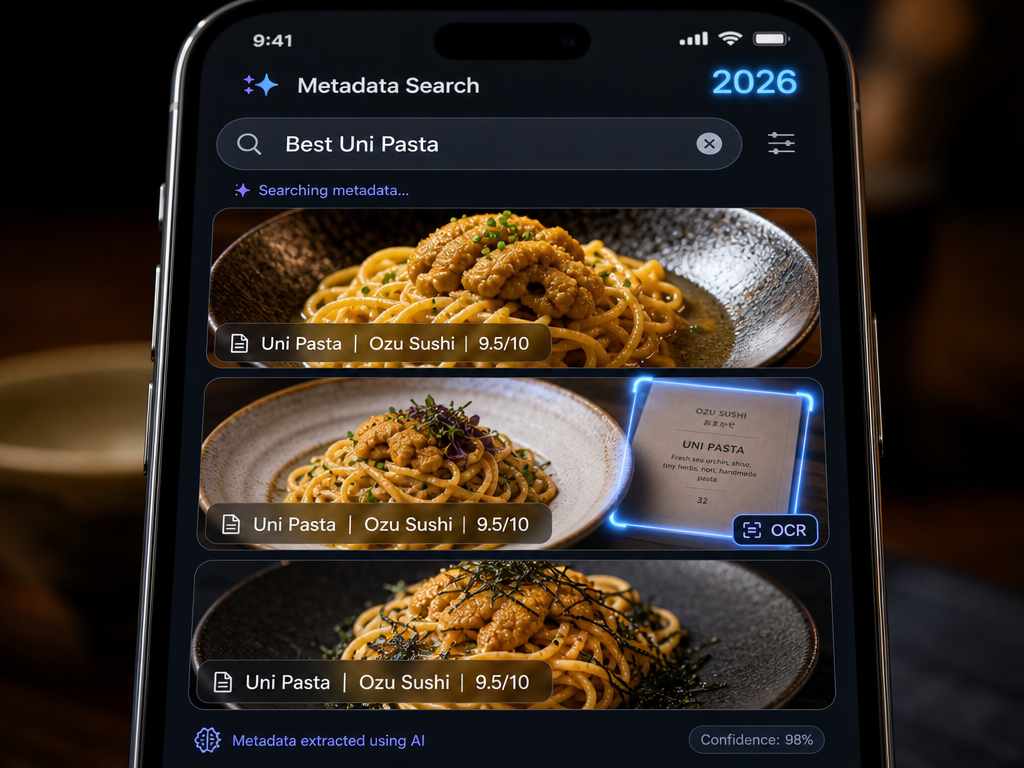
Modern AI and OCR tools allow you to find specific dishes by searching for text contained within your photos or captions.
The Metadata Layer: Making Photos Truly Searchable
Photos are visual, but search is textual. The metadata layer is what bridges that gap.
Core metadata fields:
- Dish Name: The specific item, not the category. "Tonkotsu Ramen" beats "Ramen."
- Restaurant Name: Include the neighborhood or city if the name is generic ("Joe's Diner, Austin").
- Date: Auto-captured by your phone, but verify it if you're backfilling old photos.
- Rating: A 5-point or 10-point scale. Be consistent.
- Price: Optional but useful for budgeting and value analysis.
- Tasting Notes: A sentence or two capturing what made this dish memorable. "Perfectly crispy skin, meat fell off the bone, sauce was too sweet."
Advanced metadata fields (Level 3 only):
- Cuisine type (Italian, Japanese, Mexican)
- Spice level (Mild, Medium, Hot)
- Protein type (Beef, Pork, Seafood, Vegetarian)
- Occasion (Date night, Business lunch, Solo meal)
- Would I order again? (Yes/No)
The more metadata you add, the more powerful your searches become. But there's a point of diminishing returns. If logging a meal takes five minutes, you'll stop doing it. If it takes 30 seconds, it becomes automatic.
For people interested in flavor documentation, read what is a flavor profile.
Frequently Asked Questions
What is the best app for keeping a photo food diary?
It depends on whether you want a public-facing social app or a private archive. For private, dish-level tracking with 10-point ratings, Savor is the strongest option. For social sharing and visual ranking lists, Beli offers a more polished interface. If you want maximum control and don't mind manual setup, Notion or Airtable let you build a fully custom database. For a deeper comparison, see best food diary app.
How do I organize my thousands of digital food photos?
Start by creating a dedicated album in your native photo app and use the search function to bulk-add existing food photos. Then implement the "Caption Power Move" - add a simple "Dish | Restaurant | Rating" caption to each photo going forward. This takes 15 seconds per meal and makes your collection searchable. For photos you've already taken, set aside an hour to backfill captions for your top 20-30 favorite meals. Don't try to annotate everything at once; focus on the dishes that actually matter.
What is the best way to organize my photos on Apple Photos?
Use a combination of albums and captions. Create a dedicated "Food Library" album and manually add food photos to it. Then write captions in the format "Dish Name | Restaurant | Rating" so you can search by text. If you're a power user, create Smart Albums that auto-populate based on caption keywords or location. Avoid relying solely on Apple's AI recognition - it's helpful but not precise enough for serious curation.
How can I use OCR to search for text on menus in my photos?
On Android, use Google Lens by opening Google Photos, selecting a menu photo, and tapping the Lens icon. The text becomes searchable. On iOS, Visual Look Up can identify some menu text, but it's less reliable than Google Lens. For best results, take clear, well-lit photos of menus with printed text. Handwritten or stylized fonts reduce accuracy. OCR is most useful for capturing the exact names of complex dishes or dishes in foreign languages.
Is it better to organize by restaurant or dish name?
Organize by dish name. When you recall a great meal, you remember "that incredible duck confit," not "that restaurant in the 3rd arrondissement." Dish-first organization mirrors how memory actually works. In captions, lead with the dish name ("Uni Pasta | Osteria Francescana"), not the restaurant. In databases like Notion, use Dish Type as your primary filter and Restaurant as secondary metadata.
Which one is better, Airtable or Notion?
Notion is better for people who want a flexible, wiki-style interface with embedded photos and long-form notes. Airtable is better for people who want numerical analysis, advanced filtering, and a spreadsheet-like structure. If you're comfortable with spreadsheets and want to track spending trends or rating distributions, choose Airtable. If you want a visual, narrative-driven archive with linked pages, choose Notion. Both have steep learning curves and require hours of setup.
What is the best photo filter for taking food photos?
Don't use filters. They distort color accuracy and make it harder to remember what the dish actually looked like. Instead, focus on lighting and composition. Natural window light produces the best results for food photography. If you're shooting indoors, position yourself so the light source is behind you or to the side, not directly overhead. Use your phone's exposure slider to brighten shadows without blowing out highlights. The best "filter" is good light and a steady hand.
You've spent years accumulating food photos. It's time to turn that messy camera roll into a searchable personal database. Pick a system that matches your commitment level, implement the 30-second post-meal workflow, and watch your culinary memory transform from vague impressions into instant, detailed recall. The best meal you've ever eaten doesn't have to disappear just because you forgot to write it down.