
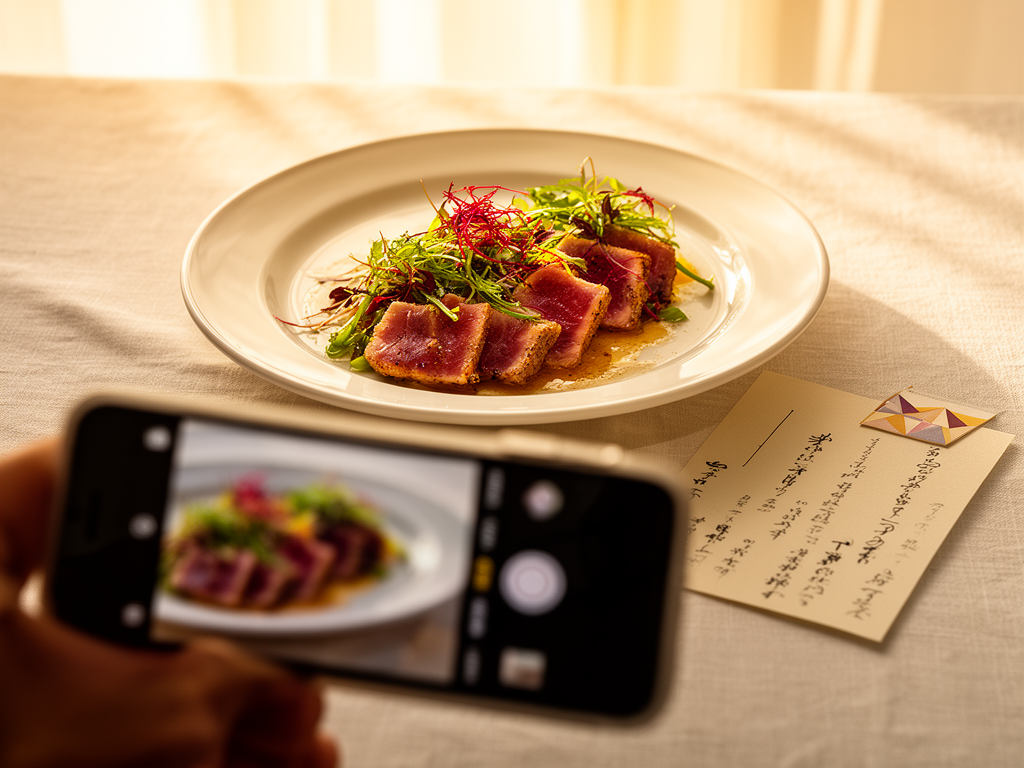
How to Remember Which Dishes You Loved (2026)
Harry the matcha king
Harry is our resident matcha obsessive. He’s tasted hundreds of bowls and tracks every cup in Savor.
How to Actually Remember Which Dishes You Loved: The Complete System for Serious Foodies You spent $180 on omakase in Tokyo, and three months later, you can't...
How to Actually Remember Which Dishes You Loved: The Complete System for Serious Foodies
You spent $180 on omakase in Tokyo, and three months later, you can't remember a single piece.
You're scrolling through your camera roll at 11 PM, trying to find that life-changing carbonara from Rome, but all you see is an endless scroll of brown food on white plates. You took the photo. You remember the feeling. But the details? The name of the dish? The restaurant? The specific flavors that made it transcendent? Gone.
Your camera roll holds 2,847 food photos. You remember taking them. You don't remember eating them.
This is the Camera Roll Graveyard - and according to research from Savor, search time for a specific food photo in a standard camera roll averages 3 minutes, while organized tracking apps reduce this to around 3 seconds.
This guide will show you how to transition from passive documentation to active curation - building a personal food database that actually helps you remember what you loved.
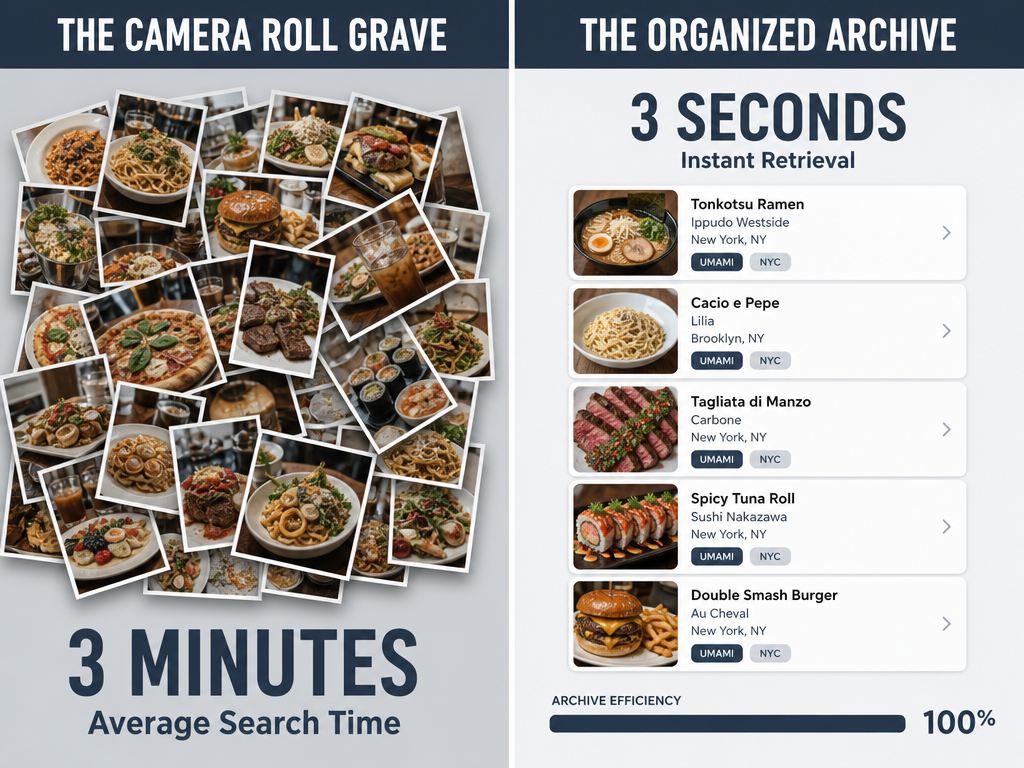 Stop losing your culinary memories in the camera roll grave. Transitioning to a structured archiving system reduces retrieval time from minutes to seconds.
Table of Contents
- The Camera Roll Problem: Why Your Brain Can't Index Generic Food Photos
- Restaurant-Level vs. Dish-Level Tracking: Why the Dish Matters More
- The 3-Tier System Selection: Finding Your Archiving Partner
- The 2-Minute Capture Protocol: How to Log Without the Fatigue
- The Taste Memory Zone: Sensory Encoding for Better Recall
- The Privacy Manifest: Why Your Best Reviews Should Stay Private
- Maintenance and Export: Protecting Your Culinary Archive
- Frequently Asked Questions
The Camera Roll Problem: Why Your Brain Can't Index Generic Food Photos
Your brain is terrible at remembering generic visual data without context.
A photo of brown food on a white plate provides almost no retrieval cues. There's no text. No location metadata that means anything to you six months later. No flavor notes. No emotional anchor. It's just... a photo.
This is why you can have 3,000 food photos and still struggle to remember what you ate last Tuesday. The photo exists, but the memory doesn't. Your camera captured the image, but nothing captured the experience.
The human brain doesn't index memories by image alone. According to research on taste memory, the insular cortex is the brain region responsible for the sensory perception and recording of taste. Visual memory alone doesn't activate this region - you need sensory and emotional context to create a lasting food memory.
That's the fundamental problem: you're documenting the wrong thing. You're capturing the plate, not the experience.
Restaurant-Level vs. Dish-Level Tracking: Why the Dish Matters More
Most food apps ask you to rate the restaurant. That's the wrong unit of measurement.
A restaurant might serve a 9/10 Cacio e Pepe and a 4/10 steak. If you rate "the restaurant" as a 7, you've averaged away the most important information: which specific dishes were worth ordering again.
Serious foodies require dish-level tracking because:
- Menus change. That chef who made the incredible duck confit might leave next month.
- Execution varies. The same restaurant can deliver a transcendent dish one night and a mediocre version the next.
- Personal taste is specific. You might love their pasta but hate their fish.
- Memory is dish-specific. You don't remember "that restaurant in Paris." You remember the tarte tatin.
If you're dining out 150+ times a year, you need a system that tracks the dish, not just the venue. Restaurant ratings are useful for deciding where to go. Dish ratings are useful for deciding what to order.
Learn more about building a personal dish archive that actually works.
The 3-Tier System Selection: Finding Your Archiving Partner
There's no single "best" app for remembering dishes. There are three fundamentally different approaches, each optimized for a different type of foodie.
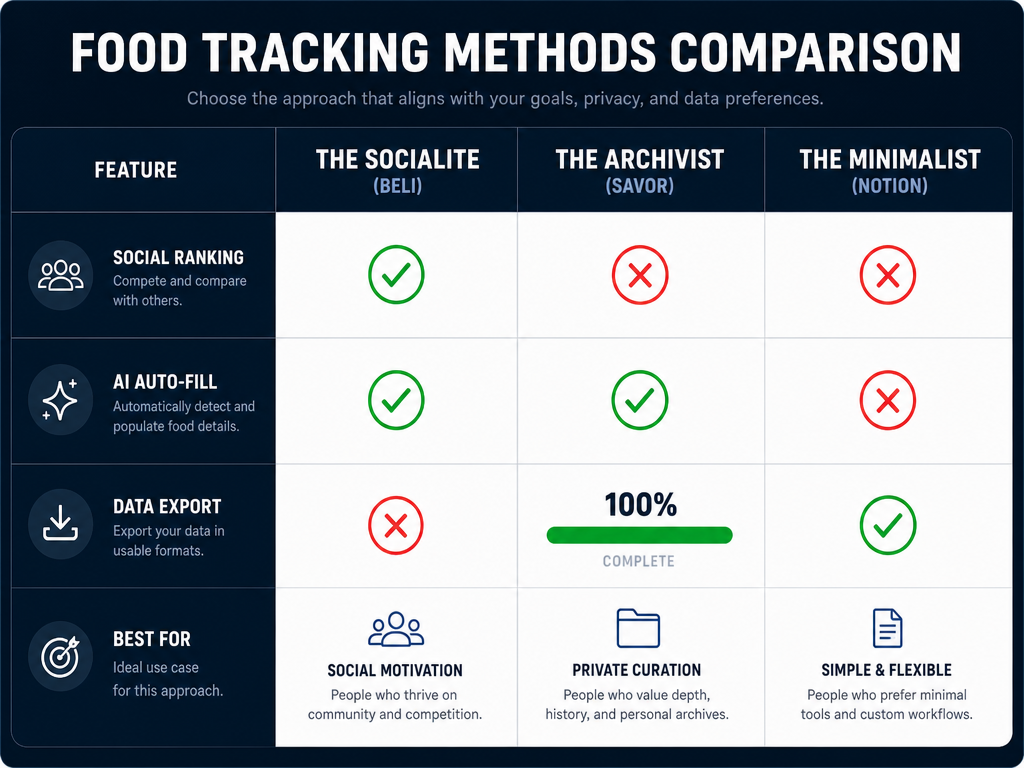 Choosing the right system depends on your goals. Whether you want social competition or a private data-rich archive, this matrix helps you decide.
The Socialite: Beli
Best for: Competitive eaters who want friend-based discovery and public rankings.
Beli uses ELO ranking - you compare dishes head-to-head instead of assigning absolute scores. It's a social app first, with feeds, followers, and the ability to see what your friends are eating.
The tradeoff: Your reviews are public, which means you're less likely to be brutally honest. That famous dish everyone raves about? You're not going to give it a 4/10 on Beli, even if that's what you truly think. Social pressure creates performance reviews, not private truth.
Who it's for: Foodies who want dining to be a social activity and who value friend recommendations over personal archiving.
The Archivist: Savor and Memolli
Best for: Private, detailed archiving with AI-assisted speed.
These apps let you track individual dishes with photos, ratings, flavor notes, and location data. They're optimized for speed - you can log a dish in under two minutes. Many include AI dish recognition to reduce manual entry.
The big difference from social apps? Your reviews are private by default. You can be honest. You can rate that Michelin-starred dish a 6 without worrying about comments from strangers.
Who it's for: High-frequency diners who need to log 4+ meals a week without fatigue, and who prioritize honest personal records over social discovery.
Explore the best dish tracking apps for foodies.
The Minimalist: Apple Notes or Notion
Best for: Total control freaks who want no new apps and absolute data ownership.
You already have Apple Notes. You already know how to use it. Create a new note for each dish, add a photo, write three sentences, tag it with the restaurant and city, and you're done.
The advantage is simplicity and permanence - Apple Notes will exist as long as you have an iPhone. The disadvantage is no automation, no AI help, and slower search.
Notion adds more structure. You can build a database with custom fields (dish name, restaurant, city, rating, date, tags) and filter/sort in ways Apple Notes can't. But you're trading simplicity for power.
Who it's for: Foodies who distrust new apps, who want complete data control, and who don't mind a bit of manual work.
The 2-Minute Capture Protocol: How to Log Without the Fatigue
The biggest enemy of any food tracking system is logging fatigue. You get home from a three-hour dinner, and the last thing you want to do is write a dissertation about every dish.
The solution is a protocol so simple you can execute it in under two minutes, even after wine.
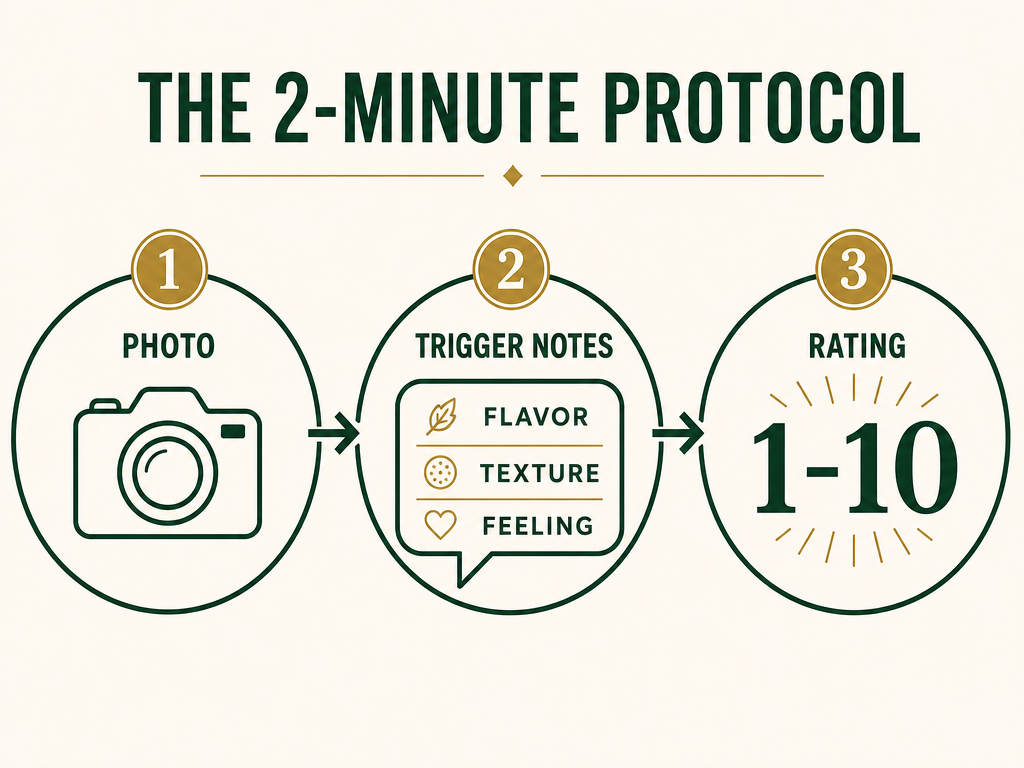 Master the 2-minute capture protocol to ensure every meal is documented with enough sensory detail to trigger your memory years later.
Step 1: One Clear Photo
Not ten photos. One.
Take it before you start eating, with decent lighting. Get the whole dish in frame. This photo isn't for Instagram - it's a memory trigger for your future self.
Step 2: The Trigger Note (Three Words)
This is the secret weapon. Write exactly three words:
- One flavor: The dominant or most surprising taste (yuzu, truffle, miso, smoke)
- One texture: The most memorable physical sensation (crunchy, silky, chewy, crispy)
- One feeling: The emotional response (nostalgic, exciting, comforting, challenging)
Example: "Yuzu, silky, nostalgic."
That's it. These three words activate the insular cortex - the brain's taste memory center - far more effectively than a paragraph of description. Specific sensory triggers create stronger neural connections than generic praise.
Learn how to build a searchable food memory archive.
Step 3: The Quick Rating
Use a 1-10 scale, not stars. Stars feel too coarse. You need more resolution to capture the difference between "really good" (7) and "life-changing" (10).
Rate in the moment. Don't wait until you get home. Your memory starts degrading immediately.
That's the entire protocol: Photo, three words, one number. Under two minutes. Repeatable 200 times a year without burning out.
The Taste Memory Zone: Sensory Encoding for Better Recall
Why do some meals haunt you for years while others vanish overnight?
It's not about the quality of the food. It's about how you encoded the memory.
The insular cortex - your brain's taste processing center - needs specific sensory anchors to create lasting memories. Generic praise ("it was delicious") doesn't activate it. Specific sensory details do.
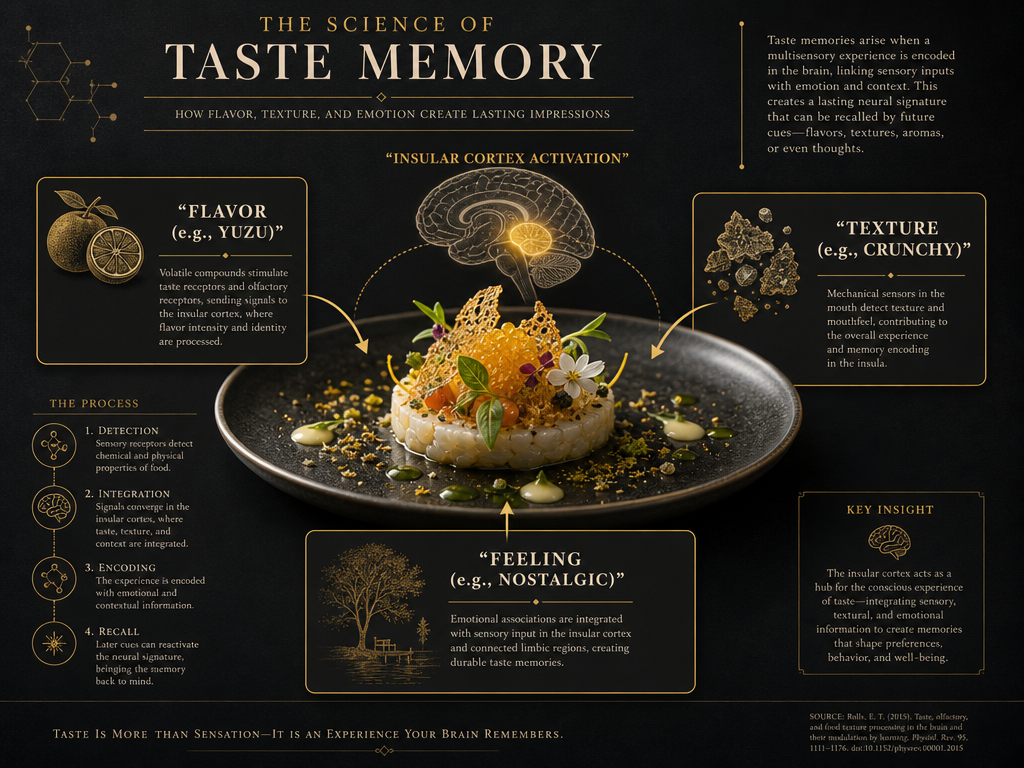 Unlock the 'Taste Memory Zone' by recording specific sensory metadata. This technique uses flavor, texture, and emotional triggers to create lasting neural imprints.
Here's what works:
Smell triggers: The brain processes smell and memory in the same region (the limbic system). If a dish had a distinctive aroma - woodsmoke, jasmine, brown butter - write it down. Six months later, that one word will unlock the entire experience.
Texture contrasts: Crispy skin giving way to tender meat. Crunchy exterior, creamy center. Your brain remembers contrast better than uniformity.
Emotional context: Who were you with? What were you celebrating? Was it raining? Emotional context creates stronger memory anchors than flavor alone.
The science is clear: the more sensory dimensions you record, the stronger the memory. That's why the 2-Minute Capture Protocol asks for flavor, texture, and feeling - it's hitting three different neural pathways instead of one.
Discover how to keep a dish rating journal.
The Privacy Manifest: Why Your Best Reviews Should Stay Private
Here's an uncomfortable truth: your public reviews are probably lying to your future self.
Social platforms - Yelp, Instagram, Beli, even Google Reviews - create performance pressure. You're not just documenting a meal; you're broadcasting an opinion to an audience. That changes what you write.
You're less likely to:
- Give a harsh rating to a restaurant owned by someone you might meet
- Admit you didn't "get" a dish everyone else loves
- Rate a famous chef's signature dish below 8/10
- Document the mediocre meals (but those are often the most useful data points)
Your public persona is "person with good taste." Your private archive should be "person with honest taste."
The solution is simple: keep two systems. Use public apps for discovery and sharing. Use a private app for your actual truth.
Your private archive is where you can write "The uni was fishy, not sweet" or "Everyone raves about this, but I found it one-note" or "I was drunk and this tasted better than it actually was." Those notes are worthless on Instagram. They're gold for your future self deciding whether to order the dish again.
Privacy isn't about hiding bad reviews. It's about creating space for honesty.
See why restaurant feedback software for foodies should be private.
Maintenance and Export: Protecting Your Culinary Archive
Your food archive is a life-long asset. You're building a personal database that will span decades, cities, relationships, and thousands of meals. That makes data permanence non-negotiable.
The Six-Month Audit
Every six months, review your system:
- Are you actually using it? If you've stopped logging meals, figure out why. Is it too slow? Too complicated? Adjust the protocol.
- Are the ratings still calibrated? Your 8/10 from two years ago might be a 6/10 by today's standards as your palate evolves. That's fine, but be aware of it.
- Are you missing patterns? Sort by rating. Sort by city. Sort by cuisine. Look for blind spots - are you only rating fancy dinners and ignoring casual meals?
The Export Insurance Policy
Never, ever use an app that doesn't let you export your data.
If the app shuts down, gets acquired, or changes its business model, your archive shouldn't vanish with it. Before you commit to any system, confirm:
- Can you export to CSV or PDF?
- Can you download your photos in full resolution?
- Is there a way to back up your notes outside the app?
Apple Notes and Notion win here by default - your data lives on your device and in iCloud, not in a third-party silo. Dedicated food apps should offer export functionality. If they don't, that's a red flag.
Your food archive isn't just a record of meals. It's a map of your taste evolution, a collection of sensory memories, and a guide to what brings you joy. Protect it accordingly.
Learn how to organize your restaurant photos like a professional.
Frequently Asked Questions
How do waiters remember orders without writing them down?
Professional servers use spatial memory and association techniques. They assign each person at the table a mental "seat number" and create vivid visual associations between the person and their order. For example, "the woman in the red jacket ordered the salmon" becomes a mental image of a salmon wearing a red jacket. They also group similar orders together and use mnemonic patterns. But here's the thing: they're only remembering those orders for 20 minutes. You're trying to remember meals for years, which is why you need an external system.
What is the app that helps you memorize things?
For food specifically, apps like Savor, Beli, and Memolli are designed to help you remember dishes. General memory apps like Anki use spaced repetition - showing you information at increasing intervals to strengthen long-term retention. But those are designed for facts, not experiences. Food memory apps work differently: they focus on sensory encoding (flavor, texture, smell) and retrieval cues (photos, location tags, emotional context) to help you reconstruct the experience later.
Why is Notion better than Apple Notes?
Notion isn't "better" - it's more powerful and more complicated. Apple Notes is simple, fast, and always available. Notion lets you build structured databases with custom fields, filters, and views. For food tracking, Notion's advantage is organization: you can create a database with fields for dish name, restaurant, city, rating, tags, and date, then filter to show "all 9+ rated pasta dishes in Rome" or "everything I ate in Tokyo sorted by rating." Apple Notes can't do that. But most people don't need that. If you're logging 200+ dishes a year and want advanced search, Notion wins. If you're logging 50 dishes a year and want simplicity, Apple Notes wins.
Is Apple Notes or Google Keep better?
For food tracking, Apple Notes has better integration with the Apple ecosystem - better photo handling, better search, better organization with folders and tags. Google Keep is faster for quick capture but worse for long-form notes and photo management. Keep works better if you're on Android or use multiple platforms. Notes works better if you're all-in on iPhone and Mac. Neither is purpose-built for food, so the real question is: which one are you already using every day? Use that one.
What is the best app for restaurant ratings?
For public restaurant ratings, Yelp and Google Maps dominate because they have the most coverage and reviews. For private dish-level tracking, Savor and Beli are the current leaders. But "best" depends on your goal. If you want to find restaurants other people like, use Yelp. If you want to remember which specific dishes you personally loved, use a private tracking app. They solve different problems.
What is the sensory memory of taste?
Sensory memory of taste is your brain's ability to recall the specific flavor, texture, and smell of a food you've eaten before. This happens in the insular cortex, the brain region that processes taste perception and creates lasting taste memories. But here's the catch: taste memory is surprisingly fragile without sensory anchors. Your brain doesn't automatically record "this tastes good" as a lasting memory. It needs specific triggers - the char on the crust, the citrus note in the sauce, the silky texture - to encode the experience in a way you can retrieve later. That's why recording specific sensory details (not just "delicious") creates stronger memories.
What are the 5 sensory for food?
The five sensory dimensions of food are taste, smell, texture (mouthfeel), appearance, and sound. Taste covers sweet, salty, sour, bitter, and umami. Smell is often more important than taste - most of what we perceive as "flavor" is actually aroma. Texture includes temperature, viscosity, and physical sensation (crunchy, creamy, chewy). Appearance affects expectation and enjoyment. Sound is often overlooked but matters (the crunch of a chip, the sizzle of fajitas). When you're documenting a dish, hitting at least three of these five dimensions creates a much stronger memory than just writing "it was good."
Why can I remember the taste of food?
You can remember the taste of food because your brain encodes sensory experiences in the insular cortex and connects them to emotional memories in the limbic system. But memory is selective and fragile. You're more likely to remember a dish if it had emotional significance (first date, celebration, travel), strong sensory contrast (crispy and creamy, sweet and salty), or novelty (first time trying a cuisine). Generic meals fade quickly because there's nothing distinctive for your brain to anchor to. That's why writing down specific sensory details immediately after eating creates stronger, more reliable memories than relying on your brain alone.