
How to Organize Your Dining Photos with a Chronological and Location Filter
Alex the juice queen
Alex hunts for the best juice bars and presses. She rates every sip and saves her favorites in Savor.
How to Organize Your Dining Photos by Chronological Location Filter: A Serious Foodie's Guide You had an extraordinary bowl of ramen in Tokyo three months ago....
How to Organize Your Dining Photos by Chronological Location Filter: A Serious Foodie's Guide
You had an extraordinary bowl of ramen in Tokyo three months ago. You can still taste the umami-rich broth, the perfect char on the chashu. You took a photo. But now? Buried somewhere in a camera roll with 2,847 other food shots, lost between screenshots of wine labels and accidental pocket photos.
You're not alone. 42% of diners eat out at least once a week or more, and 84% of diners use photos to decide where to eat. Yet most of us treat our culinary archive like a digital graveyard - thousands of images we'll never look at again because we can't find them when it matters.
The problem isn't taking photos. It's organizing them in a way that matches how you actually think about food. This guide shows you how to build a searchable dining photo system using chronological and location filters, turning your camera roll chaos into a personal culinary database.
Table of Contents
- Why Default Photo Organization Fails for Food Memories
- The Dish vs. Venue Conflict: Why Restaurant Names Don't Work
- Defining the Foodie Folder Hierarchy
- Native Power-User Tutorial: Dual-Filter Mechanics
- The Metadata Caption Hack
- AI Tagging Accuracy: Can You Trust the Tech?
- The Batch-and-Tag Workflow
- Advanced Automation with Smart Albums and Shortcuts
- App Comparison: Specialized vs. Native Solutions
- Frequently Asked Questions
Why Default Photo Organization Fails for Food Memories
Your phone's native photo app sorts by date. That's fine for vacation snapshots, but it's terrible for food.
Think about how you actually remember meals. You don't think, "What did I eat on March 14th?" You think, "Where was that perfect carbonara I had in Rome?" or "Which ramen shop in Tokyo had the best chashu?" Your memory anchors to place, flavor, and experience - not arbitrary dates.
The default chronological view forces you to scroll through hundreds of photos to find a specific meal. If you dined out three times a week for a year, that's 150+ meals buried in a timeline alongside everything else you photographed. The cognitive load of scanning all those thumbnails means you'll rarely look back, and the photo becomes useless.
Location filters help, but only if you remember exactly where you were. Did you take that photo in the Mission or NOMA? Was it the East Village or the West Village? Without additional context, location becomes another guessing game.
The Dish vs. Venue Conflict: Why Restaurant Names Don't Work
Here's the fundamental problem with restaurant-first organization: you rarely love every dish at a restaurant equally.
You might visit a highly-rated Italian spot and discover the bucatini all'amatriciana is transcendent while the tiramisu is forgettable. Six months later, you want to recommend "that place with the incredible amatriciana," but all you remember is a vague restaurant name and a 4-star average that tells you nothing about which specific dish to order.
This is why apps like Savor focus on dish-level tracking rather than venue reviews. Your culinary memory is granular - it's about specific plates, not entire menus. A photo organization system that ignores this reality will always feel inadequate.
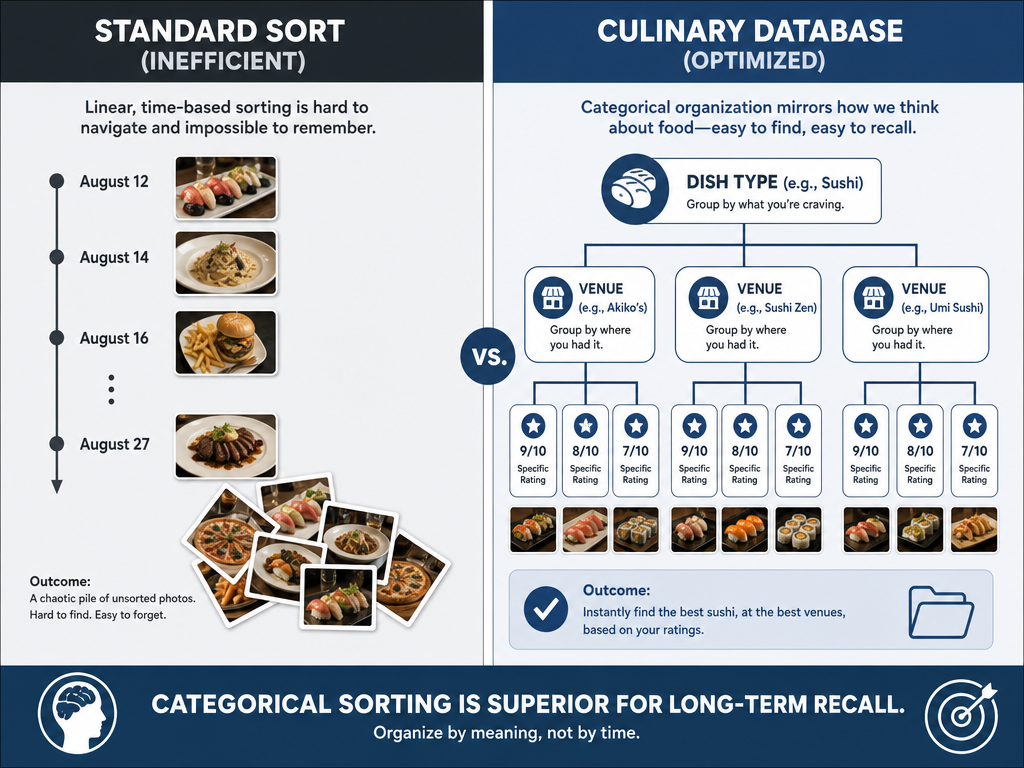 Transitioning from a basic chronological timeline to a categorical hierarchy allows foodies to locate specific meals and ratings instantly rather than scrolling through thousands of photos.
Defining the Foodie Folder Hierarchy
The solution is to invert the default structure. Instead of Date → Location → Random Food, build a system that prioritizes what matters: Dish Type → Venue → Date.
Here's how it works in practice:
Tier 1: Dish Category
Your top-level folders should reflect broad dish categories that match how you search for food: Pasta, Ramen, Pizza, Sushi, Tacos, Desserts, etc. This immediately narrows your search space from thousands of photos to a manageable subset.
Tier 2: Geographic Region or City
Within each dish category, organize by location. Your "Ramen" folder might contain subfolders for Tokyo, New York, Los Angeles, and Paris. This layer answers the question: "Where did I have great ramen?"
Tier 3: Venue and Date
The final layer includes the specific restaurant name and the date you visited. This granular level preserves the full context without cluttering your initial search.
Example path: Ramen → Tokyo → Tsuta (March 2026)
This hierarchy matches your actual thought process. You start with what you're craving (ramen), narrow by location (Tokyo), and drill down to the specific memory (Tsuta, that Michelin-starred bowl you had in spring).
Native Power-User Tutorial: Dual-Filter Mechanics
You don't need a specialized app to make this work. Both iOS and Android have native features that let you apply multiple filters simultaneously - you just need to know where they are.
iOS: Search Tab + Sort & Filter
- Open the Photos app and tap the Search tab at the bottom.
- Type "Food" in the search bar. Apple's AI will display photos it recognizes as food.
- Tap the result to see all food photos.
- Now, tap the search bar again and add a location (e.g., "Chicago" or "Paris").
- iOS will show only food photos taken in that location.
- To sort by date, tap the Sort & Filter button (three horizontal lines) in the top-right corner. You can now toggle between "Captured" (when you took the photo) and "Added" (when it appeared in your library).
This dual-filter approach - food category plus location - drastically reduces the number of photos you need to scan. You can further refine by adding a date range: "July 2026" or "Last 6 months."
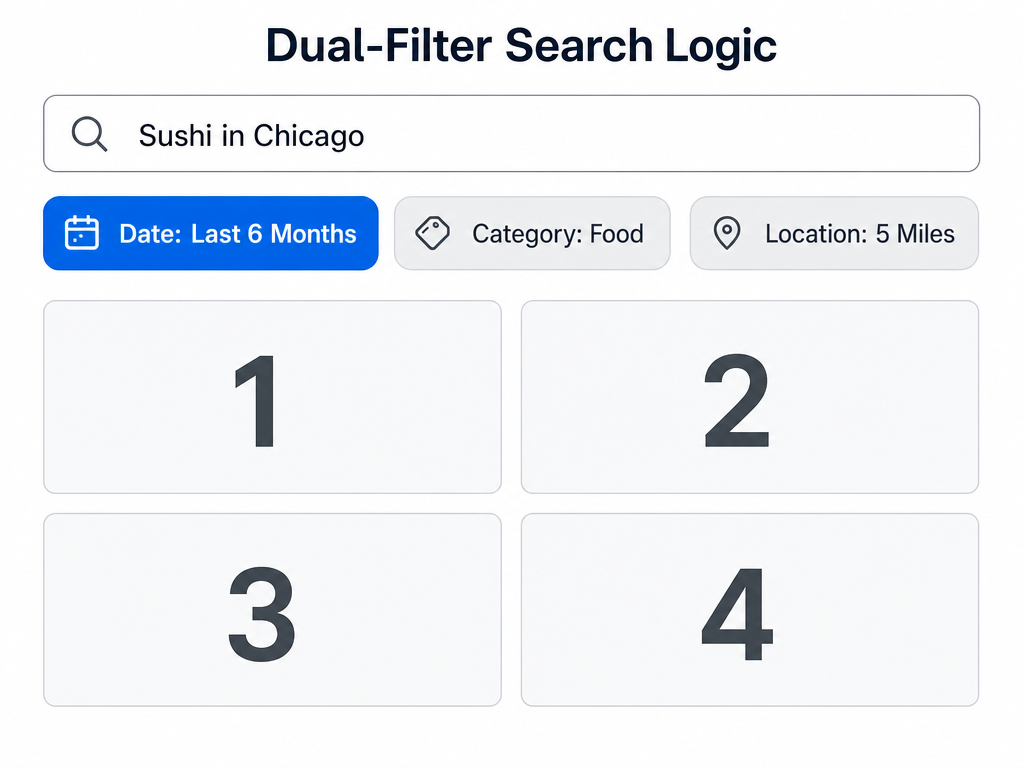 Mastering dual-filter mechanics allows you to cross-reference location and time, making it easy to find that specific dish from your last city trip.
Android: Google Photos Search with Boolean-Style Queries
Google Photos has a powerful search function that understands natural language queries, though it doesn't always expose this feature clearly.
- Open Google Photos and tap the Search icon.
- Type "Food" to filter all food-related images.
- In the same search bar, add a location: "Sushi in Seattle."
- For date filtering, add a year or timeframe: "Sushi in Seattle 2026."
Google Photos will interpret this as a multi-criteria search. The AI is context-aware, so you can use phrases like "Pizza in New York last month" or "Ramen in Tokyo 2025."
The limitation: Google Photos doesn't always let you sort results by date within a filtered search, so you may still need to scroll through results chronologically. The workaround is to be as specific as possible with your search terms.
The Metadata Caption Hack
Here's the truth about photo metadata: most of it disappears when you share, sync, or migrate your library. EXIF data (camera settings, GPS coordinates) survives, but custom tags and keywords often don't. The one field that persists across platforms and AI indexing is the caption.
Use captions as a structured metadata string. After a meal, add a caption to each photo in this format:
[Dish Name] | [Rating] | [Venue] | [Date]
Example:Cacio e Pepe | 9/10 | Roscioli | March 2026
This simple convention makes every photo fully searchable by keyword. Later, when you type "Cacio e Pepe" in your photo app's search bar, the image appears instantly - even if the AI misidentified it as "pasta" or "noodles."
Why this works:
- Platform-agnostic: Captions sync across iCloud, Google Photos, and most third-party apps.
- AI-indexed: Modern photo libraries index caption text, making it searchable.
- Future-proof: Even if you switch apps or platforms, the caption data migrates with the photo file itself.
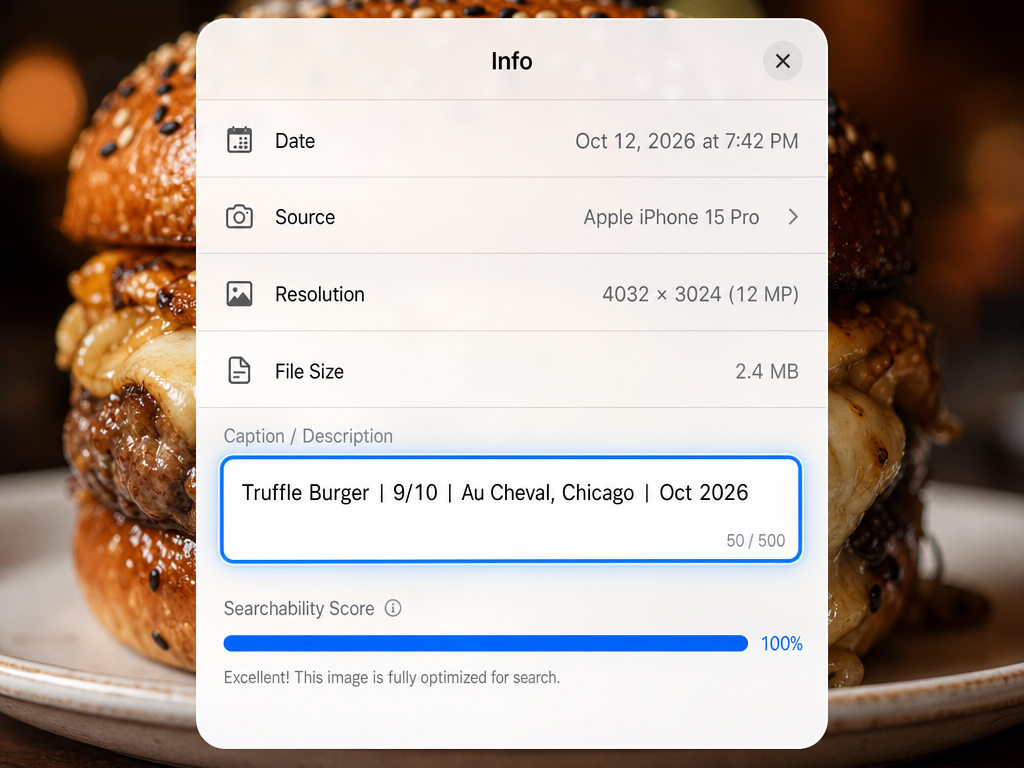 Using the caption field as a unified metadata string ensures your dining data remains searchable across all platforms and survives future AI library migrations.
This method is deliberately low-friction. You're not building a database - you're adding four pieces of information that take 10 seconds to type. Over time, this builds a searchable archive without requiring specialized software.
For a more robust system, consider dedicated dish-tracking apps that handle metadata automatically.
AI Tagging Accuracy: Can You Trust the Tech?
AI photo recognition is impressive but not flawless, especially for food. Apple's "Food Scenes" AI achieves 81% accuracy on common dishes but only 41% on fine dining, according to Bloomberg reporting via Savor.
What this means in practice: your iPhone will reliably tag a burger, pizza, or salad. It struggles with plated presentations from high-end restaurants, unfamiliar cuisines, or dishes with complex compositions. That beautifully arranged omakase sushi might get tagged as "assorted food" or not tagged at all.
Google Photos faces similar challenges. Its AI excels at common items but falters when faced with regional dishes, molecular gastronomy, or anything that doesn't match training data from Western cuisines.
The gap widens further for specific ingredients. If you photograph a dish containing burrata, the AI might tag it as "cheese" or "mozzarella" but rarely the precise variety. This matters if you're trying to track which restaurants serve the best burrata.
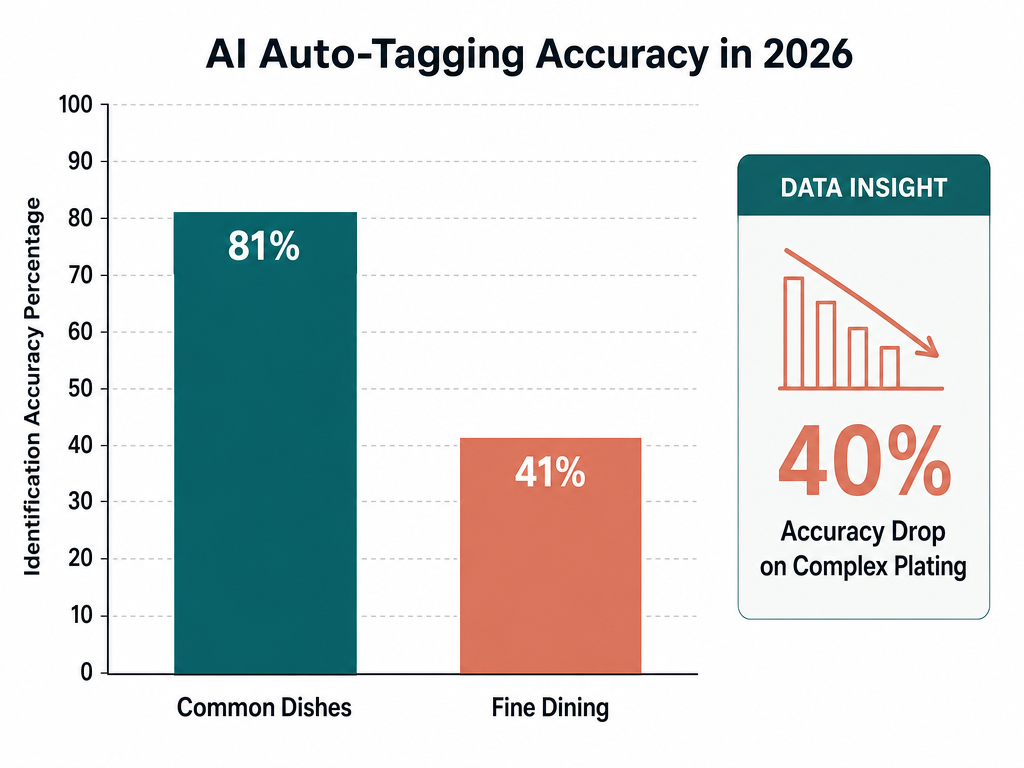 While AI is proficient at identifying basic food items, its accuracy drops by half when faced with complex fine dining presentations, necessitating manual tagging.
The workaround: Don't rely solely on AI. Use it as a starting point, then supplement with manual captions for anything important. The "Batch-and-Tag" workflow (next section) makes this sustainable.
The Batch-and-Tag Workflow
Tagging photos at the table interrupts the dining experience. The better approach is batching - wait until after the meal, then process all photos in one focused session.
Here's the workflow:
Phase 1: At the Table (Capture)
- Shoot your photos at 2x zoom instead of wide-angle. This reduces distortion and improves AI recognition accuracy by eliminating background clutter.
- Take the photo, then immediately return to the meal. Don't review, edit, or caption anything yet.
Phase 2: The Ride Home or Before Bed (Tag)
- Open your photo app and navigate to the most recent images.
- Select all photos from that meal (use multi-select if your app supports it).
- Add the caption using the format above:
[Dish] | [Rating] | [Venue] | [Date]. - If your app supports it, add the photos to a dedicated album (e.g., "Dining Out 2026").
This two-phase approach separates capturing from cataloging. You stay present during the meal, then spend 2-3 minutes per dining experience organizing your archive. Over time, this becomes automatic.
For batch processing on iOS, use the "Add to Album" feature to move multiple photos at once. On Android, Google Photos lets you select multiple images and apply a shared caption or move them to a folder in one action.
If you want to eliminate even this manual step, consider automation (next section).
Advanced Automation with Smart Albums and Shortcuts
Smart Albums and automation tools can reduce the friction of photo organization to near-zero.
iOS Shortcuts: Auto-Sorting by Location
You can create an iOS Shortcut that automatically moves any photo taken at a restaurant into a dedicated "Dining Log" album.
- Open the Shortcuts app.
- Create a new Personal Automation triggered by Location.
- Set the trigger to activate when you Arrive at a location tagged as a "Restaurant" (you'll need to define this manually or use a list of saved places).
- Add an action: "Find Photos where Date is Today."
- Add a second action: "Add to Album → Dining Log."
Now, every time you visit a restaurant and take a photo, the Shortcut automatically files it into your dining album. You still need to add captions manually, but the initial organization happens without any action on your part.
Smart Albums: Auto-Filter by Keyword
Apple Photos and Google Photos both support Smart Albums - dynamic folders that auto-populate based on criteria you define.
On macOS Photos, create a Smart Album with these criteria:
- Caption contains: "9/10" (or any other rating)
- Caption contains: "Ramen"
- Location is: "Tokyo"
The album updates automatically as you add new photos that match those criteria. This is useful for creating "best-of" collections: "My 9+ Rated Dishes" or "Every Ramen Shop in Tokyo."
On Google Photos, use the search bar to create saved searches. Type "Ramen in Tokyo 2026" and bookmark the search. It functions like a Smart Album, dynamically updating as new photos match the query.
For a deeper dive into automation workflows, see our guide on organizing restaurant photos by dish.
App Comparison: Specialized vs. Native Solutions
Should you stick with native apps or move to a specialized food tracker? The answer depends on how seriously you take your culinary archive.
Native Apps (Apple Photos / Google Photos)
Best for: Casual food photographers who want basic organization without extra tools.
Strengths:
- Already on your phone; no new app to learn.
- Good-enough AI tagging for common dishes.
- Location and date filters are built-in.
Weaknesses:
- No dish-level ratings or structured notes.
- AI struggles with fine dining and regional cuisines.
- No comparative tools (e.g., "Show me all ramen I've rated 8+ in Tokyo").
Savor
Best for: Serious foodies who want a private, searchable culinary database with granular dish ratings.
Strengths:
- Dish-first architecture: rate individual plates, not entire restaurants.
- 10-point scoring system for nuanced ratings.
- Filters by dish type, cuisine, city, and rating.
- Private: your data isn't shared or used for public reviews.
Weaknesses:
- Requires manual entry of dish details (though this becomes second nature).
- Not a photo-management tool per se; it's a structured database with photo support.
Beli
Best for: Social foodies who want to share recommendations with friends.
Strengths:
- Social features: follow friends, see their top dishes, build shared lists.
- Visual interface optimized for food discovery.
- Strong map integration for location-based browsing.
Weaknesses:
- Public-first design; less useful if you want a private archive.
- Less granular than Savor for personal dish ratings.
Notion
Best for: Power users who want complete customization and don't mind building their own system.
Strengths:
- Infinite flexibility: create custom databases, tags, filters, and views.
- Cross-platform syncing.
- Can integrate with other tools (calendars, task managers, etc.).
Weaknesses:
- Steep learning curve; you're building from scratch.
- Photo handling is clunky compared to native photo apps.
- Requires ongoing maintenance to keep the system usable.
For most serious foodies, a hybrid approach works best: use native apps for initial photo storage, then export the best meals to a dedicated tracker like Savor or Beli for structured ratings and search.
Frequently Asked Questions
How can I organize my photos in chronological order?
Every photo app sorts chronologically by default, but the better question is whether chronological order is useful for food photos. For most serious foodies, it's not. You don't remember meals by date - you remember them by dish, location, or flavor. Use chronological sorting as a fallback when you know approximately when you took a photo, but prioritize categorical organization (dish type, cuisine, city) for long-term retrieval.
How do I sort photos based on location?
On iOS, open Photos, tap Search, and type a city or neighborhood name. Tap the location result to see all photos taken there. On Android, open Google Photos, tap Search, and type the location. Google's AI is context-aware, so you can combine location with other criteria: "Food in Barcelona" or "Ramen in Tokyo 2026." For recurring visits to the same restaurant, create a manual album or use the caption field to tag the venue name.
What photo app can add date, time, and location to my photos?
Every modern smartphone camera embeds EXIF metadata automatically, which includes date, time, and GPS coordinates. You don't need a special app for this - it's already in your photos. The challenge is making that metadata searchable. Native apps (Apple Photos, Google Photos) index this data, but they don't display it prominently unless you drill into individual photo details. If you want date and location stamps visible on the image itself, use a third-party app like Timestamp Camera (iOS/Android), which overlays metadata directly onto the photo.
What is the best app for organizing photos?
For general photo management, Google Photos offers the most powerful search and AI capabilities across platforms. For food-specific organization, native apps fall short because they lack dish-level granularity. Specialized apps like Savor excel at organizing by dish type, rating, and cuisine, turning your food photos into a queryable database. If you want maximum flexibility and don't mind manual setup, Notion lets you build a fully custom photo archive with tags, filters, and relational databases.
How do I find photos of a specific dish I ate months ago?
Use a combination of search and caption metadata. If you tagged the photo with the dish name in the caption field, simply search for that term in your photo app. If you didn't tag it, use a combination of date range and location filters to narrow the results, then scroll manually. For future-proofing, adopt the caption hack described earlier: every meal gets a structured caption with dish name, rating, venue, and date. This makes retrieval instant.
Can AI reliably identify all types of food in my photos?
No. AI accuracy drops significantly for fine dining and regional cuisines. Common dishes like burgers, pizza, and salads are tagged reliably, but complex plated presentations, molecular gastronomy, or unfamiliar ingredients often confuse the AI. The workaround is manual tagging using captions or dedicated food apps that let you specify dish details. AI is a helpful starting point, not a replacement for intentional cataloging.
How do I filter out menu screenshots and wine labels from my food photos?
Most photo apps don't distinguish between a plated dish and a screenshot of a menu. To separate them, create a dedicated album for actual meals and manually move screenshots to a different folder (e.g., "Wine Labels" or "Menus"). On iOS, use Smart Albums to filter by Media Type → Screenshot and exclude those from your dining archive. On Google Photos, search for "screenshots" and move them in bulk. The cleanest solution is to stop saving screenshots in your Camera Roll altogether - use a note-taking app like Evernote or Notion for menu PDFs and wine lists instead.
What's the best way to organize food photos by cuisine type?
Use a two-tier folder system: Cuisine → City. For example, create albums for "Italian," "Japanese," "Mexican," etc., then subdivide by location: "Italian → Rome," "Japanese → Tokyo," and so on. If your photo app supports nested albums (like macOS Photos), this structure works natively. If not, use a naming convention: "Italian - Rome," "Japanese - Tokyo." For advanced users, dedicated apps like Savor let you tag by cuisine and filter dynamically without manual folder management.
Your camera roll doesn't have to be a graveyard. With the right combination of filters, metadata, and intentional organization, you can turn thousands of food photos into a personal culinary database - one that actually helps you remember and recreate your best dining experiences.
The key is to stop thinking in terms of chronological timelines and start thinking in terms of dishes, flavors, and places. Build a system that matches how your memory actually works, and you'll never lose track of an extraordinary meal again.
For more on building a personal food archive, see our guides on tracking your favorite dishes by city and creating a searchable restaurant dish archive.