
The Serious Foodie’s Guide to Snapseed: From Camera Roll to Culinary Diary
John the smoothie monster
John lives for smoothie bowls and cold-pressed juices. He uses Savor to remember his best blends.
The Serious Foodie’s Guide to Snapseed: From Unsearchable Camera Rolls to a Digital Culinary Diary Your camera roll is a graveyard. Between screenshots of...
The Serious Foodie’s Guide to Snapseed: From Unsearchable Camera Rolls to a Digital Culinary Diary
Your camera roll is a graveyard. Between screenshots of parking tickets and blurry selfies from three weddings ago is the best duck confit you ever ate, but you can’t remember the restaurant name. The truffle pasta that made you reconsider everything you knew about cheese? Lost somewhere in a 10,000-photo black hole. You took the picture. You edited it. You even sent it to your group chat. And now, three months later, it’s functionally invisible.
This is the paradox of the modern food lover: we document everything and remember nothing.
But here’s what most Snapseed tutorials won’t tell you: the app isn’t just a photo editor. It’s the foundation of a searchable, permanent culinary archive - if you know how to use it correctly. This isn’t about making your food look "Instagram-worthy." It’s about creating a visual diary that actually functions as a reference tool, a memory system, and a personal guide to every meaningful meal you’ve ever eaten.
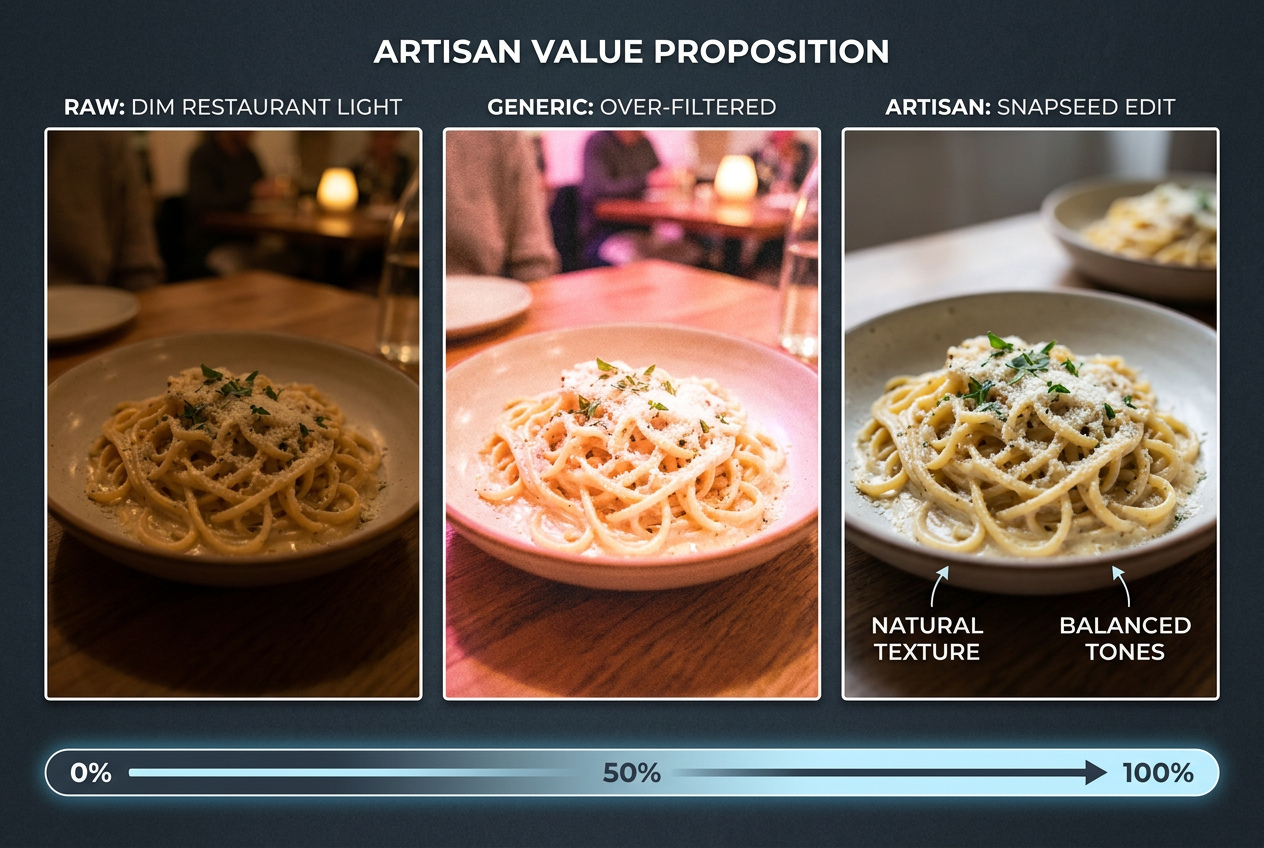 Moving beyond generic filters to the ’Artisan’ approach ensures your culinary memories maintain their authentic texture and color without looking artificial.
Table of Contents
- The Problem with the "Diner’s High"
- The "Artisan" Toolkit: Top 5 Snapseed Features for Food
- The 60-Second Workflow: Step-by-Step
- Organizing Your Gastro-History: The Metadata Hack
- Creating and Sharing Your Custom "Looks"
- Frequently Asked Questions
The Problem with the "Diner’s High"
You know the feeling. The server places a dish in front of you, and for a moment, everything else disappears. The plating is impeccable. The aroma is intoxicating. You pull out your phone, frame the shot, and capture it under the dim amber glow of the restaurant’s mood lighting. In that moment, you’re convinced you’ll remember everything: the name of the dish, the specific wine pairing the sommelier recommended, the texture of that crispy skin against the silky puree.
Then reality sets in. Three months later, you’re scrolling through your photos trying to find "that place with the amazing duck," and you’ve got nothing. No restaurant name. No dish name. Just a vaguely orange-tinted photo of something delicious that might as well be from another lifetime. The photo exists, but the memory - the context, the details, the story - is gone.
This isn’t a memory problem. It’s a documentation problem.
Most food photography guides focus on the wrong thing. They teach you how to make food look "pretty" or "appetizing" or "professional." They’re obsessed with lighting angles and rule-of-thirds composition. And sure, those things matter. But they miss the fundamental point: a photo that looks great but tells you nothing six months later is functionally useless.
The real challenge isn’t capturing a beautiful image. It’s creating a searchable, functional record of your culinary experiences that actually serves you over time. This means solving three specific problems:
Problem one: Dim restaurant lighting destroys color accuracy. That $48 sablefish wasn’t actually the color of a traffic cone, but your iPhone’s auto-white-balance thought otherwise. Generic Instagram filters can "fix" this, but they do it by plastering everything with the same artificial tint, making every dish look like it came from the same kitchen. The result feels fake because it is fake - you’ve traded one lighting problem for an entirely different authenticity problem.
Problem two: You can’t search your photos by content. Your phone can find photos of your dog, your car, and your face using AI, but it can’t distinguish between the carbonara you had in Rome and the one you had in Brooklyn. Without metadata - actual text labels embedded in the image - your camera roll is essentially unsearchable for the things that matter most to you.
Problem three: Memory fades faster than you think. The human brain is incredible at forgetting details. Within 48 hours of a meal, you’ll forget the specific preparation method. Within a week, you’ll forget half the ingredients. Within a month, you’ll struggle to remember which restaurant it even was. Your photo sits there, beautiful and useless, because you didn’t capture the one thing that matters: context.
This is where Snapseed becomes genuinely useful. It’s not about filters. It’s about precision, control, and - most importantly - the ability to embed searchable information directly into your images. It’s about treating photo editing the way a chef treats seasoning: as a precise, intentional process that elevates the raw ingredients without masking them.
The "Artisan" Toolkit: Top 5 Snapseed Features for Food
Snapseed has 29 different tools. You need five of them. Maybe six if you’re feeling ambitious. The rest are either redundant or designed for landscape photography. Here’s your essential toolkit, ranked by actual utility for food documentation.
White Balance: The "Neutralizer"
This is your first move, every single time. Restaurant lighting is designed to create ambiance, not accurate color. That warm, romantic candlelight that made the bistro feel intimate? It’s bathing your plate in a yellow-orange tint that makes everything look like it was cooked with a blowtorch.
Open Tools > White Balance. You’ll see two sliders: Temperature and Tint. Temperature controls the blue-orange spectrum. Tint controls the green-magenta spectrum. For most restaurant photos, you’re dealing with a temperature problem.
Here’s the rule: if your food looks too warm (yellow/orange), drag the temperature slider left toward blue. If it looks too cool (bluish), drag it right toward warm. The goal isn’t to make it "neutral" in some objective sense. The goal is to make it look the way the dish actually looked to your eye, before the mood lighting got involved.
Pro move: tap the eyedropper icon in the White Balance menu. This lets you select something in your photo that should be pure white or neutral gray. The ceiling, a plate rim, a napkin. Tap it, and Snapseed will auto-correct the entire image based on that reference point. It’s not always perfect, but it’s a great starting point.
Selective: The "Flavor Enhancer"
This is where Snapseed separates itself from every other mobile editing app. Tools > Selective lets you create targeted adjustment points - like seasoning one element of a dish without affecting everything else.
Tap the main subject of your photo: the protein, the garnish, whatever deserves to be the star. A red circle appears. This is your selection point. Pinch to adjust the selection radius. Now you can brighten, increase saturation, or adjust contrast for just that specific area, leaving the background untouched.
Why does this matter? Because real food photography isn’t about making everything bright and saturated. It’s about creating depth and hierarchy. You want the seared scallop to pop while the sauce stays subtle. You want the crispy skin to gleam while the vegetables provide context without competing for attention.
You can add up to eight selection points per image. Use them strategically. One for the main protein. One for the garnish. Maybe one to darken a distracting background element. Think of each point as a spotlight directing the viewer’s eye exactly where you want it.
Structure vs. Sharpening: The Texture Debate
Snapseed gives you two tools for enhancing detail: Structure (found in Tools > Details) and Sharpening (also in Details). They are not the same thing, and using the wrong one will ruin your photo.
Sharpening increases edge contrast across the entire image. It makes everything crisper, but it’s indiscriminate. Crank it too high, and your Caesar salad starts to look like plastic lettuce from a grocery store display case.
Structure is smarter. It enhances mid-tone contrast, which means it brings out texture in the actual surfaces of food - the crust of bread, the grain of a steak, the delicate layers of a pastry - without turning everything into a hyperreal cartoon.
For food, start with Structure. Set it between +15 and +25. This makes textures visible without crossing into the uncanny valley. Only add Sharpening if the image still feels soft after Structure, and even then, keep it below +10.
Exception: if you’re shooting something meant to be smooth and silky - a panna cotta, a chocolate mousse, a perfectly emulsified sauce - skip Structure entirely. Adding texture to something that’s supposed to be smooth defeats the purpose.
Healing: The "Crumb Remover"
Real dining is messy. There’s a water droplet on the marble table. A stray grain of salt near the plate rim. A crumb from the bread basket. Your eye didn’t notice these things in person, but your camera captured all of them, and now they’re distracting.
Tools > Healing is your cleanup crew. Tap the distracting element, and Snapseed intelligently fills it in with surrounding pixels. It’s shockingly good for small imperfections. Water spots disappear. Crumbs vanish. That random blob of sauce that dripped onto the table is gone.
Don’t overuse this. The goal isn’t to create a sterile, art-directed scene. The goal is to remove distractions that pull attention away from the dish itself. If it’s part of the story - a rustic crumb that adds to the charm - leave it.
Text: The "Search Engine"
This is the tool that transforms Snapseed from a photo editor into a memory system. Tools > Text lets you overlay text directly onto your image. Most people use this for Instagram captions or watermarks. You’re going to use it to make your photos searchable.
Here’s how it works: add a small, elegant text overlay to the bottom or corner of your photo. Use a clean font like "Cardo" or "Open Sans Light." Keep the opacity between 60-80% so it’s visible but not obnoxious. Write three things:
- Restaurant name
- Specific dish name
- Optional: date or location
Example: "L’Artusi | Ricotta Gnocchi | West Village"
Why does this matter? Because modern phones use Optical Character Recognition (OCR) to read text in photos. That text becomes searchable. Three months from now, when you’re trying to remember where you had that incredible gnocchi, you type "gnocchi" into your Photos app search bar, and the image appears. Not because of AI guessing what’s in the photo, but because you labeled it yourself.
This is the single most powerful technique in this entire guide. It takes 30 seconds per photo, and it turns your camera roll from an unsearchable archive into a functional culinary database.
You can also explore some tools to help you rate and organize dishes if you want to go even deeper into building your personal food reference system.
The 60-Second Workflow: Step-by-Step
Theory is fine. Now let’s make this practical. You’re sitting at a restaurant. Your food has arrived. You’ve taken the photo. The check will be here in 15 minutes. Here’s the exact sequence to follow.
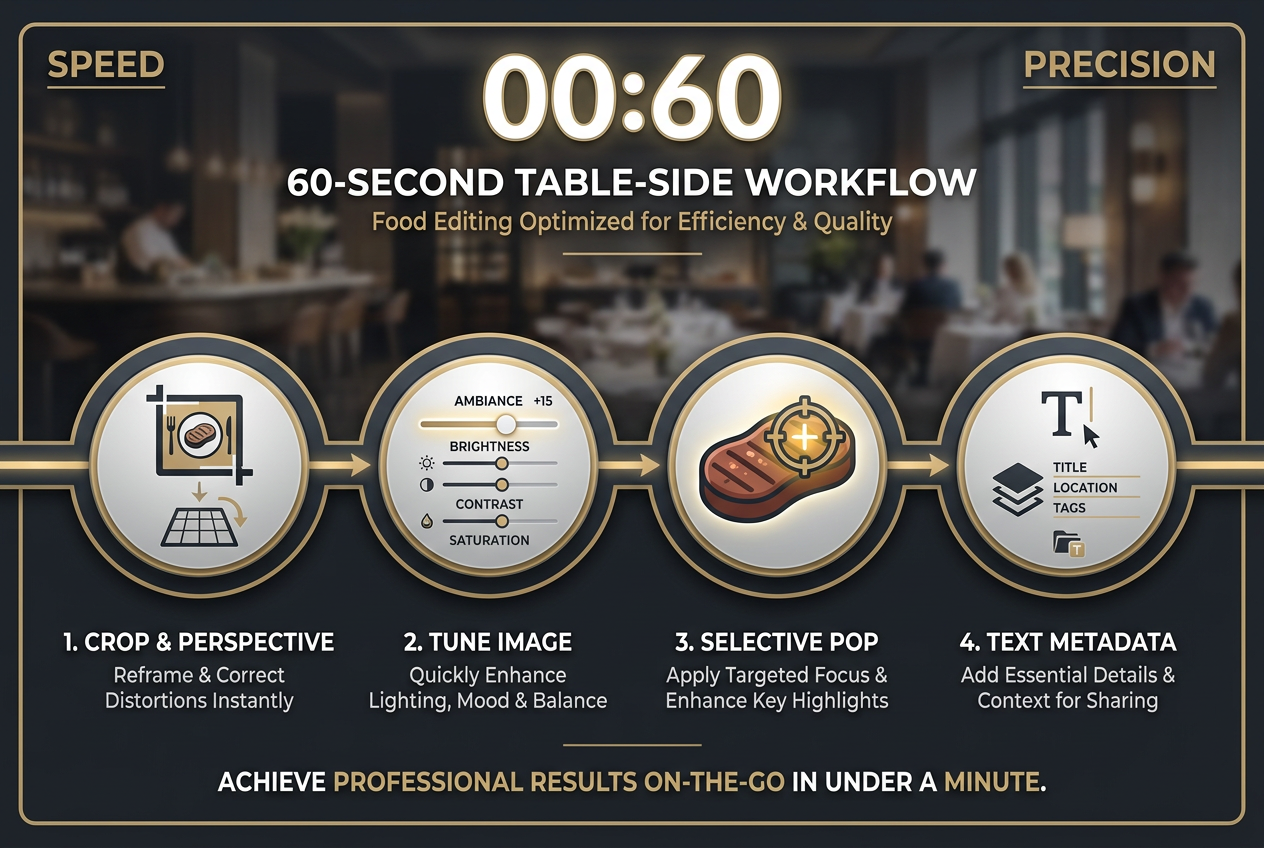 Master the 60-second table-side workflow to enhance your photos with professional precision before the check even arrives at your table.
Step 1: Crop & Perspective (10 seconds)
Open your photo in Snapseed. Go to Tools > Crop. Frame the dish so it fills most of the frame but still has breathing room. Food shouldn’t be crammed edge-to-edge.
If your plate looks tilted (this happens constantly when shooting from an angle), tap Tools > Perspective and use the rotation controls to level it. A tilted plate reads as sloppy, even if everything else is perfect.
Step 2: Tune Image (15 seconds)
Go to Tools > Tune Image. You’ll see six sliders. You need two of them:
- Brightness: +15 to +20 (most restaurant photos are underexposed)
- Ambiance: +10 to +15 (this is Snapseed’s secret weapon - it adds dimension without oversaturating)
That’s it. Don’t touch Contrast, Saturation, Shadows, or Highlights unless something specific is broken. The Brightness + Ambiance combination handles 90% of restaurant lighting problems.
Step 3: White Balance (10 seconds)
Go to Tools > White Balance. Use the eyedropper to tap something white or neutral in the frame. If the result looks good, you’re done. If it overcorrected, manually adjust the Temperature slider until it looks natural.
Step 4: Selective (15 seconds)
Go to Tools > Selective. Tap the main subject of your dish. Set the radius to cover just that element. Increase Saturation by +10 and Brightness by +5. This makes the hero ingredient pop without turning the entire plate into a neon sign.
If there’s a secondary element worth highlighting - a garnish, a sauce drizzle - add a second selection point and repeat.
Step 5: Text Overlay (10 seconds)
Go to Tools > Text. Add the restaurant name and dish name in the bottom corner. Choose a subtle font, set opacity to 70%, and position it where it won’t obscure the food.
Step 6: Export (5 seconds)
Tap the export icon. Choose Save a Copy. This keeps your original untouched while saving the edited version. Snapseed stores your editing history non-destructively, so you can always go back and adjust later.
Total time: 60 seconds. You can do this at the table before dessert arrives. You can do it in the car on the way home. You can do it the next morning with coffee. The point is that it’s fast, repeatable, and produces consistent results.
If you’re someone who eats out often and wants a systematic way to remember every dish, you might also want to check out apps designed specifically for tracking restaurant meals.
Organizing Your Gastro-History: The Metadata Hack
Adding text overlays to individual photos is powerful, but it’s just the beginning. The real game-changer is building a system around those labeled photos so they become part of a larger, searchable archive.
By adding minimal text overlays, you transform your camera roll into a searchable digital diary, making it easy to find specific dishes months later.
The OCR Advantage
Modern smartphones - both iPhone and Android - use Optical Character Recognition to automatically index text within photos. This happens in the background without you doing anything. When you add a text overlay in Snapseed with the restaurant name and dish, that text becomes part of the photo’s searchable metadata.
Practically speaking, this means you can open your Photos app, type "carbonara" in the search bar, and instantly see every carbonara photo you’ve ever labeled. You can search by restaurant name, cuisine type, or even specific ingredients if you include them in your text overlays.
This transforms your camera roll from a chronological dumping ground into a functional database. It’s the difference between "I think I ate that in 2023 somewhere" and "Here are the 12 pasta dishes I photographed in Italy last summer, sorted by location."
Building Consistency with "Looks"
Snapseed’s Looks feature lets you save your editing settings as a preset. Once you’ve dialed in the perfect Brightness + Ambiance + White Balance combination for your typical restaurant conditions, save it as a Look. Name it something specific: "Dim Bistro" or "Natural Light Brunch" or "Bar Lighting."
Now, the next time you’re editing a similar photo, you can apply that Look with one tap and then make minor adjustments from there. This creates visual consistency across your archive - all your photos will have a similar tonal quality, which makes them feel like part of a cohesive collection rather than a random assortment of unrelated images.
Here’s the subtle advantage of this: when you scroll through your camera roll, photos edited with consistent settings are easier to visually parse. Your brain starts to recognize the pattern. "That’s my food archive," not "that’s a random mix of overexposed phone snapshots."
For a deeper look at how to systematically organize your food photos beyond just editing them, check out this guide on how to organize food photos by restaurant.
The Albums Strategy
Don’t rely on search alone. Create dedicated photo albums for different categories:
- By Cuisine: "Italian," "Japanese," "Mexican"
- By City: "Tokyo Meals," "Paris Dinners," "NYC Favorites"
- By Restaurant: Dedicate albums to places you visit repeatedly
- By Dish Type: "Pasta," "Steak," "Desserts"
These albums provide a browsing experience that search can’t replicate. Sometimes you don’t know exactly what you’re looking for. You just want to scroll through all the sushi you’ve eaten and see what jumps out. Albums support that kind of exploratory behavior.
The combination of searchable text overlays and organized albums creates a two-pronged system. Need something specific? Search for it. Want to browse and reminisce? Open an album and scroll. Both modes are valuable, and Snapseed’s text labeling supports both.
Creating and Sharing Your Custom "Looks"
One of Snapseed’s most underutilized features is the ability to share your custom editing presets with other people. If you’re dining with friends who also care about documenting their meals, this turns your personal editing system into a shared visual language.
How to Create a Look
After editing a photo using your 60-second workflow, go to Looks in the main menu. Tap the icon to save your current edits as a new Look. Give it a descriptive name: "Warm Bistro," "Natural Cafe," "Moody Bar."
Snapseed saves every adjustment you made - White Balance, Brightness, Ambiance, Selective edits, everything. The next time you edit a photo in similar lighting conditions, you can apply that Look and instantly replicate those settings.
Sharing Looks via QR Code
This is where it gets interesting. Snapseed lets you generate a QR code for any Look. Go to Looks > My Looks, select the Look you want to share, and tap the share icon. Snapseed generates a unique QR code.
Your dining companion can scan that QR code with their phone’s camera, which opens Snapseed and imports your Look directly into their app. Now they can edit their photos using your exact settings. This is particularly useful for group dinners where everyone is shooting the same dishes under the same lighting - they can all apply the same Look and end up with visually cohesive results.
It’s a small feature, but it turns photo editing from an isolated activity into a shared ritual. You’re not just documenting meals together; you’re creating a consistent visual record that looks like it came from a single cohesive project.
If you’re interested in sharing not just editing styles but actual restaurant recommendations with your food-loving friends, take a look at this guide on the best apps to share lists for serious foodies.
When NOT to Use Looks
Looks are templates, not universal solutions. A Look optimized for candlelit Italian bistros will destroy a photo taken in bright natural light at a daytime cafe. The White Balance settings that fix yellow tungsten bulbs will turn outdoor photos into an icy blue disaster.
The solution is to maintain multiple Looks for different lighting scenarios:
- Warm Indoor (Bistro/Bar): Heavy blue correction on White Balance, moderate Brightness boost
- Natural Light (Cafe/Brunch): Minimal White Balance adjustment, slight Ambiance increase
- Harsh Overhead (Fast Casual): Shadow boost, Highlight reduction to soften contrast
- Dim Ambient (Cocktail Bar): Aggressive Brightness increase, Structure boost to maintain detail
Build these over time. Don’t try to create every scenario upfront. Wait until you encounter a specific lighting challenge, dial in the perfect settings, and then save it as a Look. Let your preset library grow organically based on the actual places you eat.
Frequently Asked Questions
What makes Snapseed better than other free photo editing apps?
Snapseed is the only free mobile editor that combines selective editing (targeting specific areas of an image), non-destructive editing (you can always undo or re-edit), and text overlay capabilities without watermarks or paid upgrades. Apps like VSCO and Lightroom Mobile offer some of these features, but they either require subscriptions or lack the precision of Snapseed’s Selective tool. For food documentation specifically, Snapseed’s combination of granular control and zero cost is unmatched.
How do I make my food photos look natural instead of overly edited?
The key is restraint. Most people over-edit because they’re trying to compensate for bad lighting in a single aggressive adjustment. Instead, make small incremental changes across multiple tools. Use Brightness +15 instead of +40. Use Selective editing to enhance one element instead of cranking up global Saturation. The "invisible edit" is one where viewers can’t point to what you changed - they just know the photo looks better than their phone’s auto-settings. If someone can immediately tell you used a filter, you’ve gone too far.
Can I use Snapseed on both iPhone and Android?
Yes. Snapseed is developed by Google and available for free on both iOS and Android. The interface and features are identical across platforms. Edits you make on one device won’t sync to another (Snapseed doesn’t have cloud storage), but you can export your edited photos and import them anywhere. The QR code sharing feature for Looks works across platforms as well - an iPhone user can scan a QR code from an Android user’s Look and vice versa.
Why should I add text labels to my photos instead of just using photo descriptions?
Photo descriptions and metadata stored in your device’s photo library are notoriously unreliable. They often don’t sync properly across devices, they’re invisible when you share photos, and many apps strip that metadata when you upload images. Text overlays burned directly into the image are permanent. They stay visible regardless of where you share the photo, they’re immune to metadata stripping, and they work with your phone’s built-in OCR search. Plus, they serve a dual purpose: they’re functional for you and provide context for anyone you share the photo with. If you’re curious about other ways to track and rate individual dishes beyond just photos, check out this article on the best apps to rate individual dishes.
What’s the difference between Ambiance and Brightness in Snapseed?
Brightness is a simple exposure adjustment - it makes the entire image lighter or darker uniformly. Ambiance is more sophisticated. It analyzes the tonal distribution of your image and intelligently adjusts contrast in a way that adds depth and dimension. In practice, Brightness lifts shadows and highlights equally (which can make photos look flat), while Ambiance preserves shadow detail and adds "pop" without blowing out highlights. For food photography, the Brightness + Ambiance combination (usually +15 to +20 Brightness, +10 to +15 Ambiance) produces images that look three-dimensional and appetizing without feeling overprocessed.
How can I remember to use this workflow consistently?
The biggest barrier to consistent food documentation isn’t learning the tools - it’s building the habit. Start by editing just one photo per meal for a week. Don’t worry about perfection. Just open Snapseed, apply the 60-second workflow, add a text label, and move on. After a week, you’ll notice two things: first, the muscle memory kicks in and the process becomes automatic; second, you’ll start to see the value of having labeled, searchable photos when you’re trying to remember where you had that great meal last Tuesday. Once you experience the utility of a searchable food archive, maintaining the habit becomes effortless. Many people find it helpful to build a personal restaurant library as a long-term project, which naturally reinforces the documentation habit.
Is there a faster way to edit multiple photos from the same meal?
Yes. After editing the first photo from a meal, go to Looks and save your edits. Now when you open the second photo from the same table, apply that Look with one tap. The lighting conditions are identical (same restaurant, same time, same angle), so the Look will handle 90% of the work. You’ll only need to make minor adjustments for composition or cropping. This cuts the editing time for subsequent photos from 60 seconds to about 15 seconds. If you’re someone who takes multiple angles of the same dish, this workflow efficiency is crucial for keeping the documentation process sustainable.
Should I edit photos immediately or wait until later?
Both approaches work, but they serve different purposes. Editing immediately (at the table or in the car) is ideal when the memory is fresh - you remember exactly how the dish looked, tasted, and smelled, which informs your editing decisions. You’re also more likely to add accurate text labels while the details are still in your mind. Editing later (at home, the next day) gives you emotional distance, which can lead to more restrained, objective edits. Some people find they over-edit when they’re still excited about the meal. The compromise: take the photo and add the text label immediately while the information is fresh, then do the actual editing later when you have better perspective. For more strategies on remembering dishes you’ve eaten, this guide on the best apps to remember every dish you’ve eaten offers additional approaches beyond just photo editing.